
User Guide

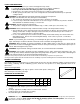

Page 3
INSTALLATION
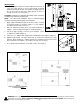
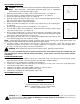
1. Locate a suitable location for the unit downstream from the ‘A’
coil in the supply plenum or in the return plenum; preferably
downstream from the air filter. For optimum “cleaning” effect on
the ‘A’ coil, mount the unit in the supply plenum as close as
possible to the ‘A’ coil. (See Figure 1)
CAUTION: Investigate and determine the location of the A coil prior
to drilling holes in duct for mounting unit.
NOTE: For duct board installation, refer to enclosed bagged
assembly containing mounting plate and instructions.
2. Apply supplied mounting template to air duct in either a vertical
or horizontal position as shown in Figure 2. (Leave template
mounted to duct for future reference.)
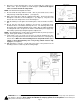
3. Drill 1/8” diameter mounting holes at positions indicated on
template. (Refer to supplied template as shown in Figure 3)
4. Cut out the large opening (1-1/2” hole) on the template. (Refer
to template as shown in Figure 3)
5. Using a ¼” to ½” drill bit, drill a viewport hole as indicated on the template. (Figure 3)
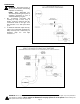
6. Optional Light Shield: The light shield may be mounted at virtually any angle.
However, when deciding on a suitable location, the mounting screw head can not be
in the shaded area of template. (See Figure 4 to view areas to avoid.)
7. Press shield onto duct wall then secure with screws. (See Figure 5)
Figure 1
Fi
g
ure 3
WARNING: Never expose eyes or skin to UVC light from any source. Looking directly at the UVC light may cause permanen
t
eye damage or blindness. Never operate the UV-Aire Air Purifying System out of the plenum. Avoid touching the
glass portion of the lamp with your hands.
Figure 2
Figure 4
Head of mounting screw CAN NOT
be
located in shaded area
Figure 5