
Air Purifying Sstem Installation Guide


Page 10
VII. MAINTENANCE
1. Inspect and clean lamp at least every 6 months.
2. Replace your UV-Aire™ Air Purifying System lamp once a year to maintain the lamps maximum output intensity.
The lamp should operate continuously for maximum lamp life and light effectiveness.
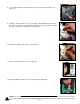
VIII. REPLACEMENT PROCEDURE
VERY IMPORTANT: Turn switch on unit to “OFF” position and unplug unit from outlet.
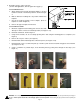
1. Loosen the cover screw on the side of the unit and open cover.
2. Unplug ballast plug from end of lamp.
3. Loosen the wing nut on swivel bracket and rotate the swivel bracket clockwise.
NOTE: When replacing the lamp, always wipe off lamp before installing.
4. Slide lamp out carefully and dispose of properly.
NOTE: UV lamps contain a small amount of mercury, like a typical fluorescent lamp. Check with your local waste
management authority for local disposal or recycling requirements. According to the EPA’s Universal Waste
Rule, these types of lamps may be disposed of into household waste
5. Insert the lamp through the mounting hole and secure the lamp by rotating the swivel bracket counter-clockwise
into position and secure by tightening wing nut. Be careful not to over tighten the wing nut.
6. Attach ballast plug onto the end of the lamp, close cover and tighten cover screw.
7. Plug in the power cord and press the power switch to the “ON” position.
8. After replacing lamp, make sure a new Lamp Replacement Label (supplied with lamp replacement) is applied to
the housing and dated with the date of installation.
F
OR MODELS WITH CIRCUIT BOARD:
1. Loosen the cover screw on the side of the unit and open cover.
2. Unplug ballast plug from end of lamp.
3. Loosen the wing nut on swivel bracket and rotate the swivel bracket clockwise.
NOTE: When replacing the lamp, always wipe off lamp before installing.
4. Slide lamp out carefully and dispose of properly.
NOTE: UV lamps contain a small amount of mercury, like a typical fluorescent lamp. Check with your local waste
management authority for local disposal or recycling requirements. According to the EPA’s Universal Waste
Rule, these types of lamps may be disposed of into household waste
5. Insert the lamp through the mounting hole and secure the lamp by rotating the swivel bracket counter-clockwise
into position and secure by tightening wing nut. Be careful not to over tighten the wing nut.
6. Attach ballast plug onto the end of the lamp.
7. Plug in the power cord and press the power switch to the “ON” position.
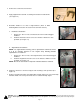
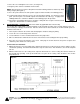
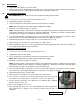
8. Press the timer reset button on the circuit board using the eraser end of a pencil
or the blunt end of a plastic ink pen. Hold for three seconds. (See Figure 23)
9. Release the timer reset button. The LED on the cover will flash twice, indicating
the timer circuit has been reset.
10. Close cover and tighten cover screw.
11. After replacing lamp, make sure a new Lamp Replacement Label (supplied with
lamp replacement) is applied to the housing and dated with the date of
installation.
Figure 23
Timer Reset Button