
Instructions / Assembly
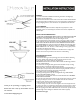
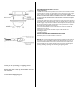
Table Of Contents

2321,2521,3101,3102,3934,3936,4621,5921
Thank you for purchasing our lighting fixture.
Please clean with a soft, dry cloth ONLY! Do not
use cleansers.
www.hudsonvalleylighting.com
GENERAL
1. To ensure successful installation, the following instructions and diagram(s)
should be read and understood.
2. All electrical connections must be made in accordance with the National Electric
code and local codes and ordinances. If you are uncertain how to install electrical
wiring and lighting fixtures, secure the services of a qualified licensed electrician.
TOOLS NEEDED
Blade screwdriver, phillips screwdriver, utility knife, slip joint pliers or small
adjustable wrench, wire cutter/stripper, electrical current tester, stepladder and
electrical tape.
INSTALLATION PREPARATION
1. TURN OFF THE ENTIRE EL
ECTRICAL CIRCUIT TO WHICH THE LIGHTING
FIXTURE IS TO BE ATTACHED. Move the appropriate circuit breaker to the
“off position or completely remove the fuse controlling the circuit.
2. If an existing fixture is being replaced, remove it and note to which of the wires
in the outlet box the fixture was attached. DO NOT SEPARATE ANY OTHER
WIRES THAT MAY BE IN THE BOX. DO NOT DAMAGE THE INSULATION
OF OLDER WIRING. In regular circumstances the BLACK wire will be the “Hot”
lead and the WHITE wire will be the “Neutral” or “Common” lead. A GREEN or
BARE COPPER wire is the “Ground”. In older buildings it is always good practice
to reconfirm the polarity of the wiring.
3. This fixture is designed to be mounted on a standard round or octagon box.
The box must be securely mounted to the structure of the building.
FIXTURE INSTALLATION
Cord Adjustment:
1. Remove the fixture, glass, and parts bag(s) from the carton. Before discarding
the carton, double-check packing to make certain that all parts are found.
2. The pendant cords can be used at any length desired.
IMPORTANT NOTE: If the cord needs to be shortened, the following procedure
must be carefully followed.
3. To determine cord length, attach glass to holder and hold cord up to ceiling.
Mark cord where it touches the ceiling. Remove the glass.
4. Below the mark, on the side of the cord that will remain, wrap tightly with 1 ½”
electrical tape. The tape will prevent the braid from fraying; however, too much
tape will prevent the cord slipping through the canopy nipple.
5. Cut off the excess cord 6” ABOVE the tape.
6. Starting at the edge of the tape, slit cord lengthwise using a VERY SHARP
UTILITY OR CRAFT KNIFE, as shown.
7. Be careful not to cut the three small wires inside. DO NOT CUT THE BRAID
AND CASING CROSSWISE.
8. Twist and peel braid and casing away from the 3 inside wires and trim, as shown.
9. Using wire strippers, remove ½” wire insulation from the end of each lead.
Twist the copper strands to make connections easier.
10. Mark the cord a second time 2” below the tape.
11. Slip the canopy on to the cord. If exact length is not critical, simply knot cord
as close to the mark as is convenient. If exact length is critical, the clamp on strain
relief should be used. Using pliers, tightly clamp the strain relief onto the cord so
that the large edge of the strain relief touches the cord as shown. (In the event the
pendant length must be changed, an additional strain relief is supplied.)
Continued next page.