
Owner's Manual

2
REV 2 - 0711071126
L-C2-18507
Installation of your gourmet smoker hood on your
Fire Magic
®
grill couldn’t be simpler. First, remove
the cooking grids from the grill. Then place the
oven in the grill without the grids, making sure
that the left and right side brackets slide into the
slots on both sides of the grill. Next insert the
reinforcement screws into the bracket on either
side of the grill to secure the smoker hood to the
unit. Now place the rear portion of the warming
rack into the warming rack hanging brackets and
slide the stabilizer bar into the allotted space
adjacent to the screws used to secure the unit.
Finally replace the grids inside the oven. You’re
done!
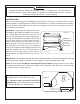
Fig. 2-2
SMOKER HOOD
When it’s not protecting your Fire Magic
®
gas grill from the elements, your new smoker hood will
greatly expand your grilling repertoire. Now you will be able to roast, bake, and smoke foods, adding
the special fl avor and tenderness that only slow cooking in a closed oven can produce (see below
for installation information).
Warming Rack
Stabilizer Bar
Side Bracket (2)
Reinforcement Screws
Barbecue Slots (2)
Hanging Brackets (2)
Fig. 2-1
Warming rack
Hanging brackets (2)
Stabilizer bar
Side bracket (2)
Grill slots (2)
Reinforcement screws
For thorough cleaning, the oven handle
assembly may be removed (see Fig. 2-2).
For stainless steel restoration and finish
maintenance, see the instructions enclosed with
Fire Magic
®
products for stainless steel.
Maintenance of the gourmet stainless steel charcoal grill w/smoker hood is just as simple. Occasionally
apply a few drops of light household oil to the hinges to keep them working smoothly.
Clean all surfaces with Fire Magic
®
foaming grill and grill cleaner or any household oven cleaner,
following the manufacturer’s instructions for porcelain or stainless steel. Never use acid chemicals
to clean porcelain or glass surfaces.
WARNING
Improper installation, adjustment, alteration, service, or maintenance can cause injury or
property damage. Refer to this manual. For assistance or additional information, consult a
qualifi ed, professional installer, or service agency.