
Operation Manual


10
Assembly Instructions
Once the Bungee Cord is attached to the Rear
Brace, tighten the bolts holding the Footboard,
the Mainframe to Side Rail Bolts as they are
easier to access from the vertical position.
Lower the Rower back to the Horizontal position
and test for proper bungee recoil.
Check Seat Rollers/Runners for dirt or debris
before sitting on the rower seat. Small objects
captured between the seat rollers and runners
can damage the wheels or running surface.
Check runners for debris prior to each use and
clean regularly.
Note: The Rower Frame Bolts require periodic
checking for tightness. Do this at the end of the
first month of use and again after every 12
months
Choose a suitable location when standing the
product for storage.
The Rower frame can be polished with any high
grade furniture polish to further highlight the
rich luster of the wood finish.
Install supplied 2x AA Duracell battery and
check computer function. Details regarding
can be found in the Computer section of this
manual.
Choose a flat, level surface on which to use your
Rower, to avoid rocking and potential premature
wear.
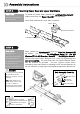
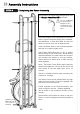
Pull Bungee Cord and Hook Bungee End onto
the Bungee Hook Mount[5] as shown.
Do not cut Bungee
tie wrap before
Bungee cord is
attached to rear
of rower as shown
here.
Tighten Frame
Bolts securely
once rower is
standing.
STEP 4
Completing the Rower Assembly