Installation instructions and user guide Refrigerator & Freezer NZ AU UK IE PAC
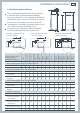
Active Smart™ models 635mm wide E331T, E372B, E381T, E402B, E411T, E415H 680mm wide E406B, E413T, E440T, E442B 790mm wide E521T, E522B Cyclic and compact models 525mm wide P120, E169T, C170T, C190, E240B, E249T, C270 635mm wide C373, C450, E373, E450 Vertical freezer models 525mm wide E150, E210 635mm wide E308, E388 Chest freezer models Slimline H215, H275, H320 Standard H160, H220, H280, H360, H510, H701
Contents General operating instructions – all products Safety and warnings Installation instructions Moving or storing your refrigerator Door conversion Ice & Water refrigerators Please refer to supplement Ice & Water User Guide Active Smart™ refrigerators Operating instructions Special features Maintenance Cleaning care Cyclic and compact refrigerators Operating instructions Special features and maintenance Cleaning care Vertical freezers Operating Instructions Chest freezers Operating instructions Special
2 Safety and warnings To reduce the risk of fire, electric shock, or injury to persons read the IMPORTANT SAFETY INSTRUCTIONS before operating this appliance. Use this appliance only for its intended purpose as described in this User Guide. Important safety precautions Warning When using this appliance always exercise basic safety precautions including the following: Danger This appliance is not intended for use by young children or infirm persons without supervision.
Safety and warnings 3 Storing food and drinks Never store volatile or flammable materials in your refrigerator or freezer as they may explode. Never freeze liquids in glass containers. Liquid expands during freezing, which may cause the container to explode. Never freeze carbonated drinks. They may explode. Do not consume food if it is too cold. Food removed from the freezer compartment may be cold enough to cause damage when brought into contact with bare skin e.g. frozen ice cubes.
4 Installation instructions Please follow the steps for installation to ensure your appliance operates correctly. 1. Power The appliance must be installed so the plug is accessible. To ensure that the appliance is not accidentally switched off, connect your refrigerator or freezer to its own power point. Do not plug in any other appliance at this power point or use extension cords and double adaptors, as the combined weight of both power cords can pull the double adaptor from a wall outlet socket.
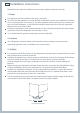
Installation instructions 5 4. Ventilation and installation To ensure adequate ventilation for your refrigerator or vertical freezer, see recommended cabinetry dimensions below. To ensure adequate ventilation for chest freezers, allow a minimum of 20mm of airspace on each side of the cabinet, and 75mm at the rear. The appliance is intended to be placed against a wall with a free distance not exceeding 75mm.
6 Installation instructions Before placing food in the fresh food or freezer compartments Remove all packaging. Ensure that all transit clips are removed from the refrigerator. These are small rubber stops located at the back of the shelves. Allow the refrigerator and freezer to run empty for 2 – 3 hours to allow each compartment to cool to the appropriate temperature. Clean the inside of the appliance with warm water and a little liquid detergent to remove manufacturing and transportation dust.
Moving or storing your refrigerator 7 If your refrigerator or freezer is turned off for any reason, wait 10 minutes before turning it back on. This will allow the refrigeration system pressures to equalise before restarting. Moving your refrigerator Turn off the appliance and unplug from the power point. Remove all food. Turn the adjustable feet to the right as far as they will turn (see page 4). Ease the refrigerator out of its position. Tuck the power cord away and tape the doors closed.
8 Door conversion If you need to hinge your door on the opposite side we recommend that you call your local Fisher and Paykel Authorised Service Centre or Dealer to make this conversion. Active Smart™ refrigerators with silver handles need to be ordered either with left or right opening doors and can not be interchanged. All other models except those models listed below need to have an appropriate conversion kit for your model refrigerator.
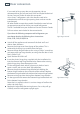
Door conversion Fit new cap door closing to bottom hinge bracket. The new cap door closing is a mirror image of the existing part. Remove the hinge hole covers from the ends of the door using a narrow blade to prise them away from the door. The hinge hole covers are the components without holes. Keep them for re-use. Move the hinge bearing on the door to the opposite side of the top of the door (refer Fig.4). Fit the new hinge bearing closing hook to the opposite side of the bottom door.
10 Active Smart™ operating instructions Models: 635mm wide 680mm wide 790mm wide E331T, E372B, E381T, E402B, E411T, E415H E406B, E413T, E440T, E442B E521T, E522B For information on the operation of the Ice & Water control panel please refer to the Ice & Water User Guide. Temperature control When the refrigerator is first turned on, the powerful cooling system will automatically cool both refrigerator and freezer compartments to their set temperatures.
Active Smart™ operating instructions 11 Sabbath mode To activate the Sabbath mode press the compartment select button on the temperature control panel for 10 seconds. When the product is in sabbath mode: The light will not operate when the door is opened. The door alarm will not operate. The display will not be illuminated. Opening the door will not affect the compressor or fans.
12 Active Smart™ special features Fruit and vegetable bins and humidity control cover The fruit and vegetable bins feature a unique cover which provides two functions: The humidity cover seals the bins and provides a humid microclimate to extend storage times of fruits and vegetables. The humidity cover prevents condensation, which forms at high humidities, from dripping down onto the fruit and vegetables.
Active Smart™ special features 13 Fault alarms If the electronic controller detects a fault from which it is unable to recover an alarm will sound. When the fresh food compartment door is opened a fault code (specific pattern of lights) will flash red and green on the Control panel to alert you to the fault. The audible alarm will stop when any button is pressed but the lights will remain flashing.
14 Active Smart™ maintenance Replacement of the interior light (Halogen light bulb) Turn the power off at the wall socket before replacing the bulb. The light bulb is located on the top roof of the cabinet at the front. Remove the lens cover using a small screwdriver. Insert the screwdriver in the front centre of the lens cover and gently lever down. Pull out old bulb. Do not touch the new bulb with your hand. Leave it in the plastic bag whilst slotting into position.
Active Smart™ cleaning care – interior/exterior 15 Interior It is important to keep the interior of the refrigerator and freezer clean to help prevent food from becoming contaminated during storage. The amount and types of food stored determines how often cleaning should be carried out (ideally once every 1 to 2 weeks) in the refrigerator. Remove the shelves from cabinet and door. Wash shelves and storage bins in warm water and detergent; rinse in clean water and dry before replacing.
16 Active Smart™ cleaning care – special features Interior Glass shelves Clean with warm water and detergent or a glass cleaner. If cleaning the shelves without removing from the cabinet, use only warm water and detergent as a glass cleaner can damage the plastic components of your refrigerator. Important! Many commercially available cleaning products contain solvents that may attack the plastic components of your freezer and cause them to crack.
Active Smart™ cleaning care – special features Humidity Control System (where fitted) Important! When cleaning the shelf above the vegetable bins, we recommend that you do not disassemble the Humidity Control System from the shelf. Retainer In the event that the plastic lid and humidity slides become separated from the glass shelf, follow these instructions to reassemble. 1 2 Turn shelf upside down To attach humidity slides onto shelf front corners, fit bottom clips into shelf front trim.
18 Active Smart™ cleaning care – special features Roll out fruit and vegetable bin – E415H Remove for cleaning by pulling out the compartment until it stops, lifting and then continuing to slide it forward until it is fully extended. Rest the door front on the floor and with the refrigerator compartment door open, remove the tray, divider rack and bin. Wash with warm water and detergent. Rinse, dry and replace.
Cyclic and compact operating instructions Models: 525mm wide 635mm wide P120, E169T, C170T, C190, E240B, E249T, C270 C373, E373, C450, E450 Temperature control The control has been factory set for normal operating conditions. Allow the refrigerator to run empty for 2 – 3 hours before placing food inside the fresh food or freezer compartments. Re-adjust the control as necessary to suit your individual preference.
20 Cyclic and compact special features and maintenance P120 Ice box This is designed for short-term storage of frozen foods and ice only. It is recommended that the tray is kept in place under the ice box at all times. Door alarms (E169T, E240B, E249T, E373, E450 only) If the fresh food compartment door is left open the alarm will beep after 90 seconds. If the door remains open, subsequent beeps will sound every 30 seconds for 5 minutes.
Cyclic and compact cleaning care – interior/exterior 21 Interior It is important to keep the interior of the refrigerator and freezer clean to help prevent food from becoming contaminated during storage. The amount and types of food stored determines how often cleaning should be carried out (ideally once every 1 to 2 weeks) in the refrigerator. Remove the shelves from cabinet and door. Wash shelves and storage bins in warm water and detergent; rinse in clean water and dry before replacing.
22 Cyclic and compact cleaning care special features Vegetable bin – 525mm wide models – except P120 models Wash in warm water and detergent. Rinse and dry. Fruit and vegetable bins and cover – 635mm wide models C Remove bins then the bottom refrigerator shelf. Place the shelf upside down on a flat surface. Pull cover at position A then lift up at position B. Take cover off at sides. Clean cover and bins in warm soapy water.
Cyclic and compact cleaning care 23 Defrosting model C170T It is recommended that a freezer be defrosted when the frost is greater than 6mm thick. Remove all frozen food and wrap it in several layers of paper. Place food in the refrigerator compartment or a cool environment e.g. insulated picnic bin. Switch the power off at the wall. The temperature control can remain at its normal setting. Remove the freezer baskets or shelves for ease of cleaning. Whilst defrosting, leave the freezer door open.
24 Vertical freezer operating instructions Models: 525mm wide 635mm wide E150, E210 E308, E388 Temperature control The cabinet control is located at the bottom rear of the cabinet. The control has been factory set to position 4 for normal operating conditions. The freezer temperature should be approximately -18°C. Re-adjust the control as necessary to suit your individual preference. 1 is the warmest. 7 is the coldest. Door alarms Fig.
Chest freezers special features and maintenance 25 Defrosting your chest freezer It is recommended that your freezer be defrosted when the frost is greater than 6 to 10mm thick using the plastic scraper provided. Remove all frozen food and wrap it in several layers of paper. Place in a refrigerator compartment or a cool environment e.g insulated bin. Switch the power off at the wall. Unplug and open the defrost water drain and spout. Place a shallow container under the spout.
26 Storing food in your refrigerator Storing fresh, perishable foods in your refrigerator helps to extend storage times. The cold temperatures slow down the major causes of food spoilage – namely, the growth of bacteria, moulds and yeasts, and chemical and physical reactions. Fresh food care The quality of food before it is placed in the refrigerator is critical to successful storage. For best results: Select foods that are very fresh and of good quality.
Storing food in your refrigerator Red Meat Place fresh red meat on a plate and loosely cover with waxed paper or plastic wrap or foil. Store cooked and raw meat on separate plates. This will prevent any juices lost from the raw meat from contaminating the cooked product. Delicatessan meats should be used within the recommended storage time. Poultry Fresh whole birds should be rinsed inside and out with cold running water. Dry and place on a plate. Cover loosely with plastic wrap or foil.
28 Storing food in your freezer The use of temperatures of -18˚C or colder to store food means that the food can be kept for longer periods than when refrigeration temperatures are used. This is because the growth of bacteria, moulds and yeasts are stopped, and chemical and physical reactions are severely restricted at very low temperatures. Frozen food care For best results: Choose only high quality foods that freeze well. Store at -18˚C or colder. Take care to maintain this low storage temperature e.g.
Storing food in your freezer Meat, Poultry and Game Do not try to freeze more than 1kg meat per 25L freezer capacity. Meat must be frozen quickly in order to maintain its texture. Do not stuff poultry before freezing. Red meat can be cooked from frozen, or from the partly or completely thawed states. Remember to allow extra cooking time if cooking from frozen. Always thaw poultry completely before cooking. Fish Fish is best frozen commercially.
30 Problem solving checklist If there is a problem with your appliance, please check the following points before contacting your local Fisher & Paykel Appliances Authorised Service Centre Dealer or Customer Care Centre.
Problem solving checklist Problem Possible causes Sides of cabinet are warm This is normal Condensation on outside of refrigerator/ freezer Not unusual during periods of high humidity Wipe dry Condensation inside fresh food compartment Frequent or long door openings Minimise door openings Door gasket leaking Check that gasket is sitting flat and sealing tightly Not unusual during periods of high humidity Wipe dry Freezer door not closing tightly Move items in freezer so door can close tightl
32 Customer care Before you call for service or assistance… Check the things you can do yourself. Refer to your User Guide and check: Your appliance is correctly installed You are familiar with its normal operation You have read the problem solving at the back of the book If after checking these points you still need assistance please refer to the following... In New Zealand if you need assistance...
Customer care 33 In Ireland if you need assistance...* Phone: 01800 625 174 Fax: 01800 635 012 Email: customer.care@fisherpaykel.ie Postal address: Fisher & Paykel Appliances Limited, Unit 3, North Park, North Road, Dublin 11 For the rest of the world…* Call your Fisher & Paykel Retailer/Dealer from whom you purchased the product. They are trained to provide information on your appliance.
Copyright © Fisher & Paykel 2006. All rights reserved. The product specifications in this booklet apply to the specific products and models described at the date of issue. Under our policy of continuous product improvement, these specifications may change at any time. You should therefore check with our Customer Care Centre to ensure this booklet correctly describes the product currently available. www.fisherpaykel.