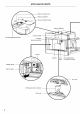
AUTOMATIC BEAN TO CUP COFFEE MACHINE EB24 model USER GUIDE US CA
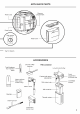
CONTENTS Appliance parts 2 Safety and warnings 4 First use 7 Menu settings 11 Making coffee 15 Making cappuccinos and milk-based coffees 19 Delivering hot water 22 Steam delivery 23 24 Customizing beverages Memorizing your personal profile 25 Cleaning 26 Descale 32 Water softener filter 35 Displayed messages 37 Troubleshooting 42 Warranty and service 44 IMPORTANT! SAVE THESE INSTRUCTIONS The models shown in this user guide may not be available in all markets and are subject to
SAFETY AND WARNINGS ● ● ● ● ● ● ● descaling. Only use the descaling tablets. Take care to use the correct mixture of water and descaler, otherwise it may cause damage. Never make coffee, hot water or steam when the appliance is extracted. Always make sure the appliance is inactive before extracting it.
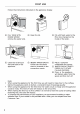
MAKING CAPPUCCINOS AND MILK-BASED COFFEES Adjusting the amount of froth Turn the froth adjustment dial on the milk container lid to adjust the amount of froth delivered while making milk-based coffees. Follow the recommendations in the table below: DIAL POSITION FROTH RECOMMENDED FOR None Latte / Hot milk Minimum Latte or Macchiato Maximum Cappuccino Making cappuccinos and milk-based coffees automatically 1 Fill the milk container and attach it as described above.
DELIVERING HOT WATER IMPORTANT! Do not leave the appliance unattended while hot water is being delivered. 1 Make sure the steam wand is attached correctly to the hot water/steam connection nozzle. 2 Place a container under the spout (as close as possible to avoid splashes). 3 Select HOT WATER The appliance delivers hot water and a progress bar appears on the display and fills gradually to indicate the stage of completion. The delivery of hot water stops automatically.
CUSTOMIZING BEVERAGES Drinks can be customized by altering the strength and size of coffee delivered. IMPORTANT As part of customizing the settings, coffee and milk will be delivered. So place a cup or container below the spouts. 1 Make sure the profile you want to customize is active. The current active profile 2 3 4 5 6 7 8 will be displayed on the home screen. To change the active profile, select the profile on display, then select from one of the six profile icons you would like to make active.
WARRANTY AND SERVICE Before you call for service or assistance... Check the things you can do yourself. Refer to the installation instructions and your user guide and check that: 1 Your product is correctly installed. 2 You are familiar with its normal operation. If after checking these points you still need assistance or parts, please refer to the Service & Warranty book for warranty details and your nearest Authorized Service Centre, Customer Care, or contact us through our website fisherpaykel.com.
FISHERPAYKEL.COM © Fisher & Paykel Appliances 2018. All rights reserved. The product specifications in this booklet apply to the specific products and models described at the date of issue. Under our policy of continuous product improvement, these specifications may change at any time. You should therefore check with your Dealer to ensure this booklet correctly describes the product currently available. US CA 591473B 07.