Cradle Swing Cradle (Seat moves side to side) Swing (Seat moves front to back) Model Number: B0639 Please keep this instruction sheet for future reference, as it contains important information. Adult assembly is required. Tools needed for assembly: Phillips Screwdriver and Adjustable Wrench (both not included). Requires four “D” (LR20) alkaline batteries for operation (not included). Maximum Weight Limit: 24 lbs. (10.9 kg.) IMPORTANT! If your child weighs less than 24 lbs.
Warning and Caution One (1) Year Limited Warranty WARNING Fisher-Price, Inc., 636 Girard Avenue, East Aurora, New York 14052, warrants that the Cradle Swing is free from all defects in material and workmanship when used under normal conditions for a period of one (1) year from the date of purchase. Should the product fail to perform properly, we will repair or replace it at our option, free of charge.
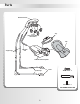
Parts Motorized Frame Tray 4 Toys (Toys may be different than shown.) Pad 2 Upper Legs Seat Tube Arm Seat with Restraint System 2 Lower Legs 2 Feet #8 x 1/2" Screw - 2 M4 x 31.
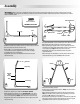
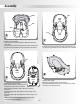
Assembly IMPORTANT! Before each use or assembly, inspect this product for damaged hardware, loose joints, missing parts or sharp edges. DO NOT use if any parts are missing or broken. Contact Fisher-Price® for replacement parts and instructions if needed. Never substitute parts. Motorized Frame #8 x 1/2" Screw - 2 SHOWN ACTUAL SIZE L Foot Lower Leg R Elbow Foot Tube Button Red Dot 3 Hole 1 • Locate the R and L on the underside of each elbow foot. The R indicates the right leg.
Assembly Seat Ruffle Waist Belts Seat Slot Crotch Belt Pad Slots 5 7 • Position the seat upright. • Place the pad onto the seat with the ruffle toward the top of the seat. • Fold the bottom of the pad up. Insert the crotch belt through the slot in the pad. Make sure the crotch belt is not twisted. • Fold the top of the pad down. Insert the waist belts through the slots in the pad. Make sure the waist belts are not twisted. Hole Hole Elastic Loops 8 Peg 6 Elastic Loops • Turn the seat upright.
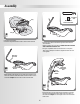
Assembly M4 x 31.5 mm Bolt Rounded Side Tray M4 Lock Nut Shown Actual Size 9 Slot 11 • Turn the seat upright. • Insert the tray tabs into the slots in each side of the seat. • Insert an M4 x 31.5 mm bolt through the seat tube arm and seat tube. • Attach an M4 lock nut to the bolt. Make sure the rounded side of the lock nut faces out. • Using an adjustable wrench, hold the lock nut in place. Then using a Phillips screwdriver, tighten the bolt. Do not over-tighten.
Assembly Mobile Clip Toy Clip Slot 14 13 Toy M4 x 31.5 mm Bolt • Fit the string (below the knot) of a toy through the slot in a clip on the mobile. • Pull down on the toy to be sure it is secure on the mobile. • Repeat this procedure to assemble the other three toys to the mobile. Note: Toys may be different than those shown. Rounded Side • Insert a M4 x 31.5 mm bolt M4 Lock Nut through smaller hole in the Shown Actual Size motorized frame tube and into the seat tube.
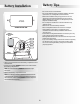
Battery Tips Battery Installation + 1.5V x 4 “D” (LR20) • Do not mix old and new batteries. • Do not mix different types of batteries: alkaline, standard (carbon-zinc) or rechargeable (nickel-cadmium). • Remove the batteries during long periods of non-use. Always remove exhausted batteries from this product. Battery leakage and corrosion can damage this product. Dispose of batteries safely. • Do not dispose of batteries in a fire. The batteries may explode or leak.
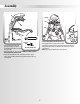
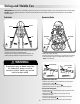
Swing and Mobile Use IMPORTANT! Before each use or assembly, inspect this product for damaged hardware, loose joints, missing parts or sharp edges. DO NOT use if any parts are missing or broken. Contact Fisher-Price® for replacement parts and instructions if needed. Never substitute parts. Restraint Belts To Unfold Button Button Leg Leg Waist Belt Waist Belt 1 Crotch Belt 2 • Firmly pull the legs outward. Make sure the buttons snap into the notches in the motorized frame.
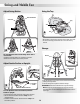
Swing and Mobile Use Adjust Swing Motion Using the Tray PRESS Seat Tube Button Seat Tube Tray Tab TURN 6 Slot • Fit the tabs on the tray into the slots in the sides of the seat. • To remove the tray, pull the tab out on one side of tray and lift. Storage 4 Cradle Swing Button You can adjust the motion of the swing: side to side or front to back. • Press the seat tube button to unlock the seat tube. • Rotate the seat tube to the desired position.
Swing and Mobile Use Speed Dial Reset Button Mode Switch Control Panel • Slide the mode switch to: Swing and Mobile Swing Only Mobile Only Swing and Mobile Off • Turn the speed dial to select any of six speed settings . 11 Hints: • As with most battery-powered swings, a heavier child reduces the amount of swinging motion on all settings. In most cases, the low setting works best for a smaller child while the high setting works best for a larger child.
Problems and Solutions Problem Motor is not running; no swinging Motor is running but swinging stops after a few minutes No difference noticed in swinging motion after speed dial is adjusted Mobile does not work Probable Cause Solution Mode switch is in OFF position or mobile only position Slide the mode switch to swing and mobile or swing only. Batteries incorrectly installed Remove the batteries and replace in correct orientation, as indicated inside the battery compartment.