CFM96 Keep this instruction sheet for future reference, as it contains important information. Requires four C (LR14) alkaline batteries (not included) for operation. Adult assembly is required. Tool required: Phillips screwdriver (not included). Wipe this toy with a clean, damp cloth. Do not immerse. This toy has no consumer serviceable parts. Do not take apart. fisher-price.
Consumer Information FCC STATEMENT (UNITED STATES ONLY) This equipment has been tested and found to comply with the limits for a Class B digital device, pursuant to Part 15 of the FCC rules. These limits are designed to provide reasonable protection against harmful interference in a residential installation. This equipment generates uses and can radiate radio frequency energy and, if not installed and used in accordance with the instructions, may cause harmful interference to radio communications.
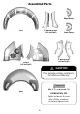
Assembled Parts Upper Ramp Arch 2 Narrow Braces (left and right) Lower Ramp 2 Wide Braces (left and right) 2 Walls (left and right) CAUTION This package contains small parts. For adult assembly only. #8 x ¾" (1,9 cm) Screw - 20 Base SHOWN ACTUAL SIZE Tighten and loosen all screws with a Phillips screwdriver. Do not over-tighten screws.
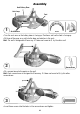
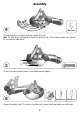
Assembly Arch Battery Door Arch Loop Foot 1 Arch Arch Notches Wall • Turn the arch over so the battery door is facing up. Position a wall so the foot is facing up. • Fit three of the pegs on a wall into the loop and notches in the arch. Hint: The wall is designed to fit one way. If it does not seem to fit, try the other wall. 2 Narrow Brace • Fit a narrow brace to the posts on the wall. Hint: Each narrow brace is designed to fit one way. If it does not seem to fit, try the other narrow brace.
Assembly 4 Wide Brace • Fit the sockets on a wide brace to the sockets on a wall. Hint: The wide brace is designed to fit onto the wall one way. If the wide brace does not seem to fit, try the other wide brace. 5 • Insert five screws into the holes in the wide brace and tighten. 6 Wall Narrow Brace Wide Brace • Repeat assembly steps 1-5 to attach the other wall, narrow brace and wide brace to the arch.
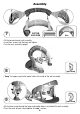
Assembly 7 BOTTOM BACK VIEW Base • Fit the base onto each wall assembly. • Insert four screws into the base and tighten. • Turn the arch assembly upright. 8 Upper Ramp • “Snap” the upper ramp to the upper hole in the inside of the wall assembly. 9 Lower Ramp • Fit the lower ramp through the lower and middle holes in outside of the wall assembly. • Press the ends of each ramp together to “snap” in place.
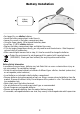
Battery Installation 1,5V x 4 C (LR14) • For longer life, use alkaline batteries. • Locate the battery compartment under the arch. • Loosen the screws in the battery compartment door. • Using the finger indents, lift to remove the battery door. • Insert four, C (LR14) alkaline batteries. • Replace the battery compartment door and tighten the screws. • If this toy begins to operate erratically, you may need to reset the electronics. Slide the power/ volume switch off and back on.
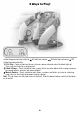
3 Ways to Play! • Slide the power/volume switch to ON with low volume, ON with high volume or OFF. • Slide the mode switch to: Sit & Play – Touch a block on the arch to hear a piano note and watch the block light up! Then, wait and listen for a song to play! Stand & Dance – Touch a block to hear a song. Touch any other block while a song is playing for sounds effects, phrases and dancing lights! Move & Explore – Touch a block to learn colors, numbers and letters, or listen to a learning song.