
User Guide

National
®
Style
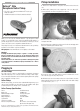
Resophonic Guitar Pickup
• For single cone instruments with National
®
biscuit-style
bridge assemblies
• Installation instructions for Passive and Active Models
Installation Guide
Thank you for choosing the Fishman National
®
Style Resophonic Guitar
Pickup. It is our wish that you are completely satisfied with this product. If
you have any questions or comments, we would like to hear from you. Please
contact our customer service department at www.fishman.com
This pickup fits single cone instruments with National
®
biscuit-style bridge
assemblies. Not for Dobro
®
style biscuit bridges.
Wiring Options: visit www.fishman.com for updates to this manual.
Warning!
Installing the National Style pickup in a guitar is a simple procedure,
but we recommend this job only if you are an experienced guitar repair
technician. Please read and understand all these instructions before you
install the pickup.
Fishman Transducers, Inc. will not be responsible for damage to the guitar
or personal injury due to installation, improper installation, use or misuse
of the product.
Plugging In
Passive Pickup
For clean, noiseless sound, use a high quality low capacitance instrument
cable with metal plugs. For consistent sound into a variety of audio inputs,
we recommend an outboard acoustic instrument preamp between the pickup
and your amplifier or mixing console.
Active Pickup
With the active pickup, you won’t need an outboard buffering preamp, so you
can get great sound when you, plug directly into any available audio input
(instrument amplifier, DI, mixing console, soundcard, etc.).
Active Preamp Specifications
Power: 9V alkaline battery
Battery Life: 11,000 hours
Maximum Output Voltage: 4 Volts peak to peak
Input Impedance: 2.5 Meg Ohm
Output Impedance: Less than 5k Ohm
System Gain: 3dB
Signal-to-noise Ratio: 94 dB
Discrete Component Design: FET low noise class A input stage,
bipolar class AB output stage
Because we continually improve our products, the specifications and information in this
manual are subject to change without notice.
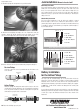
Pickup Installation
1. Remove the strings and the cover plate. Unscrew the biscuit from the
cone.
2. Drill a .094” (2.4mm) hole in the cupped side of the cone, about 3/8”
(9.5mm) below the rim. Remove any burrs from the hole.
3. Examine the bottom surface of the biscuit with a straightedge. If the biscuit
is warped sand it flat.
4. Clean off any dust or debris from the bottom of the biscuit and apply a thin
bead of woodworking glue around the edge.
5. Line up the ends of the saddle with the notches in the brass disc, on the
side of the disc opposite the pickup element
6. Affix the biscuit to the disc and wipe off any excess glue. Double-check the
alignment between the notches in the disc and the ends of the saddle. Clamp
for several minutes. (over —> )