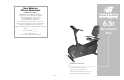
New Balance Fitness Equipment Dedication to Quality New Balance Fitness Equipment warrants this product to be free from all defects in material and workmanship when used according to the manufacturer’s instructions. See Limited Warranty Card for details. 6.5r If you have any comments or questions contact our Customer Service Department, toll free at 1-800-292-5009, Monday through Friday, 9:00 am to 5:00 pm, EST. Please record the following information and keep for reference.
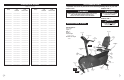
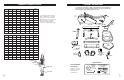
REPLACEMENT PARTS 13 12 16 TABLE OF CONTENTS 26 Important Safety Instructions ...........................................................2 15 17 16 Unit Warning Labels ..........................................................................3 BACK REST (26) Specifications & Parts .......................................................................3 Introduction .......................................................................................4 15 Assembly Instructions....................
REPLACEMENT KITS IMPORTANT SAFETY INSTRUCTIONS Read all instructions before using this machine CAUTION: Exercise of a strenuous nature, as is customarily done on this equipment, should not be undertaken without first consulting a physician. No specific health claims are made or implied as they relate to the equipment. 1) Before starting this or any other exercise program, consult your physician, who can assist you in determining the target heart rate zone appropriate for your age and physical condition.
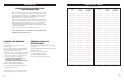
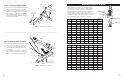
EXERCISE DATA CHARTS UNIT WARNING LABELS Update once a week Important: See below for placement of the following warning labels on your unit.
INTRODUCTION EXERCISE DATA CHARTS Update once a week CONGRATULATIONS ON PURCHASING YOUR RECUMBENT BIKE Week (Date) # Of Workouts Total Workout Time Week (Date) # Of Workouts Total Workout Time ___________ ___________ ___________ ___________ ___________ ___________ ___________ ___________ ___________ ___________ ___________ ___________ ___________ ___________ ___________ ___________ ___________ ___________ ___________ ___________ ___________ ___________ ___________ ___________
WORKOUT PROGRESS CHARTS Date Weight Waist Abdomen Hips Thighs Calves ASSEMBLY INSTRUCTIONS Occasionally our products contain components that are pre-lubricated at the factory. We recommend that you protect flooring, or anything else the parts may contact, with newspaper or cloth. Resting Heart Rate You will find it both informative and motivational to look back at what you’ve done, and this data will help you to chart future fitness goals as you progress.
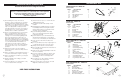
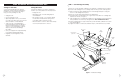
a) Remove (2) Carriage Bolts, (2) Washers and (2) Acorn Nuts from the Front Foot Tube. b) Position Front Foot Tube (with rollers) in front of Main Fame and align bolt holes, see Figure 1. c) Attach Front Foot Tube with (2) Carriage Bolts, (2) Washers and (2) Acorn Nuts that were removed in Step 1a. Tighten bolts with Multi Hex Tool provided.
CARE & STORAGE OF YOUR RECUMBENT BIKE Caring For Your Unit Storing Directions Your Recumbent Bike has been carefully designed to require minimum maintenance. However, we recommend the following to keep your unit operating smoothly. Your bike is portable. If you need to change the location of your unit, please follow the steps below. • Unplug the unit. • Use your unit indoors only. • Wipe all perspiration from your unit with a soft, clean cloth after each use to prevent an accumulation of sweat and dirt.
STEP 4 – Seat Cushion and Back Rest Installation a) Position Seat Cushion over lower Seat Carriage with narrow side pointing forward and align bolt holes. Secure with (4) Phillips Bolts and (4) Washers and tighten, see Figure 4a. b) Place Back Rest upside down on a flat surface, see Figure 4b. c) Position Seat Carriage Slider on Back Rest, as shown in Figure 4b, with Seat Adjustment Knob facing away from Back Rest and Seat Carriage Bushing towards top of Back Rest.
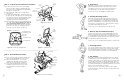
WARM UP & COOL DOWN STRETCHES Stretches can help improve flexibility and relieve the tightness in muscles that results from repetitive sport movements that require a limited range of motion. 10 to12 minutes of daily stretching is recommended. This can be done when warming up or cooling down. When performing these stretches, your movements should be slow and smooth, with no bouncing or jerking.
M8 washers HEART RATE TARGET ZONE FOR CARDIOVASCULAR FITNESS STEP 8 – Front Handlebar Installation M8 nylon nuts a) Remove (2) Allen Bolts, (2) Washers and (2) Nylon Nuts from Front Handlebar. b) Align bolt holes in Front Handlebar with holes in Handlebar Tube, see Figure 8. c) Re-install (2) Allen Bolts, (2) Washers and (2) Nylon Nuts that were removed in step 8a and tighten.
individual would need to keep their heart rate at or above 126 beats per minute to get a cardiovascular effect. Note: Although 70% was used in this example, the heart rate range needed to achieve results falls between 60% and 85% of your maximum heart rate. If you are just beginning your exercise program, your target heart rate range should be roughly at 60% of your maximum heart rate.
USING THE PULSE FUNCTION ON THE REAR HANDLEBAR The pulse window on your computer works in conjunction with the pulse sensors found on the rear handlebar. When you are ready to read your pulse: 1) Place both hands firmly on the pulse sensors. For the most accurate reading, it is important to use both hands. 2) Look at your pulse window. The small heart will begin to blink. 3) Your estimated heart rate will appear in the window approximately 6 seconds after you grasp the pulse sensors.
EXERCISE GUIDELINES OPERATING THE COMPUTER IMPORTANT WARNING Please review this section before you begin exercising. IMPORTANT: If you are over 35 and have been inactive for several years, you should consult your physician, who may or may not recommend a graded exercise test. If you are just beginning your exercise program, your target heart rate range should be roughly at 60% of your maximum heart rate.
Buttons and Definitions Programs 11 and 12: ENTER: This button allows users to set the Program and Time on Programs 1-10 and Time and Age on Programs 11-12. These unique programs allow the Computer to adjust the workout resistance according to your heart rate automatically. Grasp the pulse sensors and hold with a firm grip. If the current Heart Rate is greater than the Target Heart Rate, the Computer will decrease the workout resistance automatically.