BTHF341 User Manual Bluetooth Handsfree User Manual Model: BTHF341 .
BTHF341 User Manual Thank you for choosing our Bluetooth handsfree products. Please read this BTHF341 User Manual before you use this handsfree speaker. Flaircomm Technologies Inc. (hereinafter referred to as “The company”) reserves its rights to make any changes and improvements to the product described in this document without prior notice.
BTHF341 User Manual Certification and Safety Approvals This product has been tested and found to comply with Bluetooth BQB requirements, part 15 of FCC rules, R&TTE Directive(99/5/EC) of CE marked requirements, and approval on Bluetooth models of China Wireless Communications Committee. Warning: Users should not make changes on or modify the device in any way.
BTHF341 User Manual ETSI EN 300 328 V1.7.1(2006-10); IEC 60950-1:2001,EN 60950-1:2001+A11:2004 .
BTHF341 User Manual Contents: 1. 1.1 1.2 1.3 1.4 1.5 2. INTRODUCTION ...............................................................................................................................65 BLUETOOTH TECHNOLOGY ................................................................................................................65 BLUETOOTH HANDSFREE SPEAKER ....................................................................................................65 PRODUCT FEATURES ...........................
BTHF341 User Manual 1. Introduction 1.1 Bluetooth Technology Bluetooth is an internationally standardized technology supporting short distance wireless communications. Any two Bluetooth-compatible equipments, such as mobile phone, PDA、PC, headset, mouse, keyboard, printer, etc. can wirelessly communicate with each other via Bluetooth connection.
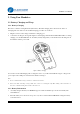
BTHF341 User Manual Easy-to-mount with Sun visor clip 1.4 Package Contents BTHF341 12/24V Car Charger Set(or 100-240V AC/DC Traveling Charger Set,Optional) User Manual 1 1 1 1.5 Overview Figure 1 Overview 1. Speaker:Voice/ music delivery 2. Red/Blue LED:Indicate device status 3. Button “ ”:Switch the device on/off, pairing, answer/end call, connect/disconnect, transfer a call between handsfree and phone 4. Button ╋:Volume up, last number redial, call mute 5.
BTHF341 User Manual 2. Using Your Handsfree 2.1 Battery Charging and Usage 2.1.1 Battery Charging This device contains a rechargeable Li-Polymer battery. First-time charging time is about 4 hours. Later-on recharging time is around 2-3 hours. Detailed charging procedures are as follows: 1. Plug the connector of the charger to handsfree’s charging port. 2. Connect the car charger to the cigarette lighter to start charging. Both the Red and Blue LEDs will be on during charging.
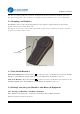
BTHF341 User Manual Note that, over-charging will reduce battery life. If a fully charged battery is left unused, it will lose power over time. Extreme temperature (either too hot or too cold) will also affect its ability to charge, capacity, and lifetime. 2.2 Mounting your Handsfree This Handsfree device can be easily mounted inside the car by using the companion Sun-Visor Clip to fix the product on the sun-visor over the driver’s seat.
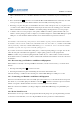
BTHF341 User Manual 1. Place your handsfree close to your Bluetooth handset, and ensure your handsfree is power off, handset power on. for at least 8 seconds until the Blue and Red LEDs alternate continuously. You will 2. Press and hold button hear 2 power-up tones to indicate that the handsfree has successfully entered the paring mode. 3.
BTHF341 User Manual 2.5 Call Functions 2.5.1 Basic Call Operations Answer Call: Press button . Reject Call: Press and hold button ━ for at least 2 seconds. End Call: Press button . Redial: Press and hold button ╋ for at least 2 seconds Adjust Volume: When in the connected or talk mode, you can adjust sound volume up or down by pressing ╋ or ━. Note: For most Bluetooth handsets, handsfree volume control will synchronize with the handset.
BTHF341 User Manual 4) Press and hold . for at least2 seconds to end held call.
BTHF341 User Manual 3. Quick User Guide 3.1 LED Indicator Patterns LED Pattern 1: Blue LED gives 1 blink per 2 seconds; Red LED is off——Standby (disconnected) LED Pattern 2: Blue LED gives 2 quick blinks per 2 seconds; Red LED is off. —— Connected LED Pattern 3: Blue LED gives3 blinks per 2 seconds; Red LED is off. —— Talking mode LED Pattern 4: Blue and Red LEDs alternate continuously ——Pairing mode LED Pattern 5: Red LED blinks continuously ——Low power LED Pattern 6: All LEDs are off.
BTHF341 User Manual handset Passkey is “0000” Connect (handsfree with handset) Disconnect Standby (disconnected ) Standby (disconnected) Press button or set up connection from the handset Standby (connected) Standby (connected) Press and hold button for at least 2 seconds or refer to handset’s manual to initiate the connection from the handset side.
BTHF341 User Manual (handsfree to handset) Call Transfer (handset to handsfree) Talk Talk Press button Key Tone LED Pattern 3 Table 5: Low Power Indication FUNCTION CURRENT STATUS HANDSET Low Power Warning OPERATION HF HANDSFREE INDICATOR AUDIO TONE Except power off Beep every 20 seconds LED INDICATOR LED Pattern 5 Table 6: Advanced Call Functions CURRENT STATUS FUNCTION HANDSET Held Active Call and Accept Incoming Call End Active Call and Answer New Call Reject Incoming Call Toggle Held
BTHF341 User Manual 4. Maintenance BTHF341 is a well-designed communications device; careful maintenance and proper use will extend the product life and keep its elite performance in delivering voice and music. Following maintenance procedures may be helpful to you: Always turn off power and keep your device in a safe place when it is not in use. Keep the device dry, away from water, precipitation, humidity, moisture, and various liquids that may corrode electronic circuits.
BTHF341 User Manual 5. Important Messages and Frequently Asked Questions Q1. Red LED blinking: Low battery indicator; please recharge your battery as soon as possible. Q2. Can't power up the device after charging more than 20 minutes: For first time use, the device should be charged at least 40 minute in advance. It is recommended that the battery should be fully charged before using the device. Q3.