
Assembly And Installation Instructions
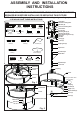

A: 21"
B: 16-1/2" ~ 73-1/2"
A
B
Fig. 3
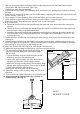
Outlet Box
Support Brace
Canopy
Coupling Kit
1. Take two side glass panels and gently slide the side glass panels into the metal frame in place,
secure them with two set screws. (See Fig.2)
Repeat with other side glass panels.
2. Install bulbs (not included). See relamping label at socket area or packaging for maximum allowed
wattage.
3. Attach the two dust-proof meshes onto the socket base by aligning the holes, then secure them with
four set screws. (See Fig.1)
4. Screw nipple-1 into the coupling of the socket base, then secure it with a hex nut.
5. Place the bottom glass over the frame, making sure the nipple-1 feeds through center hole of bottom
glass, then secure them with a cover and the finial, do not over tighten.
6. Rod Connections:
a. Thread the fixture wire from the fixture through the lower rod, then secure the lower rod onto the
coupling.
b. Thread the fixture wire through the threaded pipe and middle rod, and then secure the middle rod
onto the lower rod by using the threaded pipe.
c. Thread the fixture wire through the threaded pipe and upper rod, and then secure the upper rod
onto the middle rod by using the threaded pipe. The height can be adjustable to 16-1/2"~73-1/2"
by using the rods.
7. Thread the fixture wire through the coupling kit, collar, canopy, then secure the rod assembly to the
coupling kit.
8. Thread the fixture wire through the nipple, hex nut and mounting strap. Install the hex nut onto one
end of the nipple leaving about 3/8” (10mm) thread exposed. Install same end of nipple by screwing
into coupling kit, secure nipple by tightening hex nut.
9. Attach the nipple to the mounting strap, then secure it with hex nut.
10. Attach the mounting strap to outlet box by using two mounting screws.
11. Pull out the outlet wires and the house grounding wire
from the outlet box. Make wire connections using
the wire nuts:
---Connect the black (hot) wire from the fixture to the
black (hot) wire from the power source.
---Connect the white (neutral) wire from the fixture to
the white (neutral) wire from the power source.
---Attach the fixture grounding wire to the mounting strap
with the green grounding screw. Then connect it to the
house grounding wire with a wire nut.
Carefully tuck the wires back into the outlet box.
12. Attach the canopy to the mounting strap, and secure it
with collar.
13. Turn on the power at the main fuse or circuit breaker box.
14. Angled mounting recommended for a vaulted or
angled ceiling. (See Fig. 3)