
Quick Installation Guide
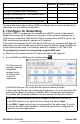
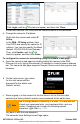
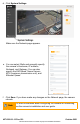
Table Of Contents

427-0200-01-10 Rev 120
October 2021
This document does not contain any export-controlled information.
Click Login, wait for Ok status to appear, and then click Close.
In the DNA Discover List, verify that the camera's status is Authenticated.
d. Change the camera’s IP address.
Right-click the camera and select IP
Setup.
In the DNA - IP Setup window, clear
Use DHCP and specify the camera's IP
address. You can also specify the Mask
(default: 255.255.255.0) and Gateway.
Then, click Update, wait for Ok
status to appear, and then click Close.
To configure the camera for networking using the camera’s web page:
a. Open the camera’s web page by double-clicking the camera in the DNA
Discover List or by typing the camera’s IP address in a web browser’s address
bar. The camera's web page supports Google Chrome
®
and other popular web
browsers.
b. On the login screen, type admin
for the user name and the
password for the admin user
(default: admin).
c. When logging in to the camera for the first time or for the first time after
performing a factory default, specify a new password for the admin user.
Note
Use a strong password consisting of at least 12 characters and
at least one uppercase letter, one lowercase letter, and one
number. Passwords can include the following special
characters: |@#~!$&<>+_-.,*?= .
Log back in with the new password.
The camera's View Settings Home Page opens.