QUICK START GUIDE Third Generation For Android and iOS
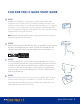
FLIR ONE PRO LT QUICK START GUIDE STEP 1 Charge the FLIR ONE Pro LT using the included USB-C power cable connected to a 1A power source. The Charge Indicator LED next to the USB-C connection blinks on and off while the FLIR ONE Pro LT is charging and stays on continuously when it is fully charged. It will take about an hour to completely charge your FLIR ONE Pro LT. Ensure the device is fully charged before using it the first time.
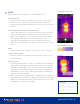
STEP 5 SPOT METERS AND ROIs Explore all the camera features on the FLIR ONE Pro LT. COLOR PALETTES • Tap the Features icon in the bottom right corner of the screen. • Choose the color palette that provides the best contrast for interpreting temperature differences in the scene. There are nine options. SPOT METERS AND REGIONS OF INTEREST (ROI) • Tap the Spot Meter icon in the top left corner to get a list of spot meters and ROIs. Add the number you want and click the icon again.