
Quick Start Guide

QUICK START GUIDE 2
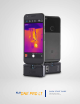
FLIR ONE PRO LT QUICK START GUIDE
STEP 1
Charge the FLIR ONE Pro LT using the included USB-C power cable
connected to a 1A power source. The Charge Indicator LED next to the
USB-C connection blinks on and o while the FLIR ONE Pro LT is charging
and stays on continuously when it is fully charged. It will take about an
hour to completely charge your FLIR ONE Pro LT. Ensure the device is fully
charged before using it the rst time.
Note: The power cable for the iPhone (with a Lightning connector) will not work to
charge the FLIR ONE Pro LT iOS model.
STEP 2
Download and install the FLIR ONE app, which is available through the Apple
App Store and Google Play Store. When you start the FLIR ONE app, the
rst-time User Guide will help you get started with the FLIR ONE Pro LT.
STEP 3
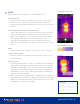
Press the power button on the bottom of the FLIR ONE Pro LT to turn it
on. The indicator light will turn orange. It will ash green when the device
is ready. If needed, adjust the blue dial of the OneFit™ and extend the
connector to the appropriate length to t through your smartphone’s
protective case. Connect the FLIR ONE Pro LT to your smartphone and
start the FLIR ONE app.
STEP 4
Check out the app’s Home screen to access your gallery, get the latest
Tips & Tricks for using your FLIR ONE Pro LT, share your photos and
videos with the FLIR ONE community, and stay up to date with all the
latest news and promotions from FLIR.