
Quick Start Guide
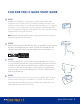

QUICK START GUIDE 3
STEP 5
Explore all the camera features on the FLIR ONE Pro LT.
COLOR PALETTES
• Tap the Features icon in the bottom right corner of the screen.
• Choose the color palette that provides the best contrast for
interpreting temperature dierences in the scene. There are nine
options.
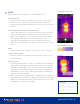
SPOT METERS AND REGIONS OF INTEREST (ROI)
• Tap the Spot Meter icon in the top left corner to get a list of spot
meters and ROIs. Add the number you want and click the icon
again. The FLIR ONE Pro LT can display up to three spot meters,
three square ROIs, and three circular ROIs at one time.
• Tap and hold a Spot Meter to move it on the screen. Pinch to
adjust the size of an ROI, or tap and hold to move an ROI on the
screen.
TIMER
• Tap the clock icon at the top to set a timer for 3 or 5 seconds.
CHANGE CAMERA MODES
• Slide the carousel at the bottom to select Video, Photo, or Time
Lapse recording.
MSX® PARALLAX
• The image that displays in the app is a combination of a thermal
image and a visible-light image through a unique process called
FLIR MSX. The FLIR ONE Pro LT thermal camera can produce an
image even in total darkness. When visible light is available, the
FLIR ONE Pro LT can use its visible-light camera to enhance the
details in the thermal image.
• When looking at an image up close or far away, you can adjust the
MSX alignment for the object to align the thermal and visible-light
images. Tap the Features button on the bottom right corner, tap
MSX Distance, and adjust as needed.
SPOT METERS AND ROIs
MSX DISTANCE SLIDER
ALIGNED
WARNING
The FLIR ONE and FLIR ONE
Pro LT are not waterproof. Use
caution if the FLIR ONE or FLIR
ONE Pro LT are used to observe
very hot objects like fire or
molten metal.