
Product Manual


Notice to customer
Changing and calibrating lenses
© 2017, FLIR Systems, Inc.
#T810264; r. AC/45029/45029; en-US
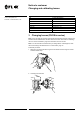
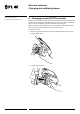
3. Mount the new lens on the camera according to the procedure in section 3 Changing
lenses (FLIR Exx series), page 2 or section 4 Changing lenses (FLIR T5xx series),
page 5. When the lens is mounted, the calibration wizard starts automatically.
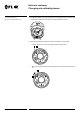
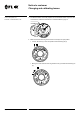
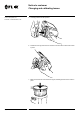
4. From a distance of 2 m (6.6 ft.), aim the camera toward the crosshair, using the laser
pointer. The camera will take a picture automatically.
NOTE
Make sure the camera’s optical path is perpendicular to the calibration target. See the image below.
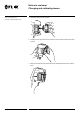
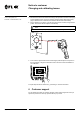
5. In the camera, align the thermal and visual images (indicated by the two squares in
the image below), using the touchscreen arrows. The lens–camera combination is
now calibrated.
To repeat the procedure at a later time, go to Settings > Camera information.
6 Customer support
Do not hesitate to contact our Customer Support Center at http://support.flir.com if you
experience problems or have any questions about your product.
9 (10)
www.flir.com