
Instructions / Assembly
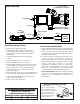


Fuse
(20 amp)
Orange (+)
Orange (+)
Butt Connectors
Orange (+)
Black (-)
Black (-)
Black (-)
Orange (+)
Discharge Port Adapter
(Garden Hose Connection)
Water Inlet
ON / OFF Valve
(Garden Hose Connection)
Power
Source
Rubber Boot
WIRING DIAGRAM
1. Remove end cap from drain pipe.
2. Install portable waste pump on drain in any
convenient position, twisting clockwise to lock.
Be sure that o-ring is on pump adapter prior to
installing unit.
3. Install waste/garden hose on discharge port
adapter.
4. Install rinse water hose to on-off valve.
5. Open black water valve, turn on pump.
6. Turn off pump and open gray water valve. Let gray
water backflush black water tank. Turn on pump.
7. Turn off pump, open rinsing valve and back fill
tanks for rinsing. Turn on pump. Turn off rinse
water. Drain tanks.
8. Close both drain valves, turn on rinse water (40 PSI
max.) and pump. Rinse pump and discharge hose.
9. Turn off water and pump, disconnect hose and
pump. Store until next use.
10. Replace end cap on drain pipe.
OPERATING INSTRUCTIONS
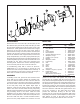
IMPELLER RELEASE FEATURE
After long periods of
non-use, a stuck impeller
can be easily broken loose
with a screwdriver inserted in
motor shaft slot. Remove
rubber boot, turn shaft
clockwise as shown, and
replace rubber boot.
ELECTRICAL INSTRUCTIONS
1. Refer to electrical drawing above. Connect the 6 foot
switch assembly to RV waste pump motor wires with
butt connectors (connect the orange motor wire to
the orange switch wire; and the black motor wire to
the black connector wire).
2. Locate a 12 VDC, 20 amp power source and install
the 6 foot power connector-cable; Connect the
orange positive wire to a 20 amp circuit, and the
Black negative wire to a negative circuit or chassis
ground. Locate this connector in the waste
compartment or adjacent to the 3 inch waste drain
and valves. Optionally, alligator clips (with 20 amp
rating) may be installed on the 6 foot power
connector-cable for a fully portable installation.
3. Fuse Replacement: The fuse is located under the
black dust cover on the bottom of the On/Off Control
Handle. Use an automotive 20 amp fuse for
replacement.
RECOMMENDED WIRE & FUSE SIZE
Wire Size for Connection
Length between Battery & Motor
Voltage 1 - 10’ 10 - 20’ Fuse/Breaker
12 12 AWG 10 AWG 20 amp