
Instructions / Assembly


11
22
33
44
66
77
88
99
1010
1111
1212
1313
1414
1515
55
1717
1616
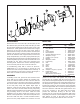
EXPLODED VIEW
DISASSEMBLY
Remove the four acorn nuts 3/8” (10 mm) (Key 1) and
fiber washers (Key 2) from the pump studs (Key 3). Slide
the macerator adapter (Key 4) off the studs. Insert a thin
bladed 9/32" (7mm) ignition wrench behind the chopper
plate (Key 6) and onto the flat of the motor shaft to
prevent it from turning. Unscrew (counter-clockwise) the
locknut 7/16” (11 mm) on the end of the motor shaft and
remove the stainless steel chopper blade.
†
Remove the
pump wearplate (Key 7) and two paper gaskets (Key 8).
Now slide the pump body (Key 12) with impeller (Key 9),
small wearplate (Key 10), two studs and shaft seal as an
assembly off the motor shaft and remaining two
mounting studs. Remove the starlock retaining washer
on the seal and push the seal out of the seal bore.
If reconditioning pump with a service kit (Part No.
18598-1000), it is not necessary to remove the seal
because the new seal is pre-installed in the new body. It
is also generally not necessary to remove the slinger or
brass studs screwed into the motor end bell.
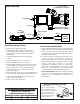
ASSEMBLY
If installing a new seal, push it into the seal bore of the
body with the lip pointing toward the impeller bore.
Press the starlock washer into the seal bore with the
concave side up to secure the seal in the bore. Install the
two shorter studs in the two holes with threaded inserts
in the new pump body and tighten finger tight. If
required, screw the two longer studs into the tapped
holes in the motor end bell. Slide the new pump body
with the shaft seal installed onto the motor shaft and two
long mounting studs in the motor. Slide the small
wearplate over the motor shaft and position it in the
bottom of the impeller bore. Slide the new impeller onto
the motor shaft and, with a counter-clockwise motion,
push it into the pump impeller bore. Position one new
gasket on the studs and against the pump body
assuring the cut-out aligns with the inlet groove in the
body. Position the large wearplate and second gasket on
the studs and against the body again aligning the hole in
the wearplate and gasket cut-out with the pump inlet.
Position the chopper on the end of the motor shaft with
drive tab aligned with flat of shaft and pointing toward
the motor. Hold the shaft with the ignition wrench and
secure the chopper to the shaft with the locknut.
position the macerator housing on the four studs
ensuring the cut-out in the inner wall aligns with pump
body inlet port and hole in the wearplate. Position a new
fiber washer on each of the studs and secure the
macerator housing in place with the four acorn nuts.
PARTS LIST
Key
*These parts are supplied in 18598-2000 service kit
Description Qty
Part
Number
Acorn Nut
Fiber Washer
Stud
Pump Adapter
Rinse Adapter
Chopper Plate w/Locknut
Wearplate, Large
Gaskets (2 ea. per kit)
Impeller
Wearplate, Small
Pump Body
Seal
Slinger
Stud
Motor
Service Kit
Adapter O-ring Kit (2 per kit)
Rubber Boot
Switch (not shown)
Wire Harness w/Connector
4
4
2
1
1
1
1
1
1
1
1
1
1
2
1
1
1
1
1
1
91085-0340*
91613-0140*
17288-0010*
18599-000A*
91010250A*
37056-1000*
18597-1000*
18596-1000*
6303-0003*
12316-1002*
18593-1001*
1040-0000*
6342-0000 *
17288-0000*
74001-1853A*
18598-2000*
91010253A*
21000371
21000378
20030415A
1
2
3
4
5
6
7
8
9
10
11
12
13
14
15
16
17