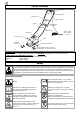
TIO A M R N NFO I T TA N se R O ence I M P before u re refer tu Read in for fu ta & re For all customer enquiries or for replacement parts, contact:- ☎ 01325 300303 www.flymo.com eop.customer.services@electrolux.co.
1 Carton Contents switchbox start/stop lever cable clip x 2 nut x 2 (if applicable) bolt x 2 upper handle plastic handle knob x 2 washer x 2 lower handle electric cable with moulded on plug grassbox fixing pin x 2 hood instruction manual spanner/scraper tool cutting height spacers (1 fitted to lawnmower & 2 in loose parts pack IMPORTANT ! Please check the contents of the carton are correct BEFORE assembling your new Flymo product.
2 General 1. Never allow children or people unfamiliar with these instructions to use the mower. Local regulations may restrict the age of the operator. 2. Only use the lawnmower in the manner and for the functions described in these instructions. 3. Never operate the lawnmower when you are tired, ill or under the influence of alcohol, drugs or medicine. 4. The operator or user is responsible for accidents or hazards occurring to other people or their property. Electrical 1.
3 CABLES IMPORTANT • Use only 1.00mm2 size cable up to 30 metres length maximum. Maximum rating : 1.00mm2 size cable, 10 amps 250 volts AC. • THE MICRO COMPACT 300 PLUS IS SUPPLIED WITH AN ELECTRIC MAINS CABLE WIRED DIRECTLY INTO THE PRODUCT 1. Flymo Mains Cables and Extension Cables are available from your local Electrolux Outdoor Products Approved Service Centre. 2. Do not wire an extension cable directly to your product yourself.
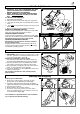
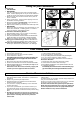
4 Handle Adjustment C • WARNING! STOP THE LAWNMOWER AND WAIT UNTIL THE BLADE HAS STOPPED ROTATING BEFORE ADJUSTING THE HANDLE. • NOTE! REMOVAL OF LOWER HANDLE FIXING PINS IS NOT REQUIRED TO ADJUST THE HANDLE TO ADJUST THE HANDLE (C) 1. Hold handle as illustrated. 2. Take the weight of the handle with your right hand... 3. ...then grip the lower part of the handle with your left hand... 4. ...and pull the lower handle towards you with your left hand. 5. Move to forward or down position as required.
5 Starting and Stopping cont... K The Micro Compact uses an advanced belt drive system, between the motor and the blade which improves cutting power and flotation in all conditions. Due to the high turning force (Torque) which this motor develops, a light squeak may be heard when the machine is started, this is quite normal and will not effect the performance of the product. 6. Press and hold the lock-off button (J) on the switchbox, then squeeze one of the Start/Stop levers towards the upper handle (K).
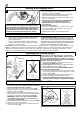
6 Caring for your Lawnmower N Cleaning (N) • USE GLOVES • IMPORTANT It is very important that you keep your lawnmower clean. Grass clippings left in any of the air intakes or under the hood could become a potential fire hazard. 1. Remove grass from under the hood with a piece of wood or similar. 2. Using a soft brush - remove grass clippings from all air intakes and the grassbox. 3. Remove the blade, see Figure M, to gain access to the fan and clean with a soft brush. 4.
Guarantee & Guarantee Policy If any part is found to be defective due to faulty manufacture within the guarantee period, Electrolux Outdoor Products, through its Authorised Service Repairers will effect the repair or replacement to the customer free of charge providing: (a) The fault is reported directly to the Authorised Repairer. (b) Proof of purchase is provided. (c) The fault is not caused by misuse, neglect or faulty adjustment by the user. (d) The failure has not occurred through fair wear and tear.