
Operation Manual


CABLES
IMPORTANT
• Use only 1.00mm
2
size cable up to 30 metres
length maximum.
Maximum rating :
1.00mm
2
size cable, 10 amps 250 volts AC.
• THE MICRO COMPACT 300 PLUS IS SUPPLIED
WITH AN ELECTRIC MAINS CABLE WIRED
DIRECTLY INTO THE PRODUCT
1. Flymo Mains Cables and Extension Cables are
available from your local Electrolux Outdoor
Products Approved Service Centre.
2. Do not wire an extension cable directly to your
product yourself. Please contact your local
Electrolux Outdoor Products Approved Service
Centre for further information on the connectors
and kits available.
3. Only use extension cables specifically designed for
outdoor use.
CONNECTORS
IMPORTANT
• Flymo connectors are suitable for use with 2 core
cable only. Under no circumstances should these
connectors be used for earthed products.
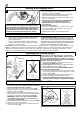
• All Flymo connectors and cables are of splashproof
construction. They are not waterproof and must
not be left outside permanently nor should they be
submerged or immersed in water. Do not let cable
lay or trail through pools of water or splashed with
water from hose pipes.
MAINS PLUG REPLACEMENT
IMPORTANT
• If the plug supplied is cut off it should be
destroyed. There is an electric shock hazard if
a cut off plug is inserted into a 13 amp socket.
1. No earth required. Flymo products are double
insulated to EN60335 and under no circumstances
should an earth be connected to any part of the
product.
2. Ensure the mains voltage suits your product
3. IMPORTANT!
The wires in the mains lead are coloured in accor-
dance with the following code:
BLUE - NEUTRAL
BROWN - LIVE
The wire which is coloured BLUE must be connect-
ed to the Terminal which is marked with the letter
'N' or coloured BLACK.
The wire which is coloured BROWN must be con-
nected to the Terminal which is marked with the let-
ter 'L' or coloured RED.
4. It is important that the outer sheath is clamped cor-
rectly into the 3-pin plug.
5. If in doubt consult your local Service Repairer or
qualified electrician before the machine is used.
6. A 13 Amp fuse must be fitted to the Mains Plug.
7. The normal plug fuse and household fuse only pro-
tect the electrical equipment and are not a safe-
guard against electrocution.
E
L
F
U
S
E
N
BLACK
OR
BLUE
RED
OR
BROWN
3
A
B
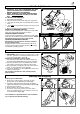
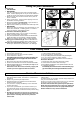
Fitting the Lower Handles to Your Lawnmower (A)
1. Place the end of the lower handle into the slots.
2. Secure lower handles to hood by firmly pushing
fixing pin through holes in hood and handle.
3. Repeat on the other side.
• NOTE
: Should a problem occur when securing
handle to hood with the fixing pin, carefully lever
fixing pin out of location and repeat steps 1 to 3
above.
Fitting Upper Handles to Lower Handles (B)
1. Ensure the upper handle is located correctly with
the lock-off button on the switchbox uppermost.
2. Ensure the upper handle and the lower handle
are aligned correctly.
3. Insert the nut into the handle knob. (if applicable)
4. Fit the bolts, washers and handle knobs.
5. Fit the cable to the handles with the clips provid-
ed. Make sure the cable is not trapped between
the handles.
Assembly Instructions
If your product is hard wired i.e. non-detachable
mains electric cable, a conversion kit and exten-
sion cable is available from all Electrolux Outdoor
Products Approved Service Centres which can be
found in your local Yellow Pages.
fixing pin
lower handle
lock-off
button
bolt
washer
handle
knob
nut