
Instructions for Use


17
GET THE MODEL READY TO FLY
Identify Your Model
No matter if you fl y at an AMA sanctioned R/C club site or if you
fl y somewhere on your own, you should always have your name,
address, telephone number and AMA number on or inside your
model. It is required at all AMA R/C club fl ying sites and AMA
sanctioned fl ying events and simply a “good idea” even if fl ying
somewhere else. Write this information on a strip of masking
tape and place it on the inside of the model. The bottom center
of the wing also makes a good location for the information.
Find a Suitable Flying Site
Find a fl ying site clear of buildings, trees, power lines and other
obstructions. Until you know how much area will be required
and have mastered fl ying your Sensei in confi ned spaces, a
site at least the size of two or three football fi elds should be
adequate – a fl ying fi eld specifi cally intended for R/C planes
is best. Don’t fl y within fi ve miles of R/C fl ying fi elds and
never fl y near people – especially children who can wander
unpredictably into the fl ying area.
Know Your Frequency
CAUTION: This applies only to pilots fl ying their Sensei
with a radio control system that broadcasts on 72MHz. This
caution does not apply to pilots fl ying their Sensei on
2.4GHz. The Tactic TTX610 operates on 2.4GHz
Transmitters operating on 72MHz operate on one of several
frequencies available. To fi nd your frequency (or “channel”),
look at the label on the transmitter. If your channel happens
to be the same as another model that is being fl own nearby
(even within a few miles), one or both models will crash.
Know your frequency and be aware of the frequency
of other models that are fl ying nearby—especially if you
are fl ying at a radio control fl ying site. All fl ying sites have
some sort of frequency control system to avoid this kind of
interference, so learn how to use their frequency control
system. Never turn on your transmitter until you are certain
that you will be the only one operating on your frequency.
Perform a Range Check
As a precaution, an operational ground range test should
be performed before the fi rst fl ight each time you go out.
Performing a range test is a good way to detect problems that
could cause loss of control such as low batteries, defective or
damaged radio components or radio interference. This usually
requires an assistant and should be done at the actual fl ying
site you will be using.
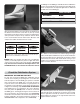
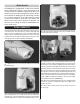
First switch on the transmitter, then install the fully-charged
battery into the fuselage. Connect the battery and install the
battery hatch.
Remember, use care not to “bump” the throttle stick. Otherwise,
the propeller will turn and possibly cause damage or injury.
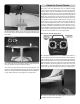
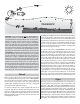
To range check the Tactic TTX610 radio control system, switch
on the transmitter and connect the motor battery to the ESC.
Set the model on the ground and have an assistant hold the
model. Walk 100’ (90m) from the model and while pointing the
transmitter at the plane, operate the controls ensuring that the
plane’s surfaces operate according to the transmitter inputs.
Operate the motor at different RPMs. Have your assistant
alert you if the controls quit responding or move suddenly or
erratically. If you are using a different radio control system,
follow the instructions that came with your radio control system
to perform a ground range check.
If the controls aren’t working correctly or if anything seems
wrong, don’t fl y the model until you fi nd and correct the problem.
Make certain all the servo wires are securely connected to the
receiver and the transmitter batteries are in good condition.
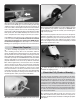
Monitor Your Flight Time
Monitor and limit your fl ight time using a timer (such as one on
a wrist watch or in your transmitter if yours has one). When the
batteries are getting low you will usually notice a performance
drop before the ESC cuts off motor power, so when the plane
starts fl ying slower you should land.
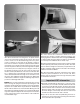
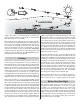
To avoid an unexpected dead-stick landing on your fi rst fl ight,
set your timer to a conservative 4 minutes (in most conditions
the Sensei will usually fl y for approximately 5 minutes, but this
can vary). When your alarm sounds you can either land right
away, or if you are an experienced pilot you may continue to
fl y until the motor fi nally quits. Then, glide it in for a landing.
If planning a “dead-stick,” circle your Sensei upwind of the
landing area until the motor quits and note the run time.
When you learn how much fl ight time you are getting you
can adjust your timer accordingly. Always be conservative so
the motor won’t quit unexpectedly and you will have enough
battery to land under power.
FLYING
Note to new pilots: Read and understand this entire section
before attempting your fi rst fl ight.
The Sensei is a great-fl ying trainer that fl ies smoothly and
predictably. The addition of the WISE gyro stabilization system
to an already stable airframe greatly improves the success
rate of beginning pilots learning without an instructor. However,
nothing replaces the advantage of having an experienced R/C
pilot at your side helping you with your fi rst few fl ights. If you
have any doubts about your ability to learn to fl y by yourself
then we encourage you seek out help. Your local R/C fl ying
fi eld should be your fi rst stop in seeking help and is will be
the best, safest location for your fl ights anyhow. The AMA
(Academy of Model Aeronautics) website, modelaircraft.org,
has a wealth of information about fl ight instruction.