
User guide


12
FINAL PREPARATION
Mount the Propeller
❏
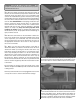
1. Mount the propeller to the propeller shaft with the
washer, nut and a tiny drop of threadlocker on the threads.
Tighten the nut with your fi ngers until it is snug against the
washer. Then, use a small crescent wrench to tighten the nut
securely. Sometimes, as you tighten the nut, the propeller
shaft turns with it causing the nut not to tighten. But if you
turn the nut quickly, it should tighten after another turn or two.
For future reference, if you ever need to remove the propeller
later, needle-nose pliers may be required to hold the propeller
hub behind the propeller to keep the shaft from turning.
❏
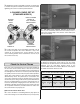
2. Install the propeller spinner by pressing it over the
propeller shaft.
❏
3. Insert the replica antenna into the hole for the wing bolt
in the top of the wing.
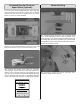
Check the C.G. (Center of Gravity)
The C.G. (Center of Gravity) is the location on the wing
where the model balances and has a great effect on how
it will fl y. If the C.G. is too far aft (tail heavy), the model
will be too responsive. If the C.G. is too far forward (nose-
heavy), the model will not be responsive enough. As
provided to you, your Piper Super Cub should already be
properly balanced, or very nearly properly balanced, but
it’s a good idea to check the balance just in case. Follow
the instructions to make sure the model is balanced
properly and the C.G. is in the correct location.
❏
1. Install the motor battery, but do not connect it to the
ESC. Also install the battery hatch. All the rest of the parts of
the model should already be installed including the propeller,
propeller spinner and the wing struts.