
User guide


8
CAUTION: Perform the following steps without the
propeller mounted to the motor. Do not mount the propeller
until instructed to do so.
❏
5. Move the throttle stick all the way down and center all
the trims on the transmitter (except for the throttle trim, which
should be all the way down). Turn on your transmitter and
connect the included battery pack to the battery wire coming
from the ESC (electronic speed control) in the fuselage. When
the connection is made you will hear one or two beeps coming
from the ESC. IMPORTANT: The beeping sound alerts you
that the system has power and the motor is “armed.” This
means whenever the throttle control stick is advanced the
propeller will turn. So later, when the propeller is mounted
and you are ready to fl y, keep clear of the propeller while
handling the model and do not inadvertently advance the
throttle stick. If you do, the propeller will turn and damage or
injury could be caused.
❏
6. Move the control sticks on the transmitter to make sure
each servo and the motor respond accordingly. If the wrong
servos respond to your commands, they are connected to
the wrong channels in the receiver. Reconnect the servos to
the appropriate channels in the receiver so they respond to
the correct commands.
❏
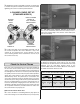
7. Make sure the motor brake function in the ESC is
deactivated. When you advance the throttle stick, the motor
should turn. When you bring the throttle stick all the way
back down, the motor should come to a coasting stop. If the
motor stops abruptly, the brake is on. To turn off the brake,
disconnect the motor battery, but leave the transmitter on.
Advance the throttle stick and throttle trim all the way up.
Reconnect the battery and listen for one beep. Bring the
throttle stick and the throttle trim all the way back down and
listen for another single beep. Now the motor brake function
is turned off.
The procedure for turning on the motor brake is the same
with the exception that two beeps will sound when the brake
is being armed.
Now that you know all the servos are plugged into the receiver
correctly the receiver can be mounted in the fuselage.
❏
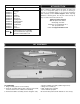
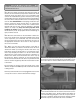
8. Use the included double-sided foam mounting tape to
mount the receiver in the fuselage where shown. Make certain
the receiver does not interfere with installation of the battery.
❏
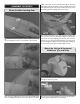
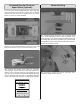
9. Add a tiny drop of threadlocker to the 2.5 x 5mm Phillips
screws and install them into the screw-lock connectors on the
elevator and rudder servos, but don’t tighten them down yet.
If you have diffi culty getting the screws in, it may be easier to
hold your screwdriver upright and hold the fuselage upside-
down. This way the screws won’t fall off the screwdriver.