
Owner's Manual


ELITE
K2
POWER
User
manual
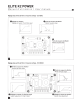
2-channel connection Kit
[Fig
A}
-
ES
1
OOK,
ES
130K,
ES
165K
2-channel connection Kit
[Fig
8}
-
ES
165K2,
ES
165KX2
These
filters
have been designed
for
use in
"bi
amplification".
•
For "conventional" use, with the help of 2
short
wires, connect the
"input"
terminals
[IN
W+
to
IN
T + &
IN
W-
to IN
T-l
[FigC&E}
2-channel Kit connections
in
the case of
bi
amplification
I
Bl
AMP using (4-channel amp):
/Fig
F}
-
ES
165K2,
ES
165KX2
3-channel connection Kit
-
ES
165KX3
3-channel Kit connections
in
the case of
bi
amplification
/Fig
K}
-
ES
165KX3
These
filters
have been designed
for
use in
"bi
amplification".
For "conventional" use,
with
the help of 2
short
wires, connect the
"input"
terminals
[IN
W+
to
IN
T
+ &
IN W- to IN
T-1/Fig H
&
J}
Mounting of the
filter
-
ES
1
OOK,
ES
130K,
ES
165K,
-
ES
165KX,
ES
165KX2,
ES
165KX3
The
filters
should
be
mounted
[using the
screws
provided
or
with
the help of double sided tape], preferably in a dry
and ventilated area.
To
open the casing,
unclip
the cover
[ES
1
00/130/165K
models]
or
unscrew
the
4
screws
[ES
165K2/165KX2/165KX3
modelsl/Fig
0
&
/}:Warning:
for
this
filter
model
please keep the 4
aluminium
spacers.
Note:
If
access to the filters is difficult, please
implement
the cabling
and
adjustments
prior
to final mounting.
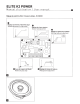
Installation of the
tweeter
(ES100K/130K/165K/165K2 kits)
There are three mounting options
1
-Mounting
on the inclined pod: choose the desired
tilt
according to the selected place.
/Fig
L1}
Make a hole
for
the
cables and screws,
mount
the
stand
with
the
help
of
the
screws
included
in
the
kit,
thread
the
2
wires
and
then
mount
the
tweeter
1n
its
housing
[adjusted
mounting].
These
tasks
can
be
performed
when
the
grating
is
assembled.
Warning:
To
remove the
tweeter
from this accessory, please act
on
the edge and, using a fine-blade tool as a
lever, remove the tweeter/plastic
collar/grille
assembly.
2-
Mounting
in the
original
place: Remove the grating,
disassemble
the
plastic
collar
exerting pressure in
order
to remove
this
spare
part
from
the
tweeter
body,
remount
the
dome
protective washer.
/Fig
L2}
The dome of the
tweeter
should not
enter
into contact
with
a surface
or
a spare
part
of the vehicle: Respect the
mounting of this
important
protective washer; this is required
for
all
mountings
without
a grating
in
original
places.
3-
Flush
mounting:
cut
out
a
40
mm
in
diameter
hole.
"Tight"
adjustment
/Fig
L3}
Note:
To
mount
the plastic collar, please respect the guide that ensures sound assembly
of
the 2 parts.