OPERATING MANUAL/INSTALLATION STEPS STEP-BY-STEP ILLUSTRATED ILLUMINATED INGENUITY Massa Intelligent Toilet • Prior to installation and use, please read this operating manual carefully. • To ensure that timely and effective service is available for you, please keep this manual for future reference. Full instructions and videos are located on our websites, please visit: In USA: www.foremostbath.com In Canada: www.foremostcanada.com NOVEMBER 2020 FOREMOST INTERNATIONAL LTD.
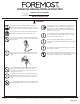
OPERATING MANUAL/INSTALLATION STEPS STEP-BY-STEP ILLUSTRATED ILLUMINATED INGENUITY Massa Intelligent Toilet NAME OF PARTS Warning Statement Bidet cover Control Panel GFCI Power supply plug Warm air outlet Nozzle Toilet water supply hose Heated seat ring Front Filter Toilet Bowl Water supply shut off valve (not included) Seat water supply hose Foot Touch Flush Function Shortcut operation keys Shortcut operation keys Power/Stop Posterior NOVEMBER 2020 Bidet Flush FOREMOST INTERNATIONAL LTD.
OPERATING MANUAL/INSTALLATION STEPS STEP-BY-STEP ILLUSTRATED ILLUMINATED INGENUITY Massa Intelligent Toilet KEYS OF REMOTE CONTROLLER NIGHT LIGHT HOT/ COLD On/Off of night light Alternate wash with hot and cold water NOZZLE CLEAN Key for nozzle clean BIDET Used for feminine area wash DRYER Press to dry the front and rear areas FLUSH Flush after use WATER TEMP. Water temperature adjustment POSTERIOR Used for posterior wash DRYER TEMP.
OPERATING MANUAL/INSTALLATION STEPS STEP-BY-STEP ILLUSTRATED ILLUMINATED INGENUITY Massa Intelligent Toilet ATTENTION - PLEASE READ CAREFULLY Thank you for purchasing this product from our company. To ensure proper use of this product, please read this manual carefully prior to use. Please retain this manual for future reference. These notes contain important safety-related contents. Significant consquences may result according to different situations.
OPERATING MANUAL/INSTALLATION STEPS STEP-BY-STEP ILLUSTRATED ILLUMINATED INGENUITY Massa Intelligent Toilet WARNING This product shall be reliably grounded; otherwise, a fault or short circuit result an electric shock. When you are not sure, contact the electrical installation company.
OPERATING MANUAL/INSTALLATION STEPS STEP-BY-STEP ILLUSTRATED ILLUMINATED INGENUITY Massa Intelligent Toilet WARNING Do not use polluted water in operating this bidet seat. Damage may occur to the bidet seat if it is not treated with care. Do not stand on the seat lid or cover plate.
OPERATING MANUAL/INSTALLATION STEPS STEP-BY-STEP ILLUSTRATED ILLUMINATED INGENUITY Massa Intelligent Toilet WARNING Battery should be kept out of reach of an infant or child. Consult an doctor immediately: • If the electrolyte solution is in contact with the body, rinse it with clean water in time. • If the electrolyte solution enters eyes, do not rub the eye, rinse it with clean water. When the battery is in use, do not do the following operations.
OPERATING MANUAL/INSTALLATION STEPS STEP-BY-STEP ILLUSTRATED ILLUMINATED INGENUITY Massa Intelligent Toilet GROUNDING INSTRUCTIONS This product must be grounded. In the event of an electrical short circuit, a grounded product reduces the risk of electric shock.This product is equipped with a cord having a grounded wire with a grounded plug. The plug must be plugged into an GCFI outlet that is properly installed and grounded. DANGER – Improper use of the plug can result in a risk of electric shock.
OPERATING MANUAL/INSTALLATION STEPS STEP-BY-STEP ILLUSTRATED ILLUMINATED INGENUITY Massa Intelligent Toilet IMPORTANT SAFEGUARDS When using electrical products, especially when children are present, basic safety precautions should always be followed, including the following: READ ALL INSTRUCTIONS BEFORE USING THIS TOILET Full instructions and videos are located on our websites, please visit: In USA: www.foremostbath.com In Canada: www.foremostcanada.com DANGER– To reduce the risk of electrocution: 1.
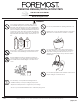
OPERATING MANUAL/INSTALLATION STEPS STEP-BY-STEP ILLUSTRATED ILLUMINATED INGENUITY Massa Intelligent Toilet HARDWARE AND PARTS LIST QTY A Intelligent Toilet x1 B Front Filter (Part # PB-HE25-WATERFILTER) x1 C Wax Ring x1 A B C D Remote Control assembly x1 E Operating instruction and other prints x1 F Connector x1 G Floor Bolts x2 D E F • Please confirm that all articles in the package are complete.
OPERATING MANUAL/INSTALLATION STEPS STEP-BY-STEP ILLUSTRATED ILLUMINATED INGENUITY Massa Intelligent Toilet CONFIRM PRIOR TO INSTALLATION Water Requirements • Minimum dynamic working pressure is 35 psi (no less than 5.3 gal/min at flowing), and maximum static water pressure is 80 psi (in motionless state). Minimum water pressure required for basic function performance.
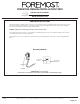
OPERATING MANUAL/INSTALLATION STEPS STEP-BY-STEP ILLUSTRATED Massa Intelligent Toilet ILLUMINATED INGENUITY INSTALLATION STEPS 1 LIFT THE PACKAGING UPWARDS TO EXPOSE THE TOILET (FIGURE 1) According to the following diagrams, put the accessories aside for later use, and then lift the packaging upwards to allow for the toilet to be exposed. FIGURE 1 2 DRAW A CROSS MARKER ON THE DRAIN OUTLET ON THE GROUND Clean the floor and wipe off any excess dust or dirt (FIGURE 2).
OPERATING MANUAL/INSTALLATION STEPS STEP-BY-STEP ILLUSTRATED ILLUMINATED INGENUITY Massa Intelligent Toilet INSTALLATION STEPS 4 INSTALL THE INTELLIGENT TOILET BOTTOM FLANGE ANCHOR SCREW FIGURE 4 Turn the ceramic body over laterally and place on a prepared foam surface (FIGURE 4).
OPERATING MANUAL/INSTALLATION STEPS STEP-BY-STEP ILLUSTRATED ILLUMINATED INGENUITY Massa Intelligent Toilet INSTALLATION STEPS 6 PREPARING THE TOILET SEAT FOR TOILET BOWL INSTALLATION The toilet seat is preinstalled by the factory. In order to access the floor bolts to secure the bowl to the floor flange the toilet seat bolts need to be removed (FIGURE 6A + 6B). Remove both screw covers with slot screwdriver and remove two fixed screws with cross screwdriver.
OPERATING MANUAL/INSTALLATION STEPS STEP-BY-STEP ILLUSTRATED ILLUMINATED INGENUITY Massa Intelligent Toilet INSTALLATION STEPS 7 INSTALLING THE TOILET BOWL ONTO FLOOR FLANGE Two people to lift the toilet bowl, slowly lower the bowl onto the floor flange use the guide marking as the toilet reference. Making sure the floor bolts on the floor flange completely come through bolt opening on the bottom of toielt bowl by viewing from the back of the seat.
OPERATING MANUAL/INSTALLATION STEPS STEP-BY-STEP ILLUSTRATED ILLUMINATED INGENUITY Massa Intelligent Toilet INSTALLATION STEPS 8 RE-ATTACH TOILET SEAT • Shift toilet seat back into position over bowl and align bolt holes in seat to appropriate holes in top of bowl. (as reverse steps 6) • Reinstall 2 bolts and plastic covers on top surface of the toilet seat. • Re-install 1 plastic nut to the underside of seat securing the seat to the bowl.
OPERATING MANUAL/INSTALLATION STEPS STEP-BY-STEP ILLUSTRATED ILLUMINATED INGENUITY Massa Intelligent Toilet INSTALLATION STEPS 9 CONNECTING THE WATER FILTER TO SHUT OFF VALVE AND CONNECTING BRAIDED WATER SUPPLY HOSES FIGURE 9A With the 3/8" male connection facing to the right, apply Telflon tape and screw on adapter (supplied). (FIGURE 9A + 9B) Connect water filter to male thread on adapter (apply Telflon tape to male threads). (FIGURE 9C) Connect braided supply tubes to water filter male connections.
OPERATING MANUAL/INSTALLATION STEPS STEP-BY-STEP ILLUSTRATED ILLUMINATED INGENUITY Massa Intelligent Toilet INSTALLATION STEPS 10 TURN ON WATER AT SHUT OFF VALVE FIGURE 10 Turn valve into the ON position and check for any water leaks at hose connections. If any leaks appear tighten connection until leaking stops.
OPERATING MANUAL/INSTALLATION STEPS STEP-BY-STEP ILLUSTRATED ILLUMINATED INGENUITY Massa Intelligent Toilet INSTALLATION STEPS 13 CONGRATULATIONS The installation of the Massa Intelligent toilet is complete. Please keep the Sale Receipt and these instructions for future reference and important information. TRIAL RUN (TRY IF THE KEYS ON THE REMOTE CONTROL AND THE LATERAL BUTTONS ON THE TOILET TO SEE THAT IT IS WORKING NORMALLY.
OPERATING MANUAL/INSTALLATION STEPS STEP-BY-STEP ILLUSTRATED ILLUMINATED INGENUITY Massa Intelligent Toilet REMOTE CONTROL CODE MATCHING PROCEDURE • Code matching of the remote control has been completed during the production of the product. In case the remote is not working, match the codes as per below: FIGURE 14A Level indicator flickers Unplug the power cord, hold on the stop key until the level indicator flickers and then loosen it (FIGURE 14A).
OPERATING MANUAL/INSTALLATION STEPS STEP-BY-STEP ILLUSTRATED ILLUMINATED INGENUITY Massa Intelligent Toilet FUNCTIONS FOR USE The Intelligent toilet automatically turns on when it senses body electrostatic induction being applied to the seat ring. The wash functions and warm air function will not work unless the body sensor on the seat ring detects body electrostatic induction (FIGURE 15). FIGURE 15 BIDET Press "Bidet" key.
OPERATING MANUAL/INSTALLATION STEPS STEP-BY-STEP ILLUSTRATED ILLUMINATED INGENUITY Massa Intelligent Toilet FUNCTIONS FOR USE HOT/COLD FIGURE 16 Press "Hot/Cold" key, and Hot/Cold function will be enabled or disabled. • In wash mode, press Hot/Cold key to change cold and warm water wash alternately. • This function can only be used in washing mode. DRYER Press "Dryer" for drying washed area. • Press dryer for drying washed area. When it is switched to warm-air temperature, press “ Dryer Temp.
OPERATING MANUAL/INSTALLATION STEPS STEP-BY-STEP ILLUSTRATED ILLUMINATED INGENUITY Massa Intelligent Toilet FUNCTIONS FOR USE WATER TEMPERATURE FIGURE 17 Press the "Water Temp" key to adjust water temperature. • The current temperature level will be displayed when the key is pressed for the first time. Pressing a second time will adjust the water temperature. Continue pressing until the desired temperature is achieved. • Temperature sequence is off, low (blue), medium (purple), and high (red).
OPERATING MANUAL/INSTALLATION STEPS STEP-BY-STEP ILLUSTRATED ILLUMINATED INGENUITY Massa Intelligent Toilet FUNCTIONS FOR USE NOZZLE CLEAN FIGURE 18 Press "Nozzle Clean" key. (Dual functions) • The nozzle sticks out for manual cleaning. This function can only be used when no body part or other objects are not in contact with the seat ring sensing area. • When you are sitting on the seat, press "Nozzle Clean key" to turn on/off the wash with air bubbles. • This function can only be in wash mode.
OPERATING MANUAL/INSTALLATION STEPS STEP-BY-STEP ILLUSTRATED ILLUMINATED INGENUITY Massa Intelligent Toilet SETTING OF OTHER FUNCTIONS POWER/STOP FIGURE 19 Press "Power/Stop" key to turn on the device. Hold "Power/Stop" key to turn off the device. • Water spray wash function can be turned off at any time by pressing Power/Stop button. POSTERIOR Press "Posterior" key. • When a person is seated and sensed, press "Posterior" key, the functions of posterior wash (1.
OPERATING MANUAL/INSTALLATION STEPS STEP-BY-STEP ILLUSTRATED ILLUMINATED INGENUITY Massa Intelligent Toilet SETTING OF OTHER FUNCTIONS WARM-AIR FLUSH FIGURE 20 Press "Dryer" key (FIGURE 20). • Warm air function will be enabled. UV STERILIZATION Dryer Radiate at the nozzle (FIGURE 21). • After using the bidet seat, the UV sterilization will automatically start and stop in 3 minutes. when UV is in function, the indicator will be on in icy blue.
OPERATING MANUAL/INSTALLATION STEPS STEP-BY-STEP ILLUSTRATED ILLUMINATED INGENUITY Massa Intelligent Toilet METHODS FOR CLEANING AND MAINTENANCE To ensure normal use of the product, please clean and maintain the product regularly. Note • Disconnect the power source prior to maintenance, close water supply angle valve and turn off water supply. • Rinsing this product with water is prohibited in the course of maintenance.
OPERATING MANUAL/INSTALLATION STEPS STEP-BY-STEP ILLUSTRATED ILLUMINATED INGENUITY Massa Intelligent Toilet METHODS FOR CLEANING AND MAINTENANCE Method of Cleaning and Maintenance of Plastic Products and Ceramic Body (FIGURE 24) • When any dust or dirt is attached to the product, wipe the product a soft wet cloth. • The ceramic bowl can be cleaned with a soft brush, cloth or wet sponge with detergent. • Do not use harsh chemicals or detergent on any part of the intelligent toilet.
OPERATING MANUAL/INSTALLATION STEPS STEP-BY-STEP ILLUSTRATED ILLUMINATED INGENUITY Massa Intelligent Toilet TROUBLE-SHOOTING Power switch, posterior wash, bidet wash and warm-air/air temperature, etc. When anyissue is found If issues arise, read the list below first for trouble-shooting tips. If the issues do not resolve, please contact our customer service team at the contacts below, or visit our website for more troubleshooting help.
OPERATING MANUAL/INSTALLATION STEPS STEP-BY-STEP ILLUSTRATED ILLUMINATED INGENUITY Massa Intelligent Toilet TROUBLE-SHOOTING Warm air/air temperature Symptom Air is cold for warm air setting Analysis of Issue Solution Check if warm air is set as being closed Adjust warm air as per the manual Check if heating part for warm air is damaged Contact our Customer Service team for further help.
LIMITED WARRANTY Foremost warrant its products to be free from defects in material or workmanship for 5 years (Vitreous China) and 1 year (Parts and Fittings) from the date of purchase of the product by the original purchaser. If inspection of this plumbing product, within 5 years (china product) or 1 year (parts and fittings) after its initial purchase, confirms that it is defective in materials or workmanship, Foremost will repair or at its option, exchange the product for a similar model.
SPECIFICATION Rated Voltage 110V Rated frequency 60Hz Rated consumption power Water intake temperature 15˚C , water outlet temperature 39˚C, flowrate 3.4gal/min power 1200W Temperature of operating environment 4˚C ~ 40˚C Water intake temperature 4˚C ~ 35˚C Range of water intake pressure for use Min. necessary water pressure 35 psi (over 20 gal /min when water is running) Max.
FUNCTIONS OF PRODUCTS Category Function ITL-5001-EW Posterior (Rear cleaning) Bidet (Front cleaning) One-key cleaning & drying Cleaning Oscillating cleaning Hot & cold massage cleaning Water pressure adjustment Water temperature adjustment Nozzle position adjustment Self-cleaning nozzle Antibacterial nozzle Seat heating Comfort Warm wind drying Soft close seat cover Seat ring temperature adjustment Warm wind temperature adjustment Night-light Variable frequency instant heating Side button control Con