
How to Guide

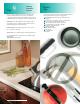

Check for proper length. Allow desired overhang. End caps should
be used on all exposed ends (end cap kits). End splashes should
be used where top butts wall (end splash kit). Additional material
should be allowed to scribe for a tight fit to end wall.
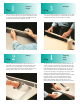
Place your countertop upside down on a flat surface. Choose strips
of wood thick enough to allow the countertop surface to match the
front build-up. Glue strips around perimeter of countertop.
13
Step
Fitting to
Length
Step
Build Up
Cover the Formica
®
brand laminate surface in the area to be
sawed with a strip of masking tape and draw a pencil line on the
tape to serve as your cutting guide. Use a fine-tooth handsaw
(10 to 12 point) and always cut into the laminate surface to avoid
chipping. Sand or file the cut to assure a smooth surface.
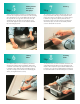
To apply end caps, set household iron at medium heat. Iron cap
onto the end of the countertop with a back-and-forth motion. Let
set for one minute, then tap the cap carefully with a rubber mallet.
Finish trimming with a fine file, applying pressure only on the up
strokes. Complete instructions are included in the end cap kit.
To apply end caps using non pre-glued end caps, apply a contact
adhesive to both the substrate and the laminate. Follow
manufacturer's guidelines for when adhesive is ready for bonding.
Roll laminate with a J-roller. Finish trimming with a fine file,
applying only pressure in the up strokes. If using a laminate
trimmer with a flush trim carbide router bit, remove excess
laminate and file smooth applying only pressure in the up strokes.
24
Step
Cutting
Step
Applying
End
Caps