
How to Guide


Always follow manufacturer's directions for installing appliances.
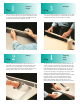
Place the sink or rangetop rim on the back side of the countertop,
where the appliance is to be located. Mark all the way around
the edge of the rim. Use a jig saw to cut the hole 1/4" to 3/8"
smaller than the line. All cutout corners should have clean,
chip-free radii. Apply two layers of heat-conductive aluminum
tape around rangetop cutout.
The countertop can be scribed to match the wall surface. The
top is provided with a scribe edge on the backsplash for this
purpose. Place the top on the cabinet. Use a scriber-compass
to mark the top edge of the countertop, then belt-sand or
block-plane to the line. This will contour the countertop to the
wall. Put top in place, check for level and stability, and then
secure to cabinets with wood screws.
Step 5 7
Making Cutouts
for Sinks or
Rangetops
Step
Scribing
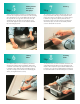
If your kitchen requires an L- or U-shaped top, precut miters
should be joined at this point in the installation. Apply a bead
of sealant to each mitered edge. Tighten fasteners only enough
to hold them in place. Align front edges and tighten fasteners.
Tap surfaces to align (use wood blocks to avoid damaging the
surface). Then tighten fasteners securely.
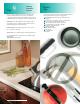
You may find it more convenient to install the sink faucets, 3/8"
supply tubing and basket drain now, before dropping the sink
into place. This is important if space behind the installed bowl is
too tight for easy connection of plumbing fittings. All sinks must
be sealed with sealant to avoid water damage to base material.
Step 6 8
Joining
Miters
Step
Installing
Sinks