Forno Venetzia Bellagio 200 Assembly Guide Forno Venetzia Bellagio 200 Guida All’assemblaggio Forno Venetzia Bellagio 200 Guide de montage
Table of Contents / Sommario / Sommaire Product Specifications / Specifiche del Prodotto / Spécifications du Produit ............................................................................2 Forno Venetzia Bellagio 200 Wood Burning Oven Assembly Guide .................................................................................................3 Forno Venetzia Torino 200 Parts List .......................................................................................................................
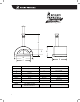
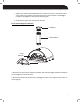
BELLAGIO 200 Wood Burning Oven Product Specifications Specifiche del Prodotto Spécifications du Produit D D A A G G E G E B B F C C F A 56.5” //143.5 48.75” 123.8 cm cm E 10” / 25.5 10.25” / 26 cm cm B 46.75” / 118.75 cm 40.25” / 102cm F 24”/ 6/ 3.5 61 cm 25” cm C 35.75” / 90.8 cm cm 44” / 111.
BELLAGIO 200 Wood Burning Oven Assembly Guide 3
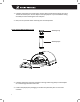
1. Carefully unpack the oven and all other contents found inside the box taking care not to scratch the various parts. Do not dispose of the polystyrene as you will need this during assembly to avoid scratching the oven and parts. 2. Next, ensure you have all the necessary parts and components. Forno Venetzia Bellagio 200 Parts List Chimney Cap Chimney Cap Chimney PipeChimney Pipe Oven Oven Door Door 3. Carefully remove the laser film protective covering.
**CAUTION – AS THE OVEN IS HEAVY SOME STEPS REQUIRE TWO PEOPLE TO PERFORM THE ASSEMBLY** 5. Carefully remove the bricks from the inside of the oven. This will make it lighter and easier to move. Handle the bricks with care as they are fragile. 6. Ensure the construction of your outdoor kitchen or BBQ island counter is well built and strong enough to support the weight of the oven including the wood from the fire. 7.
BELLAGIO 200 Wood Burning Oven Guida all’assemblaggio 6
1. Togliete con attenzione dall’imballo del forno e tutte le altre parti, cercando di evitare che si graffino. Non gettate via il polistirolo perché vi servirà durante l’assemblaggio proprio per proteggere le varie parti da eventuali graffi. 2. Assicuratevi di avere tutti i componenti necessari. Forno Venezia Bellagio List 200 parti Comignolo Comignolo Canna fumaria Canna fumaria Corpo del forno Corpo del forno Porta del forno Porta del forno 3. Rimuovete con attenzione la pellicola protettiva.
**ATTENZIONE – IL FORNO E’ PESANTE, PERTANTO PER ALCUNE FASI DELL’ASSEMBLAGGIO SONO NECESSARIE DUE PERSONE** 5. Rimuovete con attenzione i mattoni dall’interno del forno. Questo lo renderà più leggero e maneggevole. Spostate i mattoni con attenzione perché sono fragili. 6. Garantire la costruzione del vostro bancone della cucina o barbecue all'aperto isola è ben costruito e abbastanza forte per sostenere il peso del forno tra cui il legno dal fuoco. 7.
BELLAGIO 200 Wood Burning Oven Guide de montage 9
1. Déballez soigneusement les four et toutes les autres pièces contenues dans la boîte en prenant soin de ne pas les rayer. Ne jetez pas le polystyrène car vous en aurez besoin lors du montage pour ne pas égratigner le four et les pièces. 2. Ensuite, assurez-vous d’avoir toutes les pièces et composants nécessaires. Liste de pièces Forno Venetzia Bellagio 200 Mitre de cheminée Mitre de cheminée Tuyau de cheminée Tuyau de cheminée Corps du four Corps du four Porte du four Porte du four 3.
5. Retirez soigneusement les briques de l’intérieur du four. Il sera ainsi plus léger et plus facile à déplacer. Manipulez les briques avec soin car elles sont fragiles. 6. Assurez-vous que la construction de votre cuisine extérieure ou de votre comptoir d'îlot BBQ est bien construite et suffisamment solide pour supporter le poids du four, y compris le bois provenant de l'incendie. 7.
12
www.fornovenetzia.com email: info@fornovenetzia.