5014043 CONFORMS TO UL STD.60335-1 & 60335-2-24 CERTIFIED TO CSA STD.C22.2 NO.60335-1 & 60335-2-24 BUILT-IN REFRIGERATOR INSTRUCTION MANUAL Model No.
INDEX CUSTOMER CARE IMPORTANT SAFETY INSTRUCTIONS INSTALLATION INSTRUCTIONS BEFORE USING YOUR REFRIGERATOR SITE PREPARATION ANTI-TIP BRACKET INSTALLATION INSTALLING YOUR REFRIGERATOR ELECTRICAL CONNECTION ABOUT YOUR REFRIGERATOR LEVELING THE UNIT INSTALLING THE HANDLE OPERATING YOUR REFRIGERATOR TEMPERATURE CONTROL AUTOMATIC DEFROST CHANGING THE REVERSIBLE DOOR CARE AND MAINTENANCE CLEANING YOUR APPLIANCE VACATION TIME MOVING YOUR APPLIANCE ENERGY SAVING TIPS TROUBLESHOOTING GUIDE WARNING WIRE DIAGRAM 1 E
CUSTOMER CARE Thank you for purchasing a FORNO product. Please read the entire instruction manual before operating your new appliance for the first time. Whether you are an occasional user or an expert, it will be beneficial to familiarize yourself with the safety practices, features, operation and care recommendations of your cooking range. The model and serial number are listed inside the product. For warranty purposes, you will also need the date of purchase.
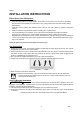
To ensure proper use of this refrigerator and your safety, please read the following instructions completely before operating this appliance. IMPORTANT SAFETY INSTRUCTIONS WARNING • • • • • • To reduce the risk of fire, electrical shock, or injury when using your appliance, follow these basic precautions: DANGER : Risk of child entrapment. Child entrapment and suffocation are not problems of the past. Junked or abandoned appliances are still dangerous, even if they will “just sit for a few days”.
safety. INSTALLATION INSTRUCTIONS Before Using Your Refrigerator • • • • • Remove the exterior and interior packing. Leave the refrigerator in an upright position for at least 4-6 hours before you connect it to the mains. This will reduce the possibility of a malfunction in the cooling system from improper handling during transportation. Clean the interior surface with lukewarm water using a soft cloth. (Refer to Cleaning instruction section) Install the handles on the drawers.
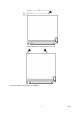
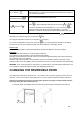
Use two expansion screws to fix feet on the floor C. Push the appliance into its place of installation.
Push the appliance into its place of installation. D. If the unit is not stable, pull out the appliance and repeat the previous step until the unit is stable. Note: If the unit is relocated, the bracket must be removed and installed in the new location. Installing Your Refrigerator • • • • • • This refrigerator is designed to be free standing only. Allow a minimum of 2 inches at the back, 0.8 inches at each sides and 3.5 inches on top to for proper air ventilation.
possibility of electrical shock. Do not, under any circumstances, cut or remove the third ground prong from the power cord supplied. This refrigerator requires a standard 115 Volt A.C. /60Hz electrical outlet with three-prong ground. This refrigerator is not designed to be used with an inverter. The cord should be secured behind the refrigerator and not left exposed or dangling to prevent accidental injury. Never unplug the refrigerator by pulling the power cord.
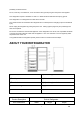
( inches ) 29.5” 73.6” Net Weight ( lbs ) 30.1”(with handle) 350 lbs Leveling The Unit Position the unit on a flat, level surface capable of supporting the entire weight of the unit when full. This unit contains four (4) adjustable leveling legs. Turn the legs clockwise to raise and counterclockwise to lower. Turn to adjust the feet Installing The Handle 1. Locate the handle over the pins on the door. 2. Fix the handle by tighten the screw.
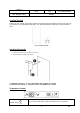
°C / °F Selector Press this key to select the temperature display setting in Fahrenheit or Celsius degrees. To change the temperature from Fahrenheit to Celsius or from Celsius to Fahrenheit. Temperature set key Press to activate the temperature setting mode. Press Up and Down to enter temperature setting mode, then press or to to increase or decrease the set temperature by 1°C (or 1°F). Press confirm the setting and shows the actual temperature.
2) Lift the door, remove from bottom hinge, turn over 180°, place it on a padded surface to prevent damage and scratches. 3) Remove the bottom hinge assembly and keep them for later use. 4) Remove the plug buttons from the upper left holes and transfer them to the uncovered holes on the right side. Be sure to press the plug buttons firmly into the hole. 5) Take the other bottom hinge from the part’s bag and install it on the left bottom.
• • • • Clean the appliance. Leave the lid open slightly to avoid possible formation of condensation, mold, or odors. Short vacations: Leave the refrigerator operating during vacations of less than three weeks. Long vacations: If the refrigerator will not be used for several months, remove all content and unplug the power cord. Clean and dry the interior thoroughly. To prevent odor and mold growth, leave the door open slightly: blocking it open if necessary.
Popping or cracking sounds when compressor comes on The door will not close proper ·This is normal. Metal parts undergo expansion and contraction, like hot water pipes. The sound will level off or disappear as refrigerator runs. ·The refrigerator is not on a level surface. ·The gasket is dirty. ·The storage basket is out of posit WARNING 1.WARNING – Keep ventilation openings, in the appliance enclosure or in the builtin structure, clear of obstruction. 2.
reduced physical, sensory or mental capabilities, or lack of experience and knowledge, unless they have been given supervision or instruction concerning use of the appliance by a person responsible for their safety. Children should be supervised to ensure that they do not play with the appliance.