24 INCH BOTTOM FREEZER RETRO REFRIGERATOR MODEL NUMBERS: F12BFRES450RWW ,F12BFRES450RGN , F12BFRES450RCR, F12BFRES450RBL 5013515 USER MANUAL
TABLE OF CONTENTS 03 04 05 07 08 10 11 11 12 13 Important safety notes Grounding instructions Installation instructions Product features Operation Care and maintenance Energy saving tips Troubleshooting Electrical diagram Warranty WELCOME Congratulations! You have purchased one of the most efficient refrigeration products available on the market today. We are proud of our quality products and we believe in the dependable service we provide.
IMPORTANT SAFETY NOTES These warnings are provided in the interest of your safety. Please ensure that you understand them all before installing or using this fridge. Your safety is of paramount importance. If you are unsure about any of these meanings or warnings, contact us for assistance. IMPORTANT: After transit where the fridge has been on its side or back, ensure that the fridge is in a level, upright position for 12 hours to allow compressor fluids to redistribute evenly before use.
IMPORTANT SAFETY NOTES CHILD SAFETY: Do not allow children to play in, on or around the fridge. It is not a toy. THERE IS A DANGER OF SUFFOCATION IF A CHILD BECOMES TRAPPED INSIDE. When the appliance is not in use, secure or remove the doors to prevent children from playing inside the cabinets. DANGER • Risk of child entrapment. Before throwing away an old appliance: • Remove the door or lid. • Leave shelves in place so that children may not easily climb inside.
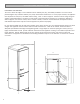
INSTALLATION INSTRUCTIONS IMPORTANT: After transit where the fridge has been on its side or back, ensure that the fridge is in a level, upright position for 12 hours before connecting the appliance to a power source, this will reduce the possibility of a malfunction in the cooling system from handling during transportation.. UNPACKING AND CLEANING Remove all packaging and securing tapes from the appliance.
INSTALLATION INSTRUCTIONS POSITIONING THE APPLIANCE The area in which the fridge is to be installed must be relatively cool, dry, and suitably ventilated. The area must be protected against any inclement weather (rain, snow) and excessive surface dust. To ensure proper function, the appliance must be placed on a flat, firm, and stable surface resting level on all four supports. The floor must be strong enough to support a fully loaded cabinet. Use wood or metal shims to level the fridge if necessary.
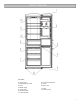
PRODUCT FEATURES FEATURES: 1: Upper hinge 2: Detachable door shelf 3: Doors 4: Middle hinge 5: Lower hinge 6: Adjustable feet 7: Freezer drawers 8: Freezer compartment 9: Crisper 10: Wine rack 11: Shelf 12: Control panel 7
OPERATION STARTING THE FRIDGE After the fridge has been properly connected to a power source, the compressor will automatically turn on and the cabinet will begin cooling. Allow the cabinet to cool for at least 4 hours prior to adding food items. OPERATION Tap any key for the first time and the control panel will be activated. If there is no button selection for one minute, the LED display will automatically go off. MODE Tap the “Mode” button to select your desired operation mode.
OPERATION alarm function will be reactivated if the door is left open for more than 3 minutes and will beep 3 times every 3 minutes until the door is closed. The sound will stop after 10 minutes if the door is not closed. INTERIOR LIGHT The interior LED light is situated on the inside ceiling of the fridge compartment, it will turn on when the door of the appliance is opened and will turn off when the door is closed.
CARE AND MAINTENANCE INTERNAL CLEANING Wash the inside of the appliance with lukewarm water and a mild soap. Never use abrasive or corrosive cleaning agents, steel wool, scouring sponges, chemical cleaning agents, or highly perfumed cleaning products to clean the interior as these will damage the surface and leave behind a strong odor. A sponge, towel, or soft brush is recommended. Wash with a mixture of two tablespoons (30ml) of baking soda to 1 quart (1.14L) warm water.
ENERGY SAVING TIPS • Do not install the fridge close to sources of heat, such as a stove, boiler, heater, chimney etc. and avoid exposure of the appliance to direct sunlight. • Locate the appliance in a cool well-ventilated room and make sure that the air vents of the compressor housing cover are not obstructed. Also allow adequate spacing around the cabinet for air circulation (3” or 7.5cm) • Avoid unnecessary frosting in the cabinet by packing all food and liquids in airtight packages or containers.
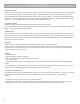
ELECTRICAL DIAGRAM 12
Refrigerator Warranty Your REFRIGERATOR has been inspected and tested and is warranted subject to following for a period to 12 months from the date of purchase against defects in workmanship and materials. During this period, we undertake to repair or replace any defective part which was originally defective in our opinion. This warranty is null and void if the appliance is used for commercial purposes.