INSTALL GUIDE FortiGate-50A/50B, FortiWiFi-50B and FortiGate-100 FortiOS 3.0 MR4 www.fortinet.
FortiGate-50A/50B, FortiWiFi-50B and FortiGate-100 Install Guide FortiOS 3.0 MR4 31 August 2007 01-30004-0265-20070831 © Copyright 2007 Fortinet, Inc. All rights reserved. No part of this publication including text, examples, diagrams or illustrations may be reproduced, transmitted, or translated in any form or by any means, electronic, mechanical, manual, optical or otherwise, for any purpose, without prior written permission of Fortinet, Inc.
Contents Contents Contents.............................................................................................. 3 Introduction ........................................................................................ 7 About the FortiGate unit ................................................................................... 7 FortiGate-50A................................................................................................ FortiGate-50B..................................................
Contents Connecting to the FortiGate unit ................................................................... 21 Web-based manager .................................................................................. Command line interface .............................................................................. Connecting to the web-based manager ...................................................... Command line interface ..............................................................................
Contents Next steps ........................................................................................................ 46 Set the date and time.................................................................................. Updating antivirus and IPS signatures ........................................................ Updating antivirus and IPS signatures from the web-based manager . Updating the IPS signatures from the CLI ............................................
Contents Reverting to a previous firmware version..................................................... 67 Reverting to a previous firmware version using the web-based manager .. 67 Reverting to a previous firmware version using the CLI ............................. 68 Installing firmware images from a system reboot using the CLI ................ 70 Restoring the previous configuration .......................................................... 72 The FortiUSB key.............................................
Introduction About the FortiGate unit Introduction Welcome and thank you for selecting Fortinet products for your real-time network protection. FortiGate™ Unified Threat Management System improves network security, reduces network misuse and abuse, and helps you use communications resources more efficiently without compromising the performance of your network. FortiGate Unified Threat Management Systems are ICSA-certified for firewall, IPSec, and antivirus services.
About the FortiGate unit Introduction FortiGate-50B The FortiGate-50B is designed for telecommuters and small remote offices with 10 to 50 employees. The FortiGate-50B unit includes two WAN ports for a redundant connection to the Internet. It also features a 3-port switch for connecting additional network connections and supports HA configurations with additional FortiGate-50B units.
Introduction Fortinet Family Products Fortinet Family Products Fortinet offers a family of products that includes both software and hardware appliances for a complete network security solution including mail, logging, reporting, network management, and security along with FortiGate Unified Threat Management Systems. For more information on the Fortinet product family, go to www.fortinet.com/products.
About this document Introduction FortiAnalyzer FortiAnalyzer™ provides network administrators with the information they need to enable the best protection and security for their networks and monitor against attacks and vulnerabilities. The FortiAnalyzer unit features include: • collecting logs from FortiGate, FortiManager, FortiMail devices and syslog devices • generating reports on network use, vulnerabilities, and traffic patterns.
Introduction About this document This document contains the following chapters: • Installing the FortiGate unit – Describes unpacking, setting up, and powering on a FortiGate unit. • Factory defaults – Provides the factory default settings for the FortiGate unit • Configuring the FortiGate unit – Provides an overview of the operating modes of the FortiGate unit and how to integrate the FortiGate unit into your network.
Fortinet documentation Introduction Convention Example Keyboard input In the Gateway Name field, type a name for the remote VPN peer or client (for example, Central_Office_1). Code examples config sys global set ips-open enable end CLI command syntax config firewall policy edit id_integer set http_retry_count set natip end Document names FortiGate Administration Guide Menu commands Go to VPN > IPSEC > Phase 1 and select Create New.
Introduction Customer service and technical support • FortiGate High Availability User Guide Contains in-depth information about the FortiGate high availability feature and the FortiGate clustering protocol. • FortiGate IPS User Guide Describes how to configure the FortiGate Intrusion Prevention System settings and how the FortiGate IPS deals with some common attacks. • FortiGate IPSec VPN User Guide Provides step-by-step instructions for configuring IPSec VPNs using the webbased manager.
Customer service and technical support 14 Introduction FortiGate-50A/50B, FortiWiFi-50B and FortiGate-100 FortiOS 3.
Installing the FortiGate unit Package Contents Installing the FortiGate unit This section provides information on installing and setting up the FortiGate unit on your network. This chapter includes the following sections: • Package Contents • Mounting • Powering on the FortiGate unit • Connecting to the FortiGate unit Package Contents Review the contents of your FortiGate package to ensure all components were included.
Package Contents Installing the FortiGate unit Table 1: Technical Specifications Dimensions 8.63 x 6.13 x 1.38 in. (21.9 x 15.6 x 3.5 cm) Weight 1.5 lb. (0.
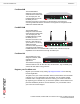
Installing the FortiGate unit Package Contents FortiWiFi-50B The FortiWiFi-50B package contains the following items: • FortiWiFi-50B Unified Threat Management System • one gray straight-through Ethernet cable (Fortinet part number CC300249) • one RJ-45 to DB-9 serial cable (Fortinet part number CC300247) • one AC adapter and power cable • two mounting brackets • FortiWiFi-50B QuickStart Guide • Fortinet Tools and Documentation CD Figure 3: FortiWiFi-50B package contents Back Front WLAN P
Package Contents Installing the FortiGate unit Figure 4: FortiGate-100 package contents Front Ethernet Cables: Orange - Crossover Grey - Straight-through INTERNAL EXTERNAL DMZ POWER STATUS Null-Modem Cable (RS-232) Internal, External, DMZ Status Interfaces LED Power LED Back DC +12V 5A Console DMZ External Internal Power Cable Power Supply QuickStart Guide INTERNAL EXTERNAL DMZ POWER STATUS FortiGate-100 Copyright 2006 Fortinet Incorporated. All rights reserved.
Installing the FortiGate unit Mounting Mounting Adhere the rubber feet included in the package to the underside of the FortiWiFi unit, near the corners of the device. Place the FortiGate unit on any flat, stable surface. Ensure the unit has at least 1.5 inches (3.75 cm) of clearance on each side to ensure adequate airflow for cooling. Alternatively, you can use the mounting brackets to mount the FortiWiFi-50B to a wall.
Powering on the FortiGate unit Installing the FortiGate unit Table 5: FortiGate-50A and FortiGate-100 LED indicators LED State Description Power Green The FortiGate unit is powered on. Off The FortiGate unit is powered off. Flashing The FortiGate unit is starting up. Off The FortiGate unit is running normally.
Installing the FortiGate unit Powering off the FortiGate unit Powering off the FortiGate unit Always shut down the FortiGate operating system properly before turning off the power switch to avoid potential hardware problems. To power off the FortiGate unit 1 From the web-based manager, go to System > Status. 2 In the Unit Operation display, select Shutdown, or from the CLI, enter: execute shutdown 3 Disconnect the power supply.
Connecting to the FortiGate unit Installing the FortiGate unit To connect to the web-based manager 1 50A Set the IP address of the computer with an Ethernet connection to the static IP address 192.168.1.2 with a netmask of 255.255.255.0. You can also configure the management computer to obtain an IP address automatically using DHCP. The FortiGate DHCP server assigns the management computer an IP address in the range 192.168.1.1 to 192.168.1.254.
Installing the FortiGate unit Connecting to the FortiGate unit Command line interface You can access the FortiGate command line interface (CLI) by connecting a management computer serial port to the FortiGate serial console connector. You can also use Telnet or a secure SSH connection to connect to the CLI from any network that is connected to the FortiGate unit, including the Internet. The CLI supports the same configuration and monitoring functionality as the web-based manager.
Quick installation using factory defaults Installing the FortiGate unit Quick installation using factory defaults You can quickly set up your FortiGate unit for a home or small office using the web-based manager and the factory default FortiGate configuration.
Installing the FortiGate unit Quick installation using factory defaults 6 Go to System > Network > Options. 7 Select one of the following DNS settings 8 • Obtain DNS server address automatically: select to get the DNS addresses from the ISP, select Apply • Use the following DNS server addresses: select and enter the DNS server addresses given to you by the ISP, select Apply Go to Router > Static, edit route #1 and change Gateway to the default gateway IP address from the ISP and select OK.
Quick installation using factory defaults 26 Installing the FortiGate unit FortiGate-50A/50B, FortiWiFi-50B and FortiGate-100 FortiOS 3.
Factory defaults Factory defaults The FortiGate unit ships with a factory default configuration. The default configuration enables you to connect to and use the FortiGate web-based manager to configure the FortiGate unit onto the network. To configure the FortiGate unit, you add an administrator password, change network interface IP addresses, add DNS server IP addresses, and, if required, configure basic routing.
Factory defaults Factory default DHCP server configuration 50A With the FortiGate-50 series, you can quickly configure the internal network and the FortiGate unit by using the factory default DHCP server settings. See “Quick installation using factory defaults” on page 24 Table 7: FortiGate DHCP Server default configuration Name internal_dhcp_server Interface Internal Default Gateway 192.168.1.99 IP Range 192.168.1.110 – 192.168.1.210 Network Mask 255.255.255.
Factory defaults Table 8: Factory default NAT/Route mode network configuration (Continued) Network Settings Default Gateway (for default route) 192.168.100.1 Interface connected to external network (for default route) external Default Route A default route consists of a default gateway and the name of the interface connected to the external network (usually the Internet). The default gateway directs all non-local traffic to this interface and to the external network. Primary DNS Server 65.39.139.
Factory defaults Table 10: Factory default firewall configuration Configuration setting Name Description Firewall policy Internal -> External Source: All Destination: All Firewall address All Firewall address matches the source or destination address of any packet. Pre-defined service More than 50 predefined services Select from any of the 50 pre-defined services to control traffic through the FortiGate unit that uses that service.
Factory defaults Restoring the default settings Restoring the default settings You can revert to the factory default settings if you change a network setting and are unable to recover from it. ! Caution: This procedure deletes all changes you have made to the FortiGate configuration and reverses the system to its original configuration, including resetting interface addresses. Restoring the default settings using the web-based manager To reset the default settings 1 Go to System > Status.
Restoring the default settings 32 Factory defaults FortiGate-50A/50B, FortiWiFi-50B and FortiGate-100 FortiOS 3.
Configuring the FortiGate unit Planning the FortiGate configuration Configuring the FortiGate unit This section provides an overview of the operating modes of the FortiGate unit. Before beginning to configure the FortiGate unit, you need to plan how to integrate the unit into your network. Your configuration plan depends on the operating mode you select: NAT/Route mode or Transparent mode.
Planning the FortiGate configuration Configuring the FortiGate unit You typically use NAT/Route mode when the FortiGate unit is operating as a gateway between private and public networks. In this configuration, you create NAT mode firewall policies to control traffic flowing between the internal, private network and the external, public network (usually the Internet). Figure 8: Example NAT/Route mode network configuration for a FortiGate-50A. . Internet External Internal 204.23.1.5 192.168.1.
Configuring the FortiGate unit Preventing the public interface from responding to ping requests Transparent mode In Transparent mode, the FortiGate unit is invisible to the network. Similar to a network bridge, all FortiGate interfaces must be on the same subnet. You only have to configure a management IP address so that you can make configuration changes. The management IP address is also used for antivirus and attack definition updates.
NAT/Route mode installation Configuring the FortiGate unit To disable ping administrative access from the web-based manager 1 Log into the FortiGate web-based manager. 2 Go to System > Network > Interface. 3 Choose the external interface and select Edit. 4 Clear the Ping Administrative Access check box. 5 Select OK. To disable ping administrative access from the FortiGate CLI 1 Log into the FortiGate CLI. 2 Disable administrative access to the external interface.
Configuring the FortiGate unit NAT/Route mode installation Administrator Password: Internal External/WAN1 DMZ/WAN2 IP: _____._____._____._____ Netmask: _____._____._____._____ IP: _____._____._____._____ Netmask: _____._____._____._____ IP: _____._____._____._____ Netmask: _____._____._____._____ Default Gateway: _____._____._____.
NAT/Route mode installation Configuring the FortiGate unit To add/change the administrator password 1 Go to System > Admin > Administrators. 2 Select the Change Password icon for the admin administrator. 3 Enter the new password and enter it again to confirm. 4 Select OK. To configure interfaces 1 Go to System > Network > Interface. 2 Select the edit icon for an interface. 3 Set the addressing mode for the interface. Choose from manual, DHCP, or PPPoE.
Configuring the FortiGate unit NAT/Route mode installation 4 Set Destination IP to 0.0.0.0. 5 Set Mask to 0.0.0.0. 6 Set Gateway to the default gateway IP address. 7 Set Device to the interface connected to the external network. 8 Select OK. Verifying the web-based manager configuration To verify access settings, go to the interface you want to verify and select the edit icon. The Administrative Access field should have check marks beside the settings you chose in the preceeding steps.
NAT/Route mode installation Configuring the FortiGate unit config system interface edit set mode static set ip end Example config system interface edit internal set mode static set ip 192.168.120.99 255.255.255.0 end 3 Set the IP address and netmask of the external interface to the external IP address and netmask you recorded in Table 12 on page 36.
Configuring the FortiGate unit NAT/Route mode installation config system dns set primary set secondary end Example config system dns set primary 293.44.75.21 set secondary 293.44.75.22 end Adding a default route Add a default route to configure where the FortiGate unit sends traffic that should be sent to an external network (usually the Internet). Adding the default route also defines which interface is connected to an external network.
NAT/Route mode installation Configuring the FortiGate unit Connecting the FortiGate unit to the network(s) When you have completed the initial configuration, you can connect the FortiGate unit between your internal network and the Internet. The following network connections are available on the FortiGate unit: • Internal for connecting to your internal network • External or WAN1 for connecting to the Internet Modem is the interface for connecting an external modem to the FortiGate-50A.
Configuring the FortiGate unit Transparent mode installation Transparent mode installation This section describes how to install the FortiGate unit in NAT/Route mode. This section includes the following topics: • Preparing to configure Transparent mode • Using the web-based manager • Using the command line interface • Connecting the FortiGate unit to your network Preparing to configure Transparent mode Use Table 14 to gather the information you need to customize Transparent mode settings.
Transparent mode installation Configuring the FortiGate unit You do not have to reconnect to the web-based manager at this time. Once you select Apply, the changes are immediate, and you can go to the system dashboard to verify the FortiGate unit has changed to Transparent mode. To configure DNS server settings 1 Go to System > Network > Options. 2 Enter the IP address of the primary DNS server. 3 Enter the IP address of the secondary DNS server. 4 Select Apply.
Configuring the FortiGate unit Transparent mode installation To configure DNS server settings Set the primary and secondary DNS server IP addresses. Enter: config system dns set primary set secondary end Example config system dns set primary 293.44.75.21 set secondary 293.44.75.22 end Reconnecting to the web-based manager When the FortiGate unit has switched to Transparent mode, you can reconnect to the web-based manager using the new IP address.
Next steps Configuring the FortiGate unit Figure 11: FortiGate-50B Transparent mode connections Internal network WAN1 Internet Internal Router (or public switch) FortiGate-50B Hub, switch or router Management Computer Next steps Use the following information to configure FortiGate system time, and to configure antivirus and attack definition updates. Refer to the FortiGate Administration Guide for complete information on configuring, monitoring, and maintaining your FortiGate unit.
Configuring the FortiGate unit Next steps 5 Specify how often the FortiGate unit should synchronize its time with the NTP server. 6 Select OK. Updating antivirus and IPS signatures Configure the FortiGate unit to connect to the FortiGuard Distribution Network (FDN) to update the antivirus (including grayware), antispam and IPS attack definitions. The FDN is a world wide network of FortiGuard Distribution Servers (FDS). When the FortiGate unit connects to the FDN, it connects to the nearest FDS.
Next steps Configuring the FortiGate unit Note: Updating antivirus definitions can cause a very short disruption in traffic currently being scanned while the FortiGate unit applies the new signature database. Schedule updates when traffic is light, for example overnight, to minimize any disruption. Updating the IPS signatures from the CLI You can update IPS signatures using the CLI. Use the following procedure to update IPS signatures.
Configuring the FortiGate unit Next steps Example config system autoupdate schedule set update every Sunday set frequency weekly set status enable set time 16:45 end Adding an override server If you cannot connect to the FDN, or if your organization provides updates using their own FortiGuard server, use the following procedures to add the IP address of an override FortiGuard server in either the web-based manager or the CLI.
Next steps 50 Configuring the FortiGate unit FortiGate-50A/50B, FortiWiFi-50B and FortiGate-100 FortiOS 3.
Configuring the modem interface Connecting a modem to the FortiGate-50A Configuring the modem interface The modem interface is only available on the FortiGate-50A. 50A The following sections will cover how to configure the FortiGate-50A modem using the CLI. The FortiGate-50A supports a redundant or stand alone 56K modem interface in NAT/Route mode. • In redundant mode, the modem interface automatically takes over from a selected Ethernet interface when that Ethernet interface is unavailable.
Selecting a modem mode Configuring the modem interface Figure 12: Example modem interface network connection FortiGate-50A DC+12V Modem Console USB USB-to-serial External Internal converter V.92 External modem Selecting a modem mode The modem interface can work in one of two modes: • redundant mode • stand alone mode Redundant mode configuration The redundant modem interface serves as a backup to the Ethernet interface.
Configuring the modem interface Configuring the modem for the FortiGate-50A In stand alone mode the modem interface replaces the external Ethernet interface. You must also configure firewall policies for connections between the modem interface and other FortiGate interfaces. Configuring the modem for the FortiGate-50A Configure the modem for the FortiGate-50A using the CLI. The following table of CLI commands are specifically for the FortiGate-50A modem configuration.
Configuring the modem for the FortiGate-50A Configuring the modem interface passwd2 Enter the password used to access the specified dialup account. No default. passwd3 Enter the password used to access the specified dial-up account. No default. Table 15: CLI commands for the FortiGate-50A 54 peer_modem1 {actiontec | ascendTNT | generic} If the modem at phone1 is Actiontec or AscendTNT, select that type, otherwise leave setting as generic.
Configuring the modem interface Adding a Ping Server Example config system modem set action dial set status enable set holddown-time 5 set interface wan1 set passwd1 acct1passwd set phone1 1234567891 set redial 10 set username1 acct1user end Adding a Ping Server Adding a ping server is required for routing failover for the modem in redundant mode. A ping server confirms the connectivity to an Ethernet interface.
Adding firewall policies for modem connections Configuring the modem interface Adding firewall policies for modem connections The modem interface requires firewall addresses and policies. You can add one or more addresses to the modem interface. For information about adding addresses, see the FortiGate Administration Guide. When you add addresses, the modem interface appears on the policy grid.
Using a wireless network Setting up a wireless network Using a wireless network This chapter is specifically for the FortiWiFi-50B. WiFi-50B In a wired network, computers are connected through a series of cables that transfer information. In a wireless network, information is transferred over radio waves. There are factors which affect the transmission of data “on the air” that you must take into account when setting up a wireless network.
Setting up a wireless network Using a wireless network Figure 13: FortiWiFi-50B as an Access Point Internal Network Wireless Network DMZ Network Internal Router WAN1 DMZ Internet WAN2 MODEM / DSL / Cable Positioning an Access Point When placing the FortiWiFi-50B AP, your main concern is providing a strong signal to all users. A strong signal ensures a fast connection and the efficient transfer of data.
Using a wireless network Setting up a wireless network To avoid RF interference: • Remove these devices from the immediate area where users are working. Something as simple as a Bluetooth enabled mouse may cause transmission interruptions. • Keep the FortiWiFi-50B AP and wireless devices at least 10 feet away from appliances such as microwave ovens and cordless phones. • If you must have a cordless phone, select one that does not use the 2.4GHz frequency range.
Wireless Security Using a wireless network Wireless Security Radio waves transmitted between a wireless device and access points provide the weakest link between the wireless device and network servers. Wireless networking can be risky because information travels on radio waves, which is a public medium. The 802.11 standard includes security options to stop your information from being intercepted by unwanted sources. These are Wireless Equivalent Privacy (WEP) and WiFi Protected Access (WPA) encryption.
Using a wireless network FortiWiFi-50B operation modes Additional security measures The FortiWiFi-50B includes other security measures you can use to block unwanted users from accessing your wireless network. By setting a few extra options, you can be assured your network and its information is secure. MAC address filtering To improve the security of your wireless network, consider enabling MAC address filtering on the FortiWiFi-50B unit.
FortiWiFi-50B operation modes Using a wireless network Figure 15: FortiWiFi in Access Point mode Internal Network Wireless Network DMZ Network Internal Router WAN1 DMZ Internet WAN2 MODEM / DSL / Cable Client mode When using the FortiWiFi-50B in Client mode, the device is set to receive transmissions from another access point. This enables you to connect remote users to an existing network using wireless protocols from a location that does not have a wired infrastructure.
Using a wireless network Setting up the FortiWiFi-50B as an Access Point Changing the operating mode To change the wireless operating mode 1 Go to System > Wireless > Settings. 2 For the Operation mode, select Change 3 Select the desired operation mode and select OK. Setting up the FortiWiFi-50B as an Access Point This section describes how to quickly configure the FortiWiFi-50B unit as an AP to allow network access for wireless workstations located on the same wireless LAN as the unit.
Setting up the FortiWiFi-50B as an Access Point Using a wireless network Set the security options To ensure proper security and protection of your network and its information, set the security options for the FortiWiFi-50B unit. To set the data security 1 Go to System > Wireless > Settings. 2 Enter an SSID. 3 Set the SSID Broadcast to either enable or disable. 4 Select a Security mode. 5 Enter a key or pre-shared key depending on the Security Mode selected. 6 Select the MAC Filter tab.
FortiGate Firmware Upgrading to a new firmware version FortiGate Firmware Fortinet periodically updates the FortiGate firmware to include enhancements and address issues. After you have registered your FortiGate unit, FortiGate firmware is available for download at http://support.fortinet.com. Only the FortiGate administrators (whose access profiles contain system configuration read and write privileges) and the FortiGate admin user can change the FortiGate firmware.
Upgrading to a new firmware version FortiGate Firmware 5 Type the path and filename of the firmware image file, or select Browse and locate the file. 6 Select OK. The FortiGate unit uploads the firmware image file, upgrades to the new firmware version, restarts, and displays the FortiGate login. This process takes a few minutes. 7 Log into the web-based manager. 8 Go to System > Status and check the Firmware Version to confirm the firmware upgrade is successfully installed.
FortiGate Firmware Reverting to a previous firmware version The FortiGate unit uploads the firmware image file, upgrades to the new firmware version, and restarts. This process takes a few minutes. 7 Reconnect to the CLI.
Reverting to a previous firmware version 6 FortiGate Firmware Select OK. The FortiGate unit uploads the firmware image file, reverts to the old firmware version, resets the configuration, restarts, and displays the FortiGate login. This process takes a few minutes. 7 Log into the web-based manager. 8 Go to System > Status and check the Firmware Version to confirm that the firmware is successfully installed. 9 Restore your configuration.
FortiGate Firmware Reverting to a previous firmware version 4 Make sure the FortiGate unit can connect to the TFTP server. You can use the following command to ping the computer running the TFTP server. For example, if the TFTP server's IP address is 192.168.1.168: execute ping 192.168.1.
Installing firmware images from a system reboot using the CLI FortiGate Firmware Installing firmware images from a system reboot using the CLI This procedure installs a specified firmware image and resets the FortiGate unit to default settings. You can use this procedure to upgrade to a new firmware version, revert to an older firmware version, or re-install the current firmware version. Use this procedure to install a new firmware version or revert to a previous firmware version.
FortiGate Firmware Installing firmware images from a system reboot using the CLI 6 Enter the following command to restart the FortiGate unit: execute reboot The FortiGate unit responds with the following message: This operation will reboot the system ! Do you want to continue? (y/n) 7 Type y. As the FortiGate units starts, a series of system startup messages is displayed. When one of the following messages appears: • FortiGate unit running v2.x BIOS Press Any Key To Download Boot Image. ...
Installing firmware images from a system reboot using the CLI 11 FortiGate Firmware Enter the firmware image filename and press Enter. The TFTP server uploads the firmware image file to the FortiGate unit and messages similar to the following are displayed: • FortiGate unit running v2.x BIOS Do You Want To Save The Image? [Y/n] Type Y. • FortiGate unit running v3.
FortiGate Firmware The FortiUSB key The FortiUSB key Note: The FortiUSB key requires a USB interface on the FortiGate unit. The FortiGate-50A, FortiGate-50B and FortiWiFi-50B include USB interfaces. The FortiUSB key provides flexibility and control when you are backing up and restoring configuration files. The FortiUSB key also enables you to have a single, secure location for storing configuration files.
The FortiUSB key FortiGate Firmware exec backup config usb 3 Enter the following command to verify the configuration files are on the key: exec usb-disk list To restore configuration using the CLI 1 Log into the CLI. 2 Enter the following command to restore the configuration files: exec restore config usb The FortiGate unit responds with the following message: This operation will replace the current firmware version! Do you want to continue? (y/n) 3 Type y.
FortiGate Firmware Testing a new firmware image before installing it config system auto-install set default-config-file set auto-install-config set default-image-file set auto-install-image end Additional CLI commands for the FortiUSB key Use the following CLI commands when you want to delete a file from the FortiUSB key, list what files are on the key, including formatting the key or renaming a file: • exec usb-disk list • exec usb-disk delete
Testing a new firmware image before installing it 4 FortiGate Firmware Make sure the internal interface is connected to the same network as the TFTP server. You can use the following command to ping the computer running the TFTP server. For example, if the TFTP server's IP address is 192.168.1.168: execute ping 192.168.1.168 5 Enter the following command to restart the FortiGate unit: execute reboot 6 As the FortiGate unit reboots, press any key to interrupt the system startup.
FortiGate Firmware Installing and using a backup firmware image 10 Type an IP address that can be used by the FortiGate unit to connect to the FTP server. The IP address can be any IP address that is valid for the network the interface is connected to. Make sure you do not enter the IP address of another device on this network. The following message appears: Enter File Name [image.out]: 11 Enter the firmware image file name and press Enter.
Installing and using a backup firmware image FortiGate Firmware • Access the CLI by connecting to the FortiGate console port using a RJ-45 to DB-9 serial cable or null-modem cable. • Install a TFTP server that you can connect to from the FortiGate as described in the procedure “Installing firmware images from a system reboot using the CLI” on page 70. To install a backup firmware image 1 Connect to the CLI using a RJ-45 or DB-9 serial cable or a null-modem cable and FortiGate console port.
FortiGate Firmware Installing and using a backup firmware image 9 Type an IP address that can be used by the FortiGate unit to connect to the FTP server. The IP address can be any IP address that is valid for the network the interface is connected to. Make sure you do not enter the IP address of another device on this network. The following message appears: Enter File Name [image.out]: 10 Enter the firmware image file name and press Enter.
Installing and using a backup firmware image 80 FortiGate Firmware FortiGate-50A/50B, FortiWiFi-50B and FortiGate-100 FortiOS 3.
Index Index A adding a default route 38, 41 C CAT5 20 certificate, security 22 CLI additional CLI commands, FortiUSB 75 connecting 23 upgrading the firmware 66, 68 comments, documentation 13 configuring redundant mode 52 standalone mode 52 connecting to the CLI 23 to the web-based manager 21 customer service 13 Fortinet 9 Fortinet customer service 13 Fortinet documentation 12 Fortinet Family Products 9 FortiBridge 10 FortiClient 9 FortiGuard 9 FortiLog 10 FortiMail 9 FortiManager 10 FortiReporter 10 Fort
Index mounting 19 configuring 52 modem 51, 52 synchronize with NTP server 46 N NAT/Route mode settings 36 using the CLI 39 using the web-based manager 37 NTP server 46 NTP server synchronize 46 P ping requests, preventing public FortiGate interface from responding to 35 ping server 55 PoE 20 Power over Ethernet 20 PPPoE configuration 37 products, Fortinet family 9 protection profiles, default 30 R reconnecting to the web-based manager 45 redundant mode configuring 52 modem 51 registering the FortiGate
www.fortinet.
www.fortinet.