USE + CARE MANUAL GAS RANGE MODELS FR304GN FR366GN
Congratulations on your recent Forza purchase! Before you begin using your new Forza product, please take a moment to review the Use + Care Manual. You will find the answers to all of your questions as well as some very important safety information.
General Warnings We have provided many important safety messages in this manual and on your appliance. Always read and obey all safety messages. This is the safety alert symbol. This symbol alerts you to potential hazards that can kill or hurt you and others. All safety messages will follow the safety alert symbol and either the word “DANGER” or “WARNING.” You can be killed or seriously injured if you don’t immediately follow instructions.
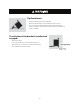
Tip Over Hazard • A child or adult can tip the range and be killed. • Ensure the anti-tip bracket is engaged when the range is moved. • Do not operate range without anti-tip bracket installed and engaged. • Failure to follow these instructions can result in death or serious burns to children and adults. To verify the anti-tip bracket is installed and engaged: • Slide range forward.
Poisoning Hazard Never cover any slots, holes, or passages in the oven bottom, cover an entire rack or the oven floor with materials such as aluminum foil. Doing so blocks airflow through the oven and may cause carbon monoxide poisoning. Aluminum foil linings may also trap heat, causing a fire hazard. Clean the appliance with caution. If a wet sponge or cloth is used to wipe spills on a hot cooking area, be careful to avoid steam burn. Some cleaners can produce noxious fumes if applied to a hot surface.
Please read all instructions before using this appliance. Read this instruction booklet before installing and using the appliance. The manufacturer will not be responsible for any damage to property or to persons caused by incorrect installation or improper use of the appliance. The manufacturer reserves the right to make changes to its products when considered necessary and useful, without affecting the essential safety and operating characteristics.
Use this range only as intended by the manufacturer. If you have any questions, contact the manufacturer. Do not cover or block any openings on this appliance. Use this appliance only for its intended use as described in this manual. Do not use corrosive chemicals, vapors, or non-food products in this appliance. This type of oven is specifically designed to heat or cook. It is not designed for industrial or laboratory use. The use of corrosive chemicals in heating or cleaning will damage the appliance.
IN CASE OF AN ELECTRICAL FAILURE To light the burners manually, carefully hold a lit match to the burner ports and turn the gas control knob to high. During a power failure, you can use the standard cooktop burners, but each must be lit with a match. The use of gas cooking appliances results in the production of heat and moisture.
When children become old enough to use the appliance, it is the responsibility of the parents or legal guardians to ensure that they are instructed in safe operation of the appliance by qualified person. DO NOT store items of interest to children above or at the back of the range. If children should climb onto the appliance to reach these items, they could be seriously injured. DO NOT allow anyone to climb, stand, lean, sit, or hang on any part of an appliance, especially a door.
When using the cooktop: DO NOT TOUCH THE BURNER GRATES OR THE IMMEDIATE SURROUNDING AREA. Areas adjacent to the burners may become hot enough to cause burns. Never leave the range unattended when using high flame settings. Boil overs cause smoking and greasy spillovers that may ignite. Also, if the burner flames and igniter are smothered with spillage, unburned gas will escape into the room. DO NOT heat or warm unopened food containers. Build-up of pressure may cause the container to burst and cause injury.
DO NOT block or obstruct the flow of air through the ventilation openings. The oven vent is located at the back of the appliance. The vents need to be unobstructed and open to provide necessary airflow that is important for proper oven performance. DO NOT touch oven vent area while the appliance is on and for several minutes after the appliance is off. Some parts of the vent and surrounding areas become hot enough to cause burns.
To reduce the risk of fire in the oven cavity: • Do not store flammable materials in or near the oven. • Do not use water on a grease fire. Smother fire or use a dry chemical or foam-type extinguisher. • It is highly recommended that a fire extinguisher be readily available and highly visible next to any cooking appliance. • Do not overcook food. Carefully attend oven if paper, plastic or other combustible materials are placed inside the oven. • Do not use the cavity for storage purposes.
Your Product Your range consists of the following main parts: • • • Cooktop: flat top part where the pan supports (supports for the pots) and the gas burners. Control panel: cooker control devices zone (i.e. knobs and lights). Oven door.
30” Range Control Panel 1) Useful for lighting and adjusting the cooktop burners. 2) Useful for lighting the lower burner (oven) or the upper gas (broiler). 3) The light function can be used when the oven is switched off. The convection fan function can be used with the lower burner. Indicator light: HEATING The indicator light comes on to indicate that the oven is heating up. It turns off as soon as it reaches the set temperature.
30” Cooktop Features KNOB COOKTOP BURNER 30” Model BURNER OUTPUT RATINGS: BTU/HR NG (Natural) Gas, 5” W.C.P BURNER OUTPUT RATINGS: BTU/HR LP (Propane) Gas, 10” W.C.P. 1 Burner rear left 12,000 btu/h 12,000 btu/h 2 Dual Flame Burner front left 20,000 btu/h 20,000 btu/h 3 Dual Flame Burner front right 20,000 btu/h 20,000 btu/h 4 Burner rear right 12,000 btu/h 12,000 btu/h 30” Oven Features OVEN BURNER 30” Model BURNER OUTPUT RATINGS: BTU/HR NG (Natural) Gas, 5” W.C.
36” Cooktop Features KNOB COOKTOP BURNER 30” Model BURNER OUTPUT RATINGS: BTU/HR NG (Natural) Gas, 5” W.C.P BURNER OUTPUT RATINGS: BTU/HR LP (Propane) Gas, 10” W.C.P.
Use Cooktop Turning on the Gas Burner Press and turn the corresponding knob counter-clockwise to the MAX position. When it is lit, hold the knob down for approximately 10 seconds, then release it and adjust flame intensity, being careful to position the knob in the area between maximum and minimum (included) and never between maximum and zero to prevent turning it off unexpectedly. The burner may go out when you release the knob: this means that the thermocouple is not hot enough.
IMPORTANT: Never leave empty cookware on a hot surface cooking area, element or surface burner. Ideal cookware should have a flat bottom, straight sides, a well-fitting lid and the material should be of medium-to-heavy thickness. Rough finishes may scratch the cooktop. Aluminum and copper may be used as a core or base in cookware. However, when used as a base it can leave permanent marks on the cooktop or grates.
Food packaged in aluminum foil should not be placed directly on the burner grate. Aluminum foil can melt during cooking. Do not let plastic, paper or cloth come in contact with a hot burner grate. They may melt or catch fire. Never let a pan boil dry. This can damage your pan and the cooking surface. Professional quality pans with metal handles are recommended because plastic handles can melt or blister if the flame extends up the side of the pan.
Canning Tips • Use a cover when bringing the contents to a boil. • Once the contents have reached a boil on high, use the lowest flame possible to maintain the boil or pressure. Match Pan Diameter to Flame Size The flame should be the same size as the bottom of the pan or smaller. Do not use small pans with high flame settings as the flames can lick up the sides of the pan. Oversize pans that span two burners are placed front to rear, not side to side. Use balanced pans.
IMPORTANT: Pay more attention during cooking with high percentage of oil, grease etc… If you insert the oven rack on the 6 level, the oven tray must be positioned on the first level. See pictures below: Correct! Wrong Position: 2-3-4-5 levels Wrong: Oven Tray on Oven Rack Oven Condensation and Temperature It is normal for a certain amount of moisture to evaporate from the food during any cooking process. The amount depends on the moisture content of the food.
Baking Recommendations Food Single Rack Position Temperature Approx. Time (min) Eggs rolls 3 or 4 400F°(204°C) 25-30 Fish sticks 3 or 4 425°F(218°C) 10-15 Lasagna (frozen) 3 or 4 375F°(191°C) 55-60 Pot pie 3 or 4 400F°(204°C) 35-40 Gr. peppers stuffed 3 or 4 375F°(191°C) 60-70 Quiche 3 or 4 400F°(204°C) 25-30 Pizza, 12” 3 or 4 400F°(204°C) 15-20 Mac.
Cooking with Convection There are many advantages to cooking with convection. In the convection system, a fan in the back of the oven moves heated air evenly around the oven. The moving air provides even heat so foods can be placed on any rack level with consistent results. Multiple racks of foods can be cooked or large quantities of foods can be cooked at the same time. Foods will cook thoroughly without having to rotate pans. Low, shallow bakeware should be used with convection cooking.
Broiling Recommendations Type and Cut of Meat Weight Rack Approx. Time (min) Rare 12 oz 3 or 4 4 Medium 12 oz 3 or 4 5 Well done 12 oz 3 or 4 6 Rare 10 oz 3 or 4 4 Medium 10 oz 3 or 4 6 Well done 10 oz 3 or 4 8 Medium ¼ lb. 3 or 4 6 Well done ¼ lb. 3 or 4 8 1/2 lb. 3 or 4 15 Bone-in breast 2-3 lbs. total 1 or 2 22 Chicken pieces 2-3 lbs. total 3 or 4 22 1 lb. 3 or 4 10 Salmon steak 1 lb. 2 or 3 8 Fillets 1 lb.
Accessories Some models are not provided with accessories. Wok Ring Useful when using a wok, use this accessory with high BTU burners Slow Cooking / Moka The cast-iron SlowCooking/Moka plate provides a steady temperature, evenly distributed across a stable heating surface. Oven Tray Broiler Rack Useful for collecting fat from foods. Oven Rack Useful for supporting containers with food during cooking. Placed on the rack above.
Cleaning the Cooktop It is advisable to clean the hob daily after every use, once it has cooled down, using specific products for steel, or a normal degreaser for colored cookers. Be careful to remove all cooking residues. We strictly advise you against using abrasive or chlorine-based products. Before cleaning, make sure all controls are off and the cooktop is cool. Always use the mildest cleaner that will do the job. Use clean, soft cloths, sponges or paper towels.
Following there is a procedure: 1) Remove the burner cap from the burner base and clean according to cleaning section. 2) Remove the burner spreader. Clean the gas tube opening and burner port according to cleaning section. 3) Clean the burner base with a damp cloth (keep the gas injector area free of cleaning agents and any other material from entering the injector orifice). 4) Replace the burner spreader and cap, making sure the alignment pins are properly aligned with the slots. 5) Turn on the burner.
• Make sure oven is cool and power to the oven has been turned off before removing the door. Failure to do so could result in electrical shock or burns. • The oven door is substantial. Use both hands to remove the oven door. The door front is glass. • Handle carefully to avoid breakage. • Grasp only the sides of the oven door. Do not grasp the handle as it may swing in your hand and cause damage or injury.
Cleaning Chart 1) Locate the number of the part to be cleaned in the illustration on this page. 2) Find the part name in the chart. • Use the cleaning method in the left column if the range has a colored enamel finish. • Use the cleaning method in the right column if the range is stainless steel. 3) Match the letter with the cleaning method on following page.
The cleaners listed below indicate types of products to use and are not being endorsed. Use all products according to package directions. Part Cleaning Method A. Chrome Plated Wash with hot sudsy water. Rinse thoroughly and dry. Or, gently rub with Soft Scrub® Bon-Ami®, Comet®, Ajax®, Brillo® or S.O.S.® pads as directed. Easy Off® or Dow® OvenCleaners (cold oven formula) can be used, but may cause darkening and discoloration.Racks may be cleaned in the oven during the self-clean mode.
Parts and Materials Suggested Cleaners Suggestions/Reminders Burner Base (Cast aluminum) Damp cloth. Keep the gas injector area free of cleaning agents and any other material from entering the injector orifice. Gas Spreader (Brass) Detergent and hot water; rinse and dry. Stiff nylon bristle-toothbrush to clean port openings. Rub lightly, in a circular motion. Aluminium cleaners may dull the surface. Abrasive cleansers: Revere ware® metal polish. Following package direction Use Brillo® or S.O.S.
Removing the door For easier cleaning, the door can be removed and placed on a canvas. To remove the door proceed as follows: 1) Open the door completely and insert two pins into the holes on the hinges indicated in the figure. 2) Grasp the door on both sides with both hands, lift it forming an angle of around 35° and remove it. 3) To reassemble the door, put the hinges in the relevant slots in the oven, making sure that grooved sections A are resting completely in the slots.
Cleaning the Door Glazing The glass in the door should always be kept thoroughly clean. Use absorbent kitchen roll. In case of stubborn dirt, wash with a damp sponge and an ordinary detergent. Replacing the internal light bulb. WARNING: Before this operation is necessary to disconnect the range from the power supply.
Troubleshooting Before contacting service, check the following to avoid unnecessary service charges. Problem Problem Solving Steps Cooling fan continues to run after oven is turned off The fan turns off automatically when the components have cooled sufficiently. Oven temperature is too hot or too cold The oven thermostat needs adjustment. Oven light is not working properly Replace or reinsert the light bulb if loose or defective.
Are the burner ports clogged? See “Cleaning gas burners” section. Surface burners flames are uneven yellow and/or noisy Are the burner caps positioned properly? See “Cleaning the burner cap and gas spreader” section. Is propane gas being used? The appliance may have been converted improperly. Contact a service technician. Is the burner wet? Let it dry.
Service Information If service is required, call your dealer or authorized service agency. The name of the authorized service agency can be obtained from the dealer or distributor in your area or email: service@forzacucina.com. Have the following information readily available: • Model number • Serial number • Date purchased • Name of dealer from whom purchased • Clearly describe the problem that you are having Record the information indicated below. You will need it if service is ever required.
FORZA WARRANTY U.S.A. FREESTANDNG GAS RANGES – DISHWASHERS – RANGE HOODS The warranties provided by Forza in this statement apply exclusively to Forza appliances and accessories sold as new products to the original owner by a Forza authorized distributor, retailer, dealer or service center and installed in the United States. The warranties provided in this statement are not transferable and have validity from the date of original purchase.
11) Service calls to connect, convert or otherwise repair the electrical wiring and/or gas line to properly use the product. 12) Service calls to provide instructions on the use of a Forza product. 13) Repair or failure of the product if it is abused, misused, used improperly, used for other than the intended purpose or if used commercially/industrially. 14) Damage or repairs caused by the use of harsh chemicals or cleaning products improperly applied. 15) Replacement of wear and tear parts.
FORZA WARRANTY U.S.A. B-STOCK/ DISPLAY MODEL FREESTANDNG GAS RANGES – DISHWASHERS – RANGE HOODS The warranties provided by Forza in this statement apply exclusively to Forza appliances and accessories sold to the original owner by a Forza authorized distributor, retailer, dealer or service center and installed in the United States. The warranties provided in this statement are not transferable and have validity from the date of original purchase.
13) Repair or failure of the product if it is abused, misused, used improperly, used for other than the intended purpose or if used commercially/industrially. 14) Damage or repairs caused by the use of harsh chemicals or cleaning products improperly applied. 15) Replacement of wear and tear parts. 16) Replacement of house fuses or resetting of circuit breakers. 17) Damages to anything situated next to the product, including, but not limited to, ceiling, floor or cabinetry.