
Installation Instructions


FRK-Gran-INST-A
Congratulations!
You have purchased a quality product designed for long lasting beauty. The following instructions will take you
step-by-step through the installation process and care of your product. We recommend reading the entire
instruction booklet before beginning.
Installing Your New Sink
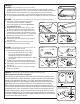
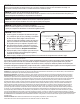
Tools And Materials
1.
2.
3.
4.
5.
6.
7.
8.
9.
10.
11.
12.
Caution: Use only Stain-Free Plumber's Putty.
Pipe wrench if steel pipe used
Punch
Drill
(2) Adjustable wrenches
Long thin screwdriver
File
Jigsaw
Yardstick
Hammer
Flashlight
Silicone sealant or plumber’s putty
2” hole saw (if installing new countertop)
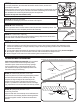
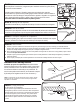
STEP 1: Remove existing sink
Leave the faucet and drain outlet in place
Shut off water supply valves (usually under sink).
Release any water that may be in the supply lines by opening
faucet valves (the same way you would normally turn your
water on). Let water run until it stops flowing.
Disconnect the supply lines from the water supply valves.
Disconnect the drain fitting from the waste trap.
Remove clips around underside of old sink.
Lift sink out with faucet and drain fitting still in place.
Step 1
1.
2.
3.
4.
5.
6.
7.
Installation Instructions:
Composite Granite Sinks
VERSION A
2: Punch
3: Drill
7:Jigsaw
1: Pipe Wrench
4: Adjustable Wrenches
5: Long Thin Screwdriver
6: File
8: Yardstick
9: Hammer 10: Flashlight
11: Silicone Sealant
Topmount Installation Instructions
12. Hole Saw
NOTE: The illustrations are a representation of a sink and may differ from
the style of your sink. The instructions still apply to your installation.