
Installation Instructions


STEP 2:
OPTION A: Prepare existing countertop
Make sure existing countertop cut-out opening is the proper size. Set the new sink
into opening. The sink rim should rest evenly on the countertop. Slight adjustments
can be made using a file or a jigsaw.
Use caution to avoid chipping or cracking the countertop while filing or sawing.
Countertop should not be warped in order for sink to fit flush in the opening.
1.
2.
3.
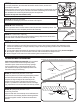
Carefully place the sink upside down on the
countertop at the desired position. Trace the
outline of the sink onto the countertop. Do not
cut along this line.
Draw a line 1/2” (12.7mm) inside the sink outline.
Measure the cut-out line you just drew and
compare to all sink dimensions. The cut-out
should be approximately 1” (25.4mm) smaller
than the overall sink dimensions.
Verify both measurements.
Drill a pilot hole inside the cutting line.
Using a jigsaw, cut along the inside line to create the opening in the countertop.
1.
2.
3.
4.
5.
Measure the cut-out line and compare to all sink
dimensions. The cut-out line should be 1” (25.4mm)
smaller than the overall sink dimensions.
Place template on countertop. Trace completely
around the edge of the template directly onto
your countertop.
Drill a pilot hole inside the cutting line.
Using a jigsaw, cut along the line to create
the opening in the countertop.
1.
2.
3.
4.
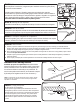
OPTION B: Prepare a new countertop
using the sink as a template
OPTION C: Prepare a new countertop
using the cut-out template provided
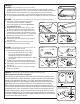
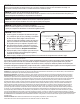
STEP 3: Knocking Out faucet/accessory holes (Must be done before installing sink)
OPTION C: 1
2
43
OPTION B: 1
4
2
5
Step 2
Step 3
Marks partially drilled holes
Carefully knock out
only the required holes
If your sink already has the proper number of holes needed, you can proceed to Step
Four. If additional holes need to be knocked out, place the sink upright on a stable
workstation (a workbench or the floor). Do NOT place the sink in the countertop to knock
out the holes, as damage could occur such as cracking or breakage. Locate the round
stickers on the ledge of the sink. These stickers represent the locations of the partially
drilled holes. With a hammer and punch or nailset, you can knock out the partially
drilled holes needed for faucet and accessories. You will then use a file (ex: rattail type)
to smooth away any rough surface in the holes. Note: any additional holes beyond the
partially drilled ones noted on this sink are considered modifications and any problems
associated with these holes are not covered by the warranty.