
Installation Instructions


To simplify installation, we recommend the installer attach faucets, strainers and
accessories at this time.
When fitting the drain to the sink, take extra care not to overtighten. Overtightening can add
a mechanical stress in the region of the drain hole which could damage or crack the sink.
We recommend the screw fitting be hand tight plus one eighth turn.
Caution: Use only Stain-Free Plumber's Putty.
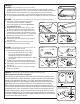
STEP 4: Install accessories
Step 4
Place a generous bead of silicone sealant around the perimeter of countertop cutout. This
will ensure that the sink is completely sealed to the countertop.
STEP 6: Seal countertop
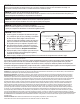
Assemble the mounting clips and bolts as shown in the diagram.
STEP 5: Mounting Brackets
Lift sink, turn face-up and lower into the countertop opening. Wipe excess sealant with a
wet cloth. Refer to sealant instructions for cure time.
STEP 7: Place sink in opening
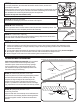
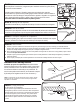
Locate the position of the sink using the template provided
and make the cut-out from the countertop. Note: This
template will align the edge of the countertop to the
tangent of the top radius of the bowl (see illustration).
If there is a preference to show more reveal of sink flange
(lip), adjustments to the cut out need to be made by installer.
Professional Installation Recommended: Only use natural
stone or a solid surface material like granite, marble,
Corian® or Quartz. Have sink and accessory openings
cut by a professional. A cutting mistake will be costly.
(We recommend comparing the template provided to the
sink before cutting the countertop.)
STEP 1: Determine position of the sink
Align the bowl under the countertop cut-out and determine
the location for the mounting brackets. Mounting brackets
have been supplied. Installer will determine attachment
method.
STEP 2: Determine position of the
mounting brackets
Undermount Installation
Place template on
countertop & co
rm where
to cut hole.
Countertop
Cabinet
Template
Step 1
Mounting bracket
(provided)
Wing nut & washer
(not provided)
Countertop
Epoxy
Silicone sealan
t
(not provided)
Sink
Step 2-5
Step 6
Countertop
Connect and tighten hot and cold faucet supply lines, strainer, drain and trap assembly. Note: Depending on the
location of sink drain holes, it may be necessary to adjust the drain pipe fittings under the sink to accommodate
the new sink installation.
Turn on water supply and examine all connections for leaks. If leak appears, tighten joint slightly. Do not overtighten.
With stopper in place, fill sink and examine area under sink and around drain flange for leaks.
Remove stopper and let water drain while examining drain connections for leaks.
1.
2.
3.
4.
STEP 8: Final Steps
NOTE: The illustrations are a representation of a sink and may differ from
the style of your sink. The instructions still apply to your installation.
Countertop
Mounting Clip
(furnished)
Fastener
(not
furnished)
Sink
Silicone Sealant
(not furnished)
Step 5