
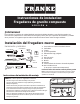
Installation Instructions
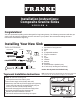


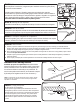

Attach the mounting brackets loosely to the countertop from underneath, using the fastener and attachment method
recommended by the countertop supplier.
STEP 3: Attach the mounting brackets
Apply a continuous bead around the top flange (lip) of the sink. Caution: Use only Stain-Free Plumber's Putty.
STEP 4: Apply silicone sealant or plumber’s putty
Align the bowl with the countertop cut-out from underneath and fully tighten the brackets against the sink flange (lip).
STEP 5: Sink alignment and mounting
To ensure long-lasting beauty, the best preventative maintenance is to ensure that the sink is clean and dry when not in use.
For best results, opt for a mild liquid soap and a wet cloth to gently clean your sink. Mild abrasives and non-metallic sponges
can be used for more aggressive cleaning. Rinse thoroughly and towel dry. Periodically wipe down sink with vegetable or
mineral oil to repel calcium or mineral deposits and enhance the natural luster of the sink.
Sinks: Franke warrants its sinks to be free from manufacturing defects in material and workmanship, under the
normal residential use for which it was intended, for the lifetime of the sink.
Marine & Outdoor Use: Franke sinks, accessories and faucets are not warranted for marine or outdoor installation.
General: This warranty applies only to the original owner, providing the product has been installed in accordance with our
installation instructions, used as recommended and in a normal residential application. In the event of a warranty claim, the
owner will be required to provide proof of purchase (sales receipt). This warranty covers all components which make the product
operational. Franke, at its option, may repair or replace the product or components necessary to restore the product to good
working condition. Franke reserves the right to inspect the installation prior to the actual replacement of the product or component
part. This warranty does not cover misuse or abuse, accidental damages, scuffs or scratches, improper installation, abnormal usage,
negligence or damage caused by improper maintenance or cleaning. Normal wear of parts is excluded from the warranty. Damage
caused by impurities or acts beyond our control are not covered. Any product or part which has been repaired or altered in any manner
outside of Franke’s factory, unless previously authorized in writing by Franke, will void warranty. Any replacement excludes transportation
and any labor re-installation costs. This warranty does not allow recovery of incidental or consequential damages such as loss of use,
delay, property damage or other consequential damage, and Franke accepts no liability for such damages. The Franke warranty is limited
to the above conditions and to the warranty period specified herein and is exclusive. Franke DISCLAIMS all other warranties, expressed
or implied, including IMPLIED WARRANTIES OF MERCHANTABILITY AND/OR FITNESS FOR A PARTICULAR PURPOSE. This warranty
gives you specific legal rights that vary from state to state.
Additional Information: For additional information about warranty, products and accessories, please visit
www.Franke.com or call our Customer Service Team at 1-800-637-6485.
1.
2.
3.
4.
CARE INSTRUCTIONS
Buyer Protection Limited Warranty
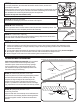
STEP 6: Final Steps
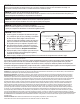
Top flange of the drain
Sink reveal
Faucet base
Countertop
Cabinet
Step 5
Connect and tighten hot and cold faucet supply lines,
strainer, drain and trap assembly. Note: Depending
on the location of sink drain holes, it may be
necessary to adjust the drain pipe fittings under
the sink to accommodate the new sink installation.
Turn on water supply and examine all connections
for leaks. If leak appears, tighten joint slightly.
Do not overtighten.
With stopper in place, fill sink and examine area
under sink and around drain flange for leaks.
Remove stopper and let water drain while examining drain connections for leaks.