
Instructions / Assembly


Adjustable Cabinet Hardware Installation Instructions
Instructions d'installation de la quincaillerie d'armoire réglable
Instrucciones de instalación de los aditamentos de gabinete ajustables
Before You Begin
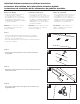
Step 1
• Selecttheappropriatefastenersfromthetwolengths
provided.Fastenersshouldbeatleast¼”longerthanthe
thicknessof yourcabinetface.
• Placethreadedfastenersinexistingholeswithboltheadon
frontsideofcabinet.
Step 2
• Insert washers and loosely thread nuts on back side of each fastener.
Do not ghten.
Step 3
• Slide pull across face of drawer or door, so that the head of each fastener
slides into the channel.
Step 4
• Ensure pull is in desired posion, then ghten hex nuts securely using
winged adapter tool.
1
4
2
3
• Readtheinstallationinstructions
completelybeforestarting.
• Ifyourcabinetrydoesnoth ave
pre-drilledholesyoucanpurchase
anAlign RightAN0251C-CL-Uor
AN6516C-CL-Uinstallationtemplate
toguideinstallation.
Caution: Take care not to scratch
your cabinets and countertops
during installation.
Attention : prenez garde à ne pas
rayer vos armoires et comptoirs
pendant l'installation.
Precaución: Tenga cuidado de no
rayar sus gabinetes y encimeras
durante la instalación.
• Lisez toutes les instructions
d'installation avant de commencer.
• Si vos armoires n'ont pas de trous
pré-percés, vous pouvez acheter
un gabarit d’installation AlignRight
AN0251C-CL-U ou AlignRight
AN6516C-CL-U pour vous guider
pendant l'installation.
• Lea completamente las instruccio nes
de instalación antes de comenzar.
• Si su gabinete no tiene agujeros
pretaladrados, puede comprar una
plantilla de instalación AlignRight
AN0251C-CL-U o AN6516C-CL-U
para guiarse en la instalación.
Avant de commencer Antes de comenzar