
Owner's Manual


Page 10 For technical questions, please call 1-888-866-5797. Item 58307
SAFETY OPERATION MAINTENANCEASSEMBLY
Operation
Safety Checks Before Operation
1. Carefully inspect the Hoist before operating it.
2. Inspect the tool for wear or damage. Pay special
attention to any wear or damage to the Wire Rope.
3. Be sure the Winch components are
clean and dry before operation.
Loading a Drywall Panel
Note: Drywall panels are very heavy; it is recommended
that they be handled by two workers when working with
larger panels. Set the Locking Casters to prevent the
Hoist from moving or rolling while loading a panel on it.
WARNING! Only use hoist with single complete drywall
panels. Lifting damaged, broken, cut, or multiple panels
may cause a panel to fall, causing serious injury.
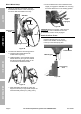
1. Rotate the Cradle Asm. so the Support
Hooks are on the opposite side of the
Telescoping Asm. from the Winch Wheel.
2. Rotate and secure the Support Hooks to
their open position. (See Figure K.)
3. Extend the Crossarms as needed to support the
panel size you are working with. (See Figure J.)
4. Pull the Tilt Pin out and tilt the
Cradle. (See Figure M.)
5. Place the drywall panel on the Cradle, with the outer
side of the panel (the good side) facing the cradle.
Carefully lean the panel on the Crossarms, being
careful not to damage the edges of the panel.
Figure O:
6. If the panel will be installed on a flat ceiling, tilt the
Cradle back to its horizontal position and lock in
place with the Tilt Pin. If the panel will be installed on
a side wall or sloped ceiling, leave the Cradle tilted.
7. Check to see that the panel is secure and balanced.
8. Lower the Cradle if needed, and
release the Caster Locks.
9. Carefully roll the Hoist near to the position
where the panel will be installed.
10. When at the appropriate location,
apply the Caster Locks.
Raising the Panel
CAUTION! Lock the Locking Casters to prevent the
Hoist from rolling after it is in position. (See Figure C.)
1. Crank the Winch Wheel clockwise to raise
the panel slightly, then stop, checking that
the Brake is functioning properly.
Figure P:
2. Once you have determined that the Brake
is functioning properly, resume raising
the panel to the desired height.