
User manual


9
EN
3
Partitioning your Freecom Hard Drive XS 3.0
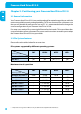
Example for different partitions with different file systems on one Freecom
Hard Drive XS 3.0
File system
Total
size of
Freecom Hard Drive XS 3.0
NTFS FAT32
1 TB 970 GB 30 GB
Note: On NTFS formatted hard disks can only be written under Windows
XP / Vista / 7. Under MacOSX data can only be read.
The example above is a good solution for Windows XP / Vista / 7 users who sometimes
exchange data with Macs.
For storing the data under Windows XP / Vista / 7 both partitions can be used. As the
NTFS file system can only be read by Mac data to be used on these operating systems
must be stored on the FAT32 partition.
Please follow the steps below to adapt the Hard Drive XS 3.0 for your needs.
3.3 Partitioning your Freecom Hard Drive XS 3.0 under Windows XP/
Vista/7
3.3.1 Deleting a partition on the Freecom Hard Drive XS 3.0 under Windows
XP/Vista/7
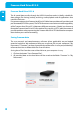
1. Click with the right mouse button on the "My Computer" icon on your desktop.
2. Select the option "Manage".
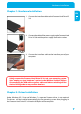
3. Select the option "Storage" -> "Disk Management".
4. Choose your external Freecom Hard Drive XS 3.0 and right-click on the partition.
5. Select "Delete Partition" and confirm by clicking on "Yes". The partition will be
deleted now.
3.3.2 Cr
eating a partition on the Freecom Hard Drive XS 3.0 under Windows
XP/Vista/7
The following steps will guide you through the process of creating partitions on your
Freecom Hard Drive XS 3.0. After this procedure your Freecom Hard Drive XS 3.0 will be
ready for use and it will be allocated a drive letter.
1. Cl
ick with the right mouse button on the "My Computer" icon on your desktop.
2. Select the option "Manage".
3. Select the option "Storage" -> "Disk Management".
4. Choose the hard disk, which is "unallocated". Ensure that the entire drive is
"unallocated".