
Installation Guide

Board Spacing or Gapping
All decking expands and contracts slightly as a result of temperature change.
1. When installing Scalloped pro le deck boards using any of the fastening
methods outlined below…
Always space boards to provide the following minimum gaps to allow for
these changes:
a. Side to Side… 3/16" (4.8 mm). (Hidden fastening clips and hidden
fastening strips will automatically set this spacing)
b. End to End… typically 3/16" (4.8mm depending on board length and
temperature (see Chart 1 - “Deck Spacing”).
c. Structure… typically 1/4" (6.4mm) between all decking and any
structure or post (see Chart 1 - “Deck Spacing”).
NOTE:
If the deck is located near or around a tree, be sure to allow for future
growth of the tree.
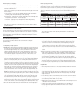
Deck Spacing (Chart #1)
Capped composite decking will expand and contract slightly due to
temperature change. Use the chart below to determine the spacing between
board ends. A gap of at least 1/4" (6.4mm) is recommended between deck
boards and xed elements like foundations, walls, pool edges, etc. If the
deck is located near or around a tree, be sure to allow for future growth of
the tree.
Temperature at Install (°F)
40-55
56-70
71-95
96-110
Over 110
1/4"
3/16"
1/8"
1/16"
1/32"
Temperature at Install (°C)
4-13
14-21
22-35
36-43
Over 43
6.4mm
4.8mm
3.2mm
1.6mm
0.8mm
Color and Orientation of Deck Boards
We recommend that you lay out the deck boards before nal installation
to ensure an acceptable color mix. Hardwood colors feature a variegated
appearance with contrasting light and dark shades of color. Laying out a
preferred pattern of deck boards before installation will help to achieve a
desired appearance.
Deck Board Fastening Methods
There are three methods that can be used to fasten Scalloped
pro le decking.
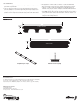
1. Snap&Stay™ strips System.
a.
NOTE:
Outer edge (Starter) and divider boards that run perpendicular to
the main rows of deck boards will require additional framing and should
be shimmed approximately 1/8" (3.2 mm) to match the crown of the
adjoining boards and the thickness of the Snap&Stay™ strips. These
boards should be fastened every 16" (404mm) using two #10 x 2-3/4"
color-matched capped composite deck screws or the Cortex
®
color-
matched plug system (Starter pro les only).
b. Locate the rst deck board at outer rim joist away from the house or
structure and work towards the house. For outer edge board installation
(Starter or Scalloped pro le), do not overhang the board more than 1"
(25 mm) widthwise or 2" (51 mm) lengthwise. For a standard 1" (25 mm)
overhang, measure and mark a location 22" (559 mm)* from the outer rim
joist on the outermost joists that run perpendicular to that joist and snap a
chalk line across the entire length of the deck. Position the Snap&Stay™
strips with one edge along chalk line and fasten the rst row of strips to
each joist with a 1-1/4" (32 mm) stainless steel ring shank roo ng nail
using 2 nails between each set of clips. (locate nails approximately 3/4"
(19 mm) from each clip with a total of 8 nails per each four board strip).
NOTE:
the side tabs on all of the strips should be orientated on the same
side of the joists and ush against the joist to allow for linking subsequent
strips together along each row of clips. Trim the overhang of the rst
row of Snap&Stay™ strips ush with the outer rim joist. Slide the outer
deck board securely into the rst clip (ensure it is properly engaged in
the groove of the board) and screw down the opposite, outer edge of the
board at each joist location using color-matched, capped composite deck
screws or the Cortex
®
color-matched plug system (Starter pro les only).
c. Once the rst 4 boards have been installed into the outer Snap&Stay™
NOTE:
The semi-gloss surface of the decking will weather to a natural matte
nish over time.
strips and proper alignment has been con rmed (measured for “square”
on joists), position the remaining strips and fasten until all of the joists
have been covered. For elevated decks, install Snap&Stay™ strips in
4 board increments as an added safety precaution. An interlocking tab
is located at the end of each strip to allow for proper spacing along the
length of each joist. The strip closest to house or structure will likely need
to be trimmed and the nal board fastened in a similar manner as the rst
board.
d. Measure and trim each deck board to your desired length and place one
edge of the board into the side of the Snap&Stay™ strips adjacent to a
previously installed board. Step down (or tap with a non-marring rubber
mallet) on the opposite elevated edge of the board to secure it in place.
You should hear an audible “click” sound as the clip engages with the
groove on the edge of board. If a board does not properly engage the clip
while stepping down on the elevated edge, strike the board adjacent at a
45 degree angle to the clip with a non-marring dead blow rubber mallet
to secure it in place. Repeat this process until all deck boards have been
installed.
Helpful hints:
• Store strips indoors before use. The strips install best between 40°F and
80°F (4°C and 27°C).
• Use a non-marring dead blow or rubber mallet to set the leading edge
of the deck boards into the clips prior to stepping down on the opposite
edge of the board. Tapping the boards at a 45 degree angle on the high
edge works best.
• If “re-skinning” a deck, ensure that all joists are level to each other before
installing the Snap&Stay™ strips system. If not level, shim or shave joists
as needed to get them within 1/8" (3.2 mm).
• Walking along joists and non-secured deck boards can be dangerous and
is therefore not recommended.
• * When using a thicker fascia board (greater than our standard 1/2"
fascia), adjust the alignment chalk line for the rst course of strips
accordingly.