• • • FREC!>" LifeJustGotCOOLER USER MANUAL FHCW061 ABE FHCW081 ABE FHCW101 ABE • FHCW1 21ABE • • • • www.FreoHome.com Questions? We're here to help! Contact us: 1-888-894-2755 or Comfort@FreoHome.
Welcome to the Freo Family! Your life just got COOLER! Thank you for purchasing one of our innovative home climate products! We know that you will be thrilled by the features and functionality. If, for an reason, you are not completely satisfied, have a general question, or need further guidance on installation, please reach out to the Freo customer service team at 888-894-2755 or Comfort@FreoHome.com.
Important Safety Instructions IMPORTANT SAFETY INSTRUCTIONS READ THIS MANUAL Inside you will find many helpful hints on how to use and maintain your air conditioner properly. Just a little preventive care on your part can save you a great deal of time and money over the life of your air conditioner. You'll find many answers to common problems in the chart of troubleshooting tips. If you review our chart of Troubleshooting Tips first, you may not need to call for service at all.
Important Safety Instructions CAUTION Do not attempt to disassemble this unit. Repairs or maintenance should be handled by an authorized service technician only! Do not attempt to repair or replace the power cord. Repairs or maintenance should be handled by an authorized service technicial only! If you are unsure how to install this unit properly, please contact a licensed installer in your area. Electrical installation must be performed in accordance with national and local regulations and standards.
Important Safety Instructions Caution: Risk of fire/ flammable materials (Required for R32 units only) WARNING: (for using R32 refrigerant only) -Flammable refrigerant - R32 is used in air conditioner. Please follow the instruction carefully to avoid any hazard. -Do not use means to accelerate the defrosting process or to clean, other than those recommended by the manufacturer.
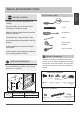
INSTALLATION INSTRUCTIONS TOOLS YOU WILL NEED Read these instructions completely and carefully. Screwdriver Note to Installer- Be sure to leave these instructions with the Consumer. Level Note to Consumer- Keep these instructions for futrue reference. Screwdriver Completion time- Approximately 1 hour. Pencil We recommend that two people install this product. Ruler or tape measure Proper installation is the responsibility of the installer.
2 PREPARE AIR CONDITIONER A: Remove the air conditioner from the carton and place on a flat surface. Installation Instructions B: Remove top rail, insulation foam hardware and weather stripping from the packaging’ material. DO NOT DISCARD WITH STYROFOAM PACKAGING MATERIALS. C: Align the holes on the top rail with those in the tpo of the unit, as shown in Fig. B. Fig.B Fig.1 B.
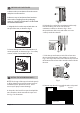
4 SECURE THE ACCORDION PANELS NOTE: Proper installation of this air conditioner requires a downward slope to the outside of 3°to 4° for water drainage. If done correctly, water should not drain from the overflow drain hole during normal use. Fig.7A 6 Fig.7B Installation Instructions A.WIth the help of another person, carefully place the unit into the window so that the bottom of the air conditioner frame is against the window sill (Fig.5A for wood frame windows and Fig.5B for vinyl windows).
8 INSTALL WEATHER STRIPPING Installation Instructions In order to minimize air leaks between the room air conditoner and the window opening, trim the weather stripping to the proper length, peel off the protective backing and plug any gaps if needed (Fig .14). Fig.
INSTALLATION WITH STORM WINDOW SASH Storm window frame or other obstruction. 1-1/2"min (38 mm) Board thickness as required, for proper pitch to rear, along entire sill. Fasten with nails or screws. 1. Sound of Rushing AIr The sound of rushing air might be heard from the front air exhaust, especially as the fan speed increases. 2. Gurgle/Hiss The sound of gurgling or hissing might be heard due to the movement of refrigerant through the evaporator during operation. 3.
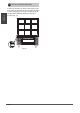
AIR CONDITIONER FEATURES ELECTRONIC CONTROL OPERATING INSTRUCTIONS REMOTE LED SCREEN INDICATORS Before you begin, thoroughly familiarize yourself with the control panel as shown below and all its functions. FAN SPEED display Displays selected FAN SPEED: HIGH, MED, or LOW NOTE: Some functions of this air conditioner are only accessible via remote control. This display is blank when set to AUTO speed. NOTE: MED is optional.
FUNCTIONALITY AND FEATURES Press POWER button on unit or remote control to turn unit on or off. The unit will start automatically in Cool mode with Energy Saver functionality active. Press MODE button on unit or remote to select between cool and fan modes. After 250 hours of operation, the filter indicator light illuminates. This feature is a reminder to clean the Air Filter for more efficient operation. Press the MODE button for 3 seconds to cancel the reminder.
Function Buttons Before you begin using your new air conditioner, make sure to familiarize yourself with its remote control. The following is a brief introduction to the remote control itself. For instructions on how to operate your air conditioner, refer to the How to Use Basic Functions section of this manual. SHORT CUT Sets and activates your favorite pre-settings. ON/OFF Turns the unit on or off. NOTE:Please do not select HEAT mode if the machine you purchased is cooling only type.
Handling The Remote Control TIPS FOR USING REMOTE CONTROL The remote control must be used within 8 feet of the unit. The unit will beep when remote signal is received. Curtains, other materials and direct sunlight can interfere with the infrared signal receiver. Remove batteries if the remote will not be used more than 2 months.
Setting the TIMER function Your air conditioning unit has two timer-related functions: TIMER ON- sets the amount of timer after which the unit will automatically turn on. TIMER OFF- sets the amount of time after which the unit will automatically turn off. TIMER ON function The TIMER ON function allows you to set a period of time after which the unit will automatically turn on, such as when you come home from work. 1. Press the TIMER ON button.
TIMER OFF function The TIMER OFF function allows you to set a period of time after which the unit will automatically turn off, such as when you wake up. 1. Press the TIMER OFF button. By default, the last time period that you set and an "h" (indicating hours)will appear on the display. Note: This number indicates the amount of time after the current time that you want the unit to turn off. For example, if you set TIMER OFF for 2 hours, " 2.
CARE AND CLEANING Cabinet Cleaning CAUTION Clean your air conditioner occasionally to keep it looking new. Be sure to unplug the unit before cleaning to prevent chock or fire hazards. Air Filter Cleaning The air filter should be cleaned at least once a month. Trapped particles in the filter can build up, causing reduced performance, frost accumulation on the coils, and shortening the lifespan of your air conditioner. NOTE: Never use hot water over 104°F to clean the filter.
TROUBLESHOOTING TIPS Before calling for service, review this list. It may save your time and expense. This list includes common occurrences that are not the result of defective workman-ship or materials in this appliance. Problem Solution Air conditioner does not start Wall plug disconnected. Push plug firmly into wall outlet. House fuse blown or circuit breaker tripped. Replace fuse with time delay type or reset circuit breaker. Plug Current Device tripped. Press the RESET button. Power is OFF.
Problem Solution Water dripping INSIDE when unit is cooling. Improper installation. Tilt air conditioner slightly to the outside to allow water drainage. Refer to installation instructions - check with installer. Water dripping OUTSIDE when unit is cooling. Unit removing large quantity of moisture from humid room. This is normal during excessively humid days. Remote Sensing Deactivating Prematurely (some models) Room too cold Remote control not located within range.
The design and specifications are subject to change without prior notice for product improvement. Consult with the sales agency or manufacturer for details. Any updates to the manual will be uploaded to: www.FreoHome.com Please check for the latest version.