All about the Use & Care of your Dishwasher TA B L E O F C O N T E N T S Important Safety Instructions .............................. 2 Dishwasher Dispenser and Detergents ............... 13 Product Registration ........................................... 3 Factors Affecting Performance .......................... 14 Dishwasher Features ......................................... 4 Care and Cleaning ........................................... 15 Operating Instructions ..................................
IMPORTANT SAFETY INSTRUCTIONS Read all instructions before using this appliance. Save these instructions for future reference. WARNING This symbol will help alert you to such dangers as personal injury, burns, fire, and electrical shock. WARNING To reduce the risk of fire, electrical shock, or injury when using your dishwasher, follow basic precautions including the following: • Do not wash plastic items unless marked “dishwasher safe” or the equivalent.
PRODUCT REGISTRATION Thank you for choosing Frigidare. This Use & Care Guide is part of our commitment to customer satisfaction and product quality throughout the service life of your new appliance. We view your purchase as the beginning of a relationship. To ensure our ability to continue serving you, please use this page to record important product information.
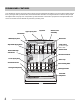
DISHWASHER FEATURES Your dishwasher cleans by spraying a mixture of hot water and detergent through the spray arms against soiled surfaces. Each cycle begins with a pre-drain. Next, the dishwasher fills with water covering the filter area. Water is then pumped through the filter and spray arms. Soil particles go down the drain as the water is pumped out and replaced with clean water. The number of water fills will vary with the cycle being used.
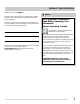
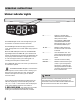
OPERATING INSTRUCTIONS heavy wash quick clean normal wash china crystal top rack energy saver rinse only sanitize add rinse aid delay washing drying air dry hi temp wash hold to lock delay start START cancel 1-24 hrs clean s Press the CIRCLE to activate Getting Started 1. Load dishwasher (See Preparing and Loading Dishes). 2. Add detergent (See Dishwasher Dispenser & Detergents). 3. Add rinse aid (See Rinse Aid). 4. Select desired CYCLE (See Cycle Chart).
OPERATING INSTRUCTIONS Sanitize Option To sanitize your dishes and glassware, select the SANITIZE option. When selected, the light above the pad will come on and remain on until end of cycle. The water temperature in the final rinse will be raised to 155°F (68°C) assuring bacteria is destroyed. This option is available in NORMAL WASH and TOP RACK. SANITIZE is automatically provided when HEAVY WASH is selected. Only these sanitization cycles have been designed to meet NSF requirements.
OPERATING INSTRUCTIONS The Smart Soil Sensor checks the soil level on your dishes in the Heavy Wash, Quick Clean, Normal and Top Rack cycles. Depending on soil level, the sensor will determine if additional water fills are needed to clean the dishes or if water fills can be deleted. Cycle time and water usage will vary based on the amount of soil on the dishes. Cycle time will also vary based on the options selected and the incoming water temperature. Not all cycles available on all models.
OPERATING INSTRUCTIONS Status Indicator Lights PF……………… Appears in window when dishwasher is first installed, or when power has been interrupted. HI-TEMP WASH and NO HEAT DRY indicator lights will also flash. To clear, touch START/CANCEL pad. 1H-24H……….. Number of delay start hours. The last hour will count down in minutes. CL……………… Close dishwasher door. The status indicator lights will also flash to indicate current cycle status. HO or Hd…..… Indicate a water heat delay. MINUTES…...
PREPARING AND LOADING DISHES Dish Preparation Scrape away large pieces of food, bones, pits, toothpicks, etc. The continuous filtered wash system will remove remaining food particles. Burned-on foods should be loosened before loading. Empty liquids from glasses and cups. Foods such as mustard, mayonnaise, vinegar, lemon juice and tomato based products may cause discoloration of stainless steel and plastics if allowed to sit for a long period of time.
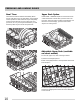
PREPARING AND LOADING DISHES Bowl Tines The bowl tines offer the ultimate in flexibility. When closed, load with saucers or small dishes. Open halfway and it is perfect for small casseroles. Open completely for those hard to fit items such as coffee pots, food processors, etc. As you load your dishwasher, you will find many other ways to use this unique feature. Upper Rack Option LIGHT WASH—UPPER RACK option can be used to wash a wide assortment of items when you don't have a full load.
PREPARING AND LOADING DISHES Loading the Bottom Rack Removable High-Side Shelf Features and appearance of racks and silverware basket may vary from your model. The removable high-side shelf can be used to hold serving spoons, spatulas, or other small items. The shelf can also fold up or be removed for more space to load large pots or pans. The lower rack is best for plates, saucers, bowls, and cookware. Large items should be placed along the edge so they do not block the spray arm rotation.
PREPARING AND LOADING DISHES Fold-down Tines The fold-down tines in the lower rack make easy loading for those extra large and hard-to-fit items. The tines may be left up for normal use or folded down for more flexible loading. Fold down for more space to load large pots or pans. Do not mix silver and stainless to avoid damaging the silver finish. The silverware basket can be separated and placed in several locations in the bottom rack. Load silverware in all sections or just one, depending on your load.
DISHWASHER DISPENSER & DETERGENTS Filling the Detergent Dispenser How much Detergent to use The detergent dispenser has one covered and one uncovered cup. Detergent in the uncovered cup falls into the dishwasher when the door is closed. The covered cup opens automatically to release detergent. The amount of detergent to use depends on the water hardness. Water hardness is measured in grains per gallon. Using too little detergent can result in poor cleaning and hard water filming or spotting.
FACTORS AFFECTING PERFORMANCE Rinse Aid Rinse aid greatly improves drying and reduces water spots and filming. Water "sheets" off dishes rather than forming water droplets that cling and leave spots. A dispenser, located next to the detergent cup, automatically releases a measured amount of rinse aid during the last rinse. If spotting and poor drying are problems, increase the amount of rinse aid dispensed by rotating the dial to a higher number. The dial is located under the dispenser cap.
CARE AND CLEANING Care of Drain Air Gap WARNING Burn Hazard Allow heating element to cool before cleaning the interior. Failure to do so can result in burns. Outside—Occasionally wipe with a mild nonabrasive detergent and water. Rinse and dry. Models with Stainless Steel Door— Clean outer door with warm soapy water and a dishcloth or sponge. Rinse with clean water and a dry cloth. Do not use harsh cleaners. Inside—The inside of the dishwasher is self-cleaning with normal use.
SOLUTIONS TO COMMON DISHWASHING PROBLEMS Before calling for service, review this list. It may save you both time and expense. This list includes common experiences that are not the result of defective workmanship or material in your dishwasher. Food Soils Left on Dishes • Choose another cycle for longer washing time. • Check rack loading section for proper loading—avoid nesting items. • Home water pressure may be too low—should be 20 to 120 pounds per square inch (psi). • Check incoming water temperature.
SOLUTIONS TO COMMON DISHWASHING PROBLEMS Dishwasher Leaks • Use only fresh detergent designed for automatic dishwashers. Measure detergent carefully. Try a different brand. • Spilled rinse aid can cause foam and lead to overflowing. Wipe up any spills with a damp cloth. • Check to see that dishwasher is level. (See Installation Instructions.) Normal Sounds You Will Hear • Normal sounds include water fill, water circulation and motor sounds.
SOLUTIONS TO COMMON DISHWASHING PROBLEMS Dishwasher Does Not Drain Properly • If unit is hooked up to a food waste disposer, make sure the disposer is empty. • Check to see if the knockout plug has been removed from inside the food waste disposer inlet. • Check to see if drain hose is kinked. Stains on Tub Interior • Washing large amounts of dishware with tomato based soil can cause a pink/orange apperance. This will not affect performance and will gradually fade over time.
WARRANTY Your appliance is covered by a one year limited warranty. For one year from your original date of purchase, Electrolux will pay all costs for repairing or replacing any parts of this appliance that prove to be defective in materials or workmanship when such appliance is installed, used and maintained in accordance with the provided instructions. Exclusions This warranty does not cover the following: 1.