Electric Wall Oven Single and Double Welcome .................................. 2 Important Safety Instructions ... 3-4 Features at a Glance .............. 5 Before Setting Oven Controls ......................... 6 Setting Oven Controls ........... 6 Cooking Informations ......... 7-9 Care & Cleaning ............... 10-13 Adjusting Your Oven Temperature ................ 13 Before You Call Solutions to Common Problems ........................................... 14-15 Warranty ................
Welcome & Congratulations Questions? 1-800-944-9044 (United States) 1-866-294-9911 (Canada) Please attach sales receipt here for future reference. Congratulations on your purchase of a new appliance! At Electrolux Home Products, we are very proud of our product and are completely committed to providing you with the best service possible. Your satisfaction is our number one priority. We know you’ll enjoy your new appliance and Thank You for choosing our product.
Important Safety Instructions Read all instructions before using this appliance. Save these instructions for future reference. This manual contains important safety symbols and instructions. Please pay attention to these symbols and follow all instructions given. This symbol will help alert you to situations that may cause serious bodily harm, death or property damage. This symbol will help alert you to situations that may cause bodily injury or property damage.
Important Safety Instructions • Do not cover the broiler grid or oven bottom with aluminum foil. Exposed fat and grease could ignite. • Do Not Use Water or Flour on Grease Fires—Smother the fire with a pan lid, or use baking soda, a dry chemical or foam-type extinguisher. • Do not touch a hot oven light bulb with a damp cloth. Doing so could cause the bulb to break. Disconnect the appliance or shut off the power to the appliance before removing and replacing the bulb.
Features At A Glance Electronic Oven Controls with Clock and Kitchen Timer (Features will vary according to model) Your Electric Wall Oven Features At A Glance Oven Broil Vent Element Dual or Single Interior Oven Lights depending on your model Manual or Self-Clean Oven depending on your model Broil Pan Insert Broil Pan Electronic Oven Controls with Clock and Kitchen Timer (Features will vary according to model) Upper Oven Broil Element Upper Oven Vent Large 1 Piece Door Handle Glass Front Oven Door w
Before Setting Oven Controls Single and Upper Oven Vent Location Upper Oven Lower Oven Some models are equipped with a blower which runs in baking and self-cleaning mode to keep all internal components at a cool temperature. The blower may keep running even if the oven has been turned off, until the components have cooled down. Oven Vent Location The ovens are vented at the center trim. When the oven is on, warm air is released through the vent.
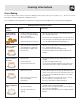
Cooking Informations Oven Baking For best cooking results, heat the oven before baking cookies, breads, cakes, pies or pastries, etc... There is no need to preheat the oven for roasting meat or baking casseroles. The cooking times and temperatures needed to bake a product may vary slightly from your previously owned appliance. Baking Problems and Solutions Chart Baking Problems Causes Corrections Cookies and biscuits burn on the bottom.
Cooking Informations Broiling Broiling is a method of cooking tender cuts of meat by direct heat under the broil element of the oven. Preheating Preheating is suggested when searing rare steaks. (Remove the broiler pan before preheating. Foods will stick if placed on hot metal.) To preheat, set the control(s) to BROIL as instructed in the Owner's Guide. Wait for the element to become red-hot, usually about 2 minutes. Preheating is not necessary when broiling meats well-done.
Cooking Informations Convection Cooking (some models) The convection oven uses a fan located in the rear wall of the oven to circulate heated air around the food to be cooked. The controlled air flow pattern quickly seals the food surface retaining the natural juices and flavour. This method of cooking enables you to obtain the best culinary results when baking, thawing, dehydrating and roasting foods. Convection notes: 1. Batch cooking is more convenient with better results. 2.
Care & Cleaning (Cleaning Chart) Surfaces How to Clean Aluminum (Trim Pieces) & Vinyl Use hot, soapy water and a cloth. Dry with a clean cloth. Do not scour or use all-purpose cleaners, ammonia, powdered cleaners or commercial oven cleaner. They can scratch and discolor aluminum. Painted and Plastic Parts, Body Parts, and Decorative Trim For general cleaning, use hot, soapy water and a cloth. For more difficult soils and builtup grease, apply a liquid detergent directly onto the soil.
Care & Cleaning Self-Cleaning (some models) Self-Cleaning Oven A Self-Cleaning oven cleans itself with high temperatures (well above cooking temperatures) which eliminate soils completely or reduces them to a fine powdered ash you can wipe away with a damp cloth. Adhere to the following cleaning precautions: • Allow the oven to cool before cleaning. • Wear rubber gloves when cleaning any exterior parts of the oven manually. • DO NOT clean the oven door gasket.
Care & Cleaning Cleaning the Manual Clean Oven (Regular oven models only) Porcelain has a smooth finish and is a type of glass fused to metal. Oven cleaners can be used on all interior oven surfaces. REMOVE SPILLOVERS AND HEAVY SOILING AS SOON AS POSSIBLE. REGULAR CLEANINGS WILL REDUCE THE NUMBER OF MAJOR CLEANINGS LATER. Adhere to the following cleaning precautions: • Allow the oven to cool before cleaning. • Wear rubber gloves when cleaning the appliance manually.
Care & Cleaning Hinge lever hook Hinge support Removing and Replacing the Oven Door The door is heavy. For safe, temporary storage, lay the door flat with the inside of the door facing down. Lock engaged for door removal Figure 1 HINGE SLOT - Door removed from the oven Figure 2 Hinge lever To Remove Oven Door: 1. Open the door to the fully opened position. 2. Pull up the lock located on both hinge supports and engage it in the hinge lever hooks (Figure 1).
Care & Cleaning To remove the “hidden bake” cover: 1. In order to remove the “hidden bake” cover, pull the back edge with one hand about 1/2" inch and lift up the “hidden bake” cover with both hands. (See picture) 2. When re-installing the “hidden bake” cover, be sure to put it all the way to the back of the oven and lay it down on the 2 shoulder screws. Then push the front edge of the cover in its place below the front bracket.
Before you call Solutions to Common Problems OCCURRENCE POSSIBLE CAUSE / SOLUTION Entire oven does not operate. House fuse has blown or circuit breaker has tripped immediately following installation. House fuse may not be fully engaged. Check fuse and screw or engage circuit breaker securely. House fuse has blown or circuit breaker has tripped after the oven has been installed and previously operating. Call an authorized servicer. Oven light does not work. Burned-out or loose bulb.
LIMITED WARRANTY Your Wall Oven is protected by this warranty WARRANTY PERIOD THROUGH OUR AUTHORIZED SERVICERS WE WILL: THE CONSUMER WILL BE RESPONSIBLE FOR: FULL ONE-YEAR WARRANTY One year from original purchase date. Pay all costs for repairing or replacing any parts of this Costs of service calls that are listed under NORMAL appliance which prove to be defective in materials or RESPONSIBILITIES OF THE CONSUMER.* workmanship.
Four encastré électrique Simple et Double Bienvenue ............................... 2 Mesures de sécurité importantes .......................... 3-4 Caractéristiques de l'appareil ............................. 5 Avant l’utilisation du four...................................... 6 Réglage des commandes du four...................................... 6 Informations de cuisson ............................ 7-9 Entretien et nettoyage .......................... 10-13 Ajustement de la température du four ............
Bienvenue et félicitations Des questions? 1-800-944-9044 (États-Unis) 1-866-294-9911 (Canada) Apposez ici votre reçu pour toute référance future. Félicitations, vous venez d’acheter un nouveau four à encastrer! Chez Electrolux Home Products, nous sommes très fiers de nos produits et nous nous engageons à vous fournir le meilleur service possible. Vous satisfaire constitue la première de nos priorités.
Mesures de sécurité importantes Lisez ces instructions avant d’utiliser l’appareil. Conservez ces instructions pour références futures. Ce guide contient des instructions et symboles de sécurité importants. Veuillez faire particulièrement attention à ces symboles et suivre les instructions données. Voici une brève explication de ces symboles. Ce symbole vous prévient des situations qui risquent d'entraîner de graves blessures, la mort ou des dommages matériels.
Mesures de sécurité importantes éviter de toucher à ces endroits avec des tissus, vêtements ou autres matériaux inflammables jusqu'à ce que le four ai eu le temps de refroidir. Ces endroits incluent entre autres la sortie de la bouche d'aération, la porte du four et le hublot. de la retirer. Pour déplacer une grille lorsque le four est chaud, soyez extrêmement prudent. Utilisez des gants isolants et tenez la grille fermement avec les deux mains pour la remettre en place.
Caractéristiques de l'appareil Les caractéristiques de votre four encastré Contrôleur électronique avec minuterie et horloge (Les caractéristiques peuvent varier selon le modèle) Orifice de Élément ventilation de grillage du four 1 ou 2 lampe(s) intérieure(s) du four (selon le modèle) Four à nettoyage facile ou autonettoyant selon le modèle Grille de lèchefrite Lèchefrite Contrôleur électronique avec minuterie et horloge (Les caractéristiques peuvent varier selon le modèle) Upper Oven Élément de grilla
Avant l’utilisation du four Emplacement de l'évent des fours encastrés simples et du four supérieur des fours encastrés doubles Upper Oven Lower Oven Certains modèles sont munis d’une soufflerie qui fonctionne pendant les modes de cuisson et autonettoyant afin de garder toutes les composantes internes froides. Il est donc possible que la soufflerie continue de fonctionner même après l’arrêt de l’appareil, jusqu’à ce que les composantes aient refroidi.
Informations de cuisson Cuisson au four Afin d’obtenir de meilleurs résultats de cuisson, préchauffez le four avant d’y faire cuire des biscuits, pains, gâteaux, tartes ou pâtisseries, etc. Il n’est pas nécessaire de préchauffer le four pour cuire un rôti ou pour cuire dans une casserole. Les durées et températures de cuisson nécessaires pour faire cuire une denrée au four peuvent varier légèrement par rapport aux temps requis avec votre ancien four.
Informations de cuisson Cuisson au gril La cuisson au gril est un procédé de cuisson des coupes tendres de viande grâce à la chaleur radiante émise par l’élément supérieur du four. Préchauffage Le préchauffage est recommandé pour saisir les biftecks saignants. (Retirez la lèchefrite avant le préchauffage. Les aliments placés sur le métal chaud collent). Pour le préchauffage, réglez la commande du four à BROIL (GRIL) en suivant les instructions du Guide de l’utilisateur.
Informations de cuisson Cuisson par convection (certains modèles) En mode convection,un ventilateur au fond du four sert à faire circuler l'air chaud autour des aliments. Ce mouvement contrôlé d'air scelle rapidement la surface des aliments, retenant ainsi tous les jus naturels et leur saveur. Cette méthode de cuisson vous permet d'obtenir les meilleurs résultats culinaires lors de la cuisson, la décongélation, la déshydratation et le rôtissage des aliments. Conseils sur la convection: 1.
Entretien et nettoyage (Tableau de nettoyage) Surfaces Méthode de nettoyage Aluminium (pieces de garniture) & Vinyle Utilisez de l’eau chaude savonneuse et un chiffon. Séchez à l’aide d’un chiffon propre. Ne récurez pas ou n'utilisez pas de nettoyant tout usage, de l'ammoniac, un nettoyant en poudre ou un nettoyant commercial pour four. Ces derniers peuvent égratigner ou décolorer l'aluminium.
Entretien et nettoyage Autonettoyage (certains modèles) Pendant le cycle d'autonettoyage, l'extérieur du four Préparation au cycle d’autonettoyage peut devenir très chaud au toucher. Un four autonettoyant se nettoie de lui-même à des températures élevées (bien au- Ne laissez pas les enfants sans dessus des températures de cuisson), qui éliminent complètement ou réduisent les surveillance près de l'appareil.
Entretien et nettoyage Nettoyage du four en émail vitrifié (Modèles à nettoyage facile seulement) L'émail vitrifié, type de verre fusionné au métal, comporte un fini lisse. Les produits de nettoyage du four peuvent être utilisés sur toutes les surfaces intérieures. ENLEVEZ LES PRODUITS RENVERSÉS ET LA SALETÉ ÉPAISSE DÈS QUE POSSIBLE. DES NETTOYAGES FRÉQUENTS RÉDUISENT LE NOMBRE DE GRANDS NETTOYAGES PAR LA SUITE.
Entretien et nettoyage Support de charnière Crochet du bras de charnière Enlever et réinstaller la porte La porte du four est lourde. Pour un rangement temporaire sécuritaire, déposer la porte à plat. Loquet en position engagée dans le bras de la charnière Figure 1 FENTE DES CHARNIÈRES Porte complètement dégagée de l'appareil Figure 2 Bras de charnière Loquet en position normale Figure 3 Pour enlever la porte du four: 1. Ouvrez la porte complètement. 2.
Entretien et nettoyage Enlever le couvercle de l'"élément caché" (certains modèles) 1. Pour enlever le couvercle de l'"élément caché", tirez le bord arrière du couvercle avec une main d'environ ½" et ensuite soulevez le couvercle avec les deux mains (voir la photo). 2. Pour replacer le couvercle de l'"élément caché", assurez-vous de placer le couvercle complètement à l'arrière et de le déposer sur les deux vis d'épaulement. Glissez ensuite le rebord avant du couvercle sous le support.
Avant de faire appel au service après-vente Solutions aux problèmes courants PROBLÈME CAUSE POSSIBLE / SOLUTION L’appareil ne fonctionne pas. Le fusible de la maison a fondu ou le coupe-circuit s'est déclenché peu après l'installation du four. Le fusible n'est peut-être pas complètement inséré. Vérifiez le fusible ou enclenchez le coupe-circuit de manière sécuritaire. Le fusible de la maison a fondu ou le coupe-circuit s'est déclenché après que le four ait été installé et ai servi.
GARANTIE LIMITÉE Votre appareil est protégé par cette garantie PÉRIODE DE GARANTIE NOUS NOUS ENGAGEONS, PAR L’ENTREMISE DE NOS RÉPARATEURS AUTORISÉS, À: RESPONSABILITÉ DU CLIENT: GARANTIE COMPLÈTE DE UN AN Un an à partir de la date d’achat. Assumer tous les frais de réparation ou de remplacement de toute pièce de cet appareil présentant des défectuosités de matériaux ou de fabrication. Les coûts des visites d’un réparateur pour les items classés sous la liste RESPONSABILITÉS NORMALES DU CLIENT.