................................................................ ................................................................
CONTENTS 6 Before Setting Oven Controls 34 Care and Cleaning 8 Setting Oven Controls 38 Before You Call 38 Solutions to Common Problems 13 Fast Preheat 41 Warranty 14 Bake 27 Adjusting the Oven Temperature PLEASE READ AND SAVE THIS GUIDE Thank you for purchasing an Electrolux appliance. You’ve chosen a product that brings with it decades of professional experience and innovation. Ingenious and stylish, it has been designed with you in mind.
Important Safety Instructions Read all instructions before using this appliance. Save these instructions for future reference. This manual contains important safety symbols and instructions. Please pay attention to these symbols and follow all instructions given. Do not attempt to install or operate your appliance until you have read the safety precautions in this manual. Safety items throughout this manual are labeled with a WARNING or CAUTION statement based on the risk type.
Important Safety Instructions • Use dry potholders. Moist or damp potholders on hot surfaces may result in burns from steam. Do not let potholders touch hot cooking areas. Do not use towels or other bulky cloths. Do not store items of interest to children in the cabinets above a range or on the backguard of the range. Children climbing on the range to reach items could be seriously injured. When heating fat or grease, watch it closely. Grease may catch fire if it becomes too hot.
Important Safety Instructions IMPORTANT INSTRUCTIONS FOR CLEANING YOUR OVEN GROUNDING INSTRUCTIONS Before manually cleaning any part of the oven, be sure all controls are turned off and the oven is cool. Cleaning a hot oven can cause burns. Clean the oven regularly to keep all parts free of grease that could catch fire. Do not allow grease to accumulate. Always follow the manufacturer’s recommended directions for use of kitchen cleaners and aerosols.
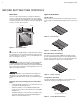
Before Setting Oven Controls BEFORE SETTING OVEN CONTROLS Oven Vents Types of Oven Racks The oven vent is located under the control panel. When the oven is on, warm air passes through this vent. This venting is necessary for proper air circulation in the oven and good baking results. Do not block oven vent. Steam or moisture may appear near the oven vent. This is normal.
Before Setting Oven Controls 7 Luxury Glide™ Oven Racks The fully extendable Luxury-Glide™ rack makes food preparation easier. This oven rack has glide tracks that allow the rack to be pulled away from the oven without rubbing the sides of the oven wall. upper rack portion Removing and Replacing the Luxury-Glide™ Oven Racks: Always use potholders or oven mitts when removing food or adjusting the oven racks. Wait until the oven in completely cooled if possible.
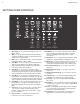
Setting Oven Controls SETTING OVEN CONTROLS 1 9 2 3 10 11 16 5 6 7 12 13 14 15 17 18 19 20 4 1. Oven Light1 - Use to turn the internal “theater” style oven light on and off. 2. Bake - Use to enter the normal baking mode temperature and start a normal bake function, at any temperature from 170°F to 550°F (76°C to 288°C). 3. Broil - Use to select the broil function, at any temperature from 300°F to 550°F (148°C to 288°C). 4. 5. 6.
Setting Oven Controls 9 26 23 21 22 24 25 27 21. Oven - Use to light up the available cooking modes functions. 22. User Pref - Use to bring the user preference menu in the display. Available when the oven is not being used, use this function to set such options as time of day, audio control, and many more. 23. Timer On-Off - Use to set or cancel the minute timer. The minute timer does not start or stop cooking. 24.
Setting Oven Controls Control and Time Settings 4. Press START enter to accept a new option entry or press user pref to advance to the next preference. 5. Press CANCEL off to save your entries and exit the user preferences mode.
Setting Oven Controls Setting the Clock Display-On or Off The clock display mode allows you to turn the clock display on or off. To set the clock display: 11 Changing Oven Temperature Display-Fahrenheit (°F) or Celsius (°C) The oven control can be programmed to display temperatures in °F or °C. The oven has been preset at the factory to display in °F To change the temperature display mode: 1. Press user pref until preset clock display mode appears (Figure 10). 2.
Setting Oven Controls Setting Silent or Audible Control Mode Timer The audio control feature allows you to control the audio volume for the oven control. You may turn the audio off and later return to operating with all the normal audible sounds and alerts. A tone sounds when a key is pressed and also at the end of a cycle (timer, cook time. or end time). This unit is equipped with a kitchen timer which serves as an extra timer in the kitchen that will chime when the set time has run out.
Setting Oven Controls 13 Interior Oven Lights Your wall oven is equipped with two dual left/right corner halogen lights.The interior oven lights are located on the rear wall of the oven interior and are covered with a glass shield. The glass shield protects the bulb from high temperatures and should always be in place whenever the oven is in use. The oven lights will turn on automatically when the oven door is opened.
Setting Oven Controls BAKE Bake may be set with these options: 1) fast preheat; 2) cook time; or 3) delayed start, achieved through using the cook time and end time settings. If bake is active without a cook time setting, the oven will remain on for 12 hours before turning off automatically unless it is cancelled. To bake longer than 12 hours, see “Changing Between 12-Hour Energy Saving or Continuous Bake Mode Settings” on page 11 for instructions. The meat probe can be used in this mode.
Setting Oven Controls 15 Cook Time Setting Cook Time with End Time Cook time is used when a recipe calls for a specific temperature and cook time. Following the recipe’s suggested cook time can help ensure the best possible results. Cook time allows the oven to be set to cook for a set length of time and shut off automatically.The maximum cook time is 11 hours, 59 minutes.The time remaining will always be shown in the timer section of the display.
Setting Oven Controls Broil Broiling is a method of cooking tender cuts of meat by direct heat under the broil element of the oven. This mode is best for meats, fish, and poultry up to 1" thick. The meat probe cannot be used with this mode. Depending on cooking preferences, you can increase or decrease cooking times or move food to a different rack position. If the food you are broiling is not listed in Table 3 , follow the instructions provided in your cookbook and watch the item closely.
Setting Oven Controls Convection Bake Convection functions use a fan to circulate the oven's heat uniformly and continuously around the oven (Figure 18). This improved heat distribution allows for fast, even baking and browning results. It also gives better baking results when using two oven racks at the same time. Heated air flows around the food from all sides, sealing in juices and flavors. Breads and pastry brown more evenly.
Setting Oven Controls Convection Baking/Convert Tips Convection Convert • Fully preheat the oven before baking items like cookies, biscuits, and breads. • When using any single oven rack, position the rack in the oven so that the food is in the center of the oven. • When baking cakes using two oven racks, place bakeware in positions 1 (using glide rack) and 4 (using flat rack) (Figure 20) and place pans as shown in Figure 19.
Setting Oven Controls 19 Using Convection convert with cook time When convection conversion is used with the cook time feature, CF (check food) will be displayed when 75% of the bake time is complete. The control will chime at regular intervals until CANCEL off is pressed, as a reminder to check the food. When the cook time runs out, the oven will shut off automatically and chime. To set convection convert for 30 minutes at 375°F (191°C): Always use pot holders or oven mitts when using the oven.
Setting Oven Controls Convection Roast To properly arrange food for roasting: Convection roast is best for cooking tender cuts of beef, lamb, pork, and poultry. Heated air circulates around the meat from all sides, gently browning the exterior and sealing in the juices and flavors. Use this mode when cooking speed is desired. Convection roast uses the hidden bake element, the hidden convection element, the broil element, and a fan to circulate the oven’s heat evenly and continuously within the oven.
Setting Oven Controls Convection Roasting tips: • Preheating for convection roast will not be necessary for most meats and poultry. • Arrange oven racks so the food is in the center of the oven. • Since convection roast cooks faster, you can reduce cook times by 25% from the recommended time of your recipe (check the food at this time). Then if needed, increase cook time until the desired doneness is obtained.
Setting Oven Controls Keep Warm Keep warm is best for keeping oven baked foods warm for serving after cooking has finished. It may be set with cook time, and cook time/end time. Keep warm uses the hidden bake element to maintain the temperature within the oven. Keep warm will run continuously or (if used with bake time) until the time runs out. To set a keep warm temperature at the default of 170°F (76°C): Food Poisoning Hazard. Do not let food sit for more than one hour before or after cooking.
Setting Oven Controls 23 Meat Probe Tips for Probe Placement When cooking meat such as roasts, hams, or poultry, use the meat probe function to check the internal temperature without guesswork. For some foods, especially poultry and roasts, testing the internal temperature is the best method to ensure properly cooked meats. Your oven will automatically change from cooking to keep warm once the probe has reached the set temperature.
Setting Oven Controls Table 6: USDA recommended min internal cooking temps 5. Press conv roast. Food Type Internal Temp. Ground meat and meat mixtures 6. Enter 3 2 5 using the numeric keypad. 7. Press probe. The default temperature of 170ºF (76°C) appears in the display 8. Enter 1 8 0 using the numeric keypad to change the probe setting.
Setting Oven Controls 25 Setting Dehydrate Setting Bread Proof The dehydrate feature dries with heat from the elements. The heat is circulated throughout the oven by the convection fan. Use dehydrate to dry and/or preserve foods such as fruits, vegetables, herbs, and very thin slices of meat. Dehydrate may be set with cook time and cook time with end time.
Setting Oven Controls Slow Cook Slow cook may be used to cook foods more slowly, at lower oven temperatures and provide cooking results much the same way as a slow cooker or crock-pot. Slow cook is ideal for roasting beef (ribs and brisket), pork, and poultry. It may be set with cook time, and cook time/end time. Slow cooking meats may result in the exterior of meats becoming dark but not burnt. This is normal. Slow cook uses the hidden bake element to maintain a low temperature in the oven.
Setting Oven Controls 27 My Favorite To use a saved favorite recipe setting: The my favorite settings allows you to save your most frequently used or most complex cooking sequences. This feature will save the cooking mode, the target temperature, and the cook time (if any). My favorite may be used with bake, cook time, convection bake, convection roast, slow cook, and keep warm, and it will not work with any other feature, including end time, broil, or fresh clean. 1.
Setting Oven Controls To offset the oven temperature by -30°F (-17°C): 1. Press user pref until UPO appears in the display. 2. To decrease the oven temperature by 30ºF, press -lo until -30 appears. 3. To accept change, press START enter. 4. When finished, press CANCEL off to return the oven to an idle mode. -30 Oven temperature adjustments made by changing the UPO setting will not affect the broil or fresh clean feature temperatures.
Setting Oven Controls 29 Setting the Sabbath Mode (for use on the Jewish Sabbath and Holidays) For further assistance, guidelines for proper usage, and a complete list of models with the Sabbath feature, please visit the web at http:\\www.star-k.org. This appliance provides special settings for use when observing the Jewish Sabbath/Holidays. Sabbath mode disables all audible tones or visual display changes on the oven control. Bake heating is the only cooking features available while in the Sabbath mode.
Setting Oven Controls What to do after a power failure or power interruption when Sabbath mode is active If a power failure or interruption occurs during the Sabbath/Holidays, the appliance will shut off. SF will appear in all the control display, indicating a Sabbath mode failure (Figure 27). Figure 27: Sabbath Failure When power is returned, the oven will not turn back on automatically.
Setting Oven Controls 31 • Do not clean the oven door gasket (Figure 29). The woven material of the oven door gasket is essential for a good seal. Care should be taken not to rub, damage, or remove the gasket. Do not use any cleaning materials on the oven door gasket. Doing so could cause damage to the door gasket. • Do not use oven cleaners or oven protective coatings in or around any part of the oven interior. Residue from oven cleaners may damage the porcelain during the next selfclean cycle.
Setting Oven Controls Setting Fresh Clean Do not leave small children unattended near the appliance. During the fresh clean cycle, the outside of the oven can become very hot to touch and can cause burns. Do not force the oven door open when fresh clean is active. This can damage the automatic door-locking system. Use caution when opening the door after fresh cleaning. The oven may still be very hot and can cause burns.
Setting Oven Controls To cancel fresh clean: 1. 33 Setting for a heavy (4 hour) fresh clean cycle to end at 8:00 o’clock: Press CANCEL off. Do not leave small children unattended near the appliance. During the fresh clean cycle, the outside of the oven can become very hot to touch and can cause burns. Use caution when opening the oven door after fresh cleaning. The oven may still be very hot and can cause burns.
Care and Cleaning CARE AND CLEANING Cleaning Various Parts of Your Oven Before cleaning any part of the oven, be sure all controls are turned off and the oven is cool. Remove spills and any heavy soiling as soon as possible. Regular cleaning will reduce the difficulty and time of major cleaning later. Surface Type Recommendation Aluminum and Vinyl Use hot, soapy water and a cloth. Dry with a clean cloth.
Care and Cleaning 35 Caring for Your Glide Racks 4. Extend and return the glide rack several times along the tracks to distribute the lubrication. 5. Turn glide rack over. Shake graphite lubrication very well before applying. Place four drops of graphite lubrication along the tracks. Repeat on both sides of the glide rack. 6. Extend and return the glide rack several times along the tracks to distribute the lubrication. 7.
Care and Cleaning Removing and Replacing the Oven Door To remove the oven door: The door is heavy. For safe, temporary storage, lay the door flat with the inside of the door facing down. To prevent possible burns, do not attempt to remove the oven door until the oven has completely cooled. 1. Open oven door completely, horizontal with floor. 2. Pull up the lock located on each hinge support toward front of the oven.
Care and Cleaning 37 Replacing the Dual Left/Right Corner Oven Lights The interior oven lights are located at the rear of the oven cavity and are covered with a glass shield. The glass shield must be in place whenever the oven is in use (Figure 41). To replace the oven interior light bulb: Be sure the oven is unplugged and all parts are cool before replacing oven light.Wear a leather-faced glove for protection against possible broken glass. 1. Turn electrical power off at the main source. 2.
Before You Call BEFORE YOU CALL SOLUTIONS TO COMMON PROBLEMS Oven Baking For best baking results, heat the oven before baking cookies, breads, cakes, pies, or pastries, etc. There is no need to preheat the oven for roasting meat or baking casseroles. The baking times and temperatures needed to bake a product may vary slightly from your previously owned appliance. Baking Problems and Solutions Baking Problems Causes Corrections Cookies and biscuits burn on • the bottom.
Before You Call 39 Solutions to Common Problems Before you call for service, review the following list. It may save you time and expense. Possible solutions are provided with the problem listed: Problem Solution Poor baking results • Many factors effect baking results. Use proper oven rack position. Center food in the oven and space pans to allow air to circulate. Preheat oven to the set temperature before placing food in the oven. Bakeware may be too lightweight or warped.
Before You Call Soil not completely removed after fresh clean. Appliance is not level. • Fresh clean was interrupted. Review “Fresh Clean” on page 31. • Excessive spills on oven bottom. Clean before starting fresh clean. • Failure to clean soil from the oven frame, the door liner outside the oven door gasket, and the small area at the front center of the oven bottom. These areas are not in the fresh cleaning area, but they get hot enough to burn on residue.
WARRANTY Your appliance is covered by a one year limited warranty. For one year from your original date of purchase, Electrolux will repair or replace any parts of this appliance that prove to be defective in materials or workmanship when such appliance is installed, used, and maintained in accordance with the provided instructions.
www.electrolux-store.