
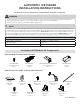
Aftermarket Installation Information

4
Ice Maker Installation Instructions
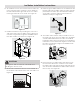
15. Plug connector on water valve wire harness into
the connector above the condenser coil. Install
the water valve clip at the bottom right side of the
unit, and route and attach the water valve harness
into the clip. See Figure 18.
CAUTION
Wear gloves and use extreme CAUTION when
handling the access cover.
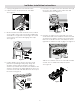
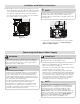
12. Remove 8 screws from access cover located at
the bottom rear outside of the unit. Set aside. See
Figure 15.
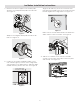
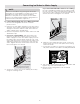
13. Place the green water tube to the ice maker into the
bottom outlet of the water valve. The tube must be
pushed into the valve up to the black line marked
on the tube. Check to make sure the tube is in-
stalled correctly. See Figure 16.
14. The water valve location has pre-made holes on
the right rear of the unit. The water line should be
oriented downward when the valve is installed.
Install the water valve using a ¼" hex head driver,
install the 2 hex head screws. Tighten screws until
they are snug and then tighten an additional ¼
turn. See Figure 17.
11. Install the water line by screwing the nut on the
end of the tube onto the water inlet. Tighten the
nut until snug, and then tighten an additional ¼
turn with needle nose pliers. See Figure 14.
Water
Line
Clip
Water
Inlet
A
B
Figure 14
Remove 8 Screws
Figure 15
Figure 17
Figure 18
Plug water tube
into water valve
Figure 16
10. To install the ice bin, the freezer shelf needs to be
in the lowest position. Slide the ice bin between
the side wall and the right side of the ice maker
housing positioned on the shelf. See Figure 13.
Figure 13