All about the Use & Care of your Dishwasher TA B L E O F C O N T E N T S Dishwasher Dispenser and Detergents .. 13-14 Product Registration ...................................3 Factors Affecting Performance ...................15 Features at a Glance...................................4 Care and Cleaning ............................... 16-17 Operating Instructions .............................4-8 Before you Call.................................... 17-19 Preparing and Loading Dishes ................
IMPORTANT SAFETY INSTRUCTIONS • When loading items to be washed: WARNING When using your dishwasher, follow basic precautions, including the following: For your Safety • Use your dishwasher only as instructed in this Use and Care Manual. • This Manual does not cover every possible condition and situation that may occur. Use common sense and caution when installing, operating and maintaining any appliance. • NSF certified residential dishwashers are not intended for licensed food establishments.
PRODUCT REGISTRATION Thank you for choosing Frigidaire This Use & Care Guide is part of our commitment to customer satisfaction and product quality throughout the service life of your new appliance. We view your purchase as the beginning of a relationship. To ensure our ability to continue serving you, please use this page to record important product information.
FEATURES AT A GLANCE Your dishwasher cleans by spraying a mixture of hot water and detergent through the spray arms against soiled surfaces. First, the dishwasher drains for a few seconds to remove soils dropped while loading, then fills with water covering the filter area. Water is then pumped through the spray arms. Soil particles go through and across the filter and down the drain as the water is pumped out. This series of steps are repeated as needed.
OPERATING INSTRUCTIONS sanitize scour heavy wash normal wash quick wash china crystal energy saver rinse only my favourite wash pressure surge spray wash temp hi temp normal heat dry air clean sanitized hold 5s normal wash quick wash china crystal energy saver rinse only favourite cycle wash pressure surge spray sanitize wash temp heat hi temp normal dry air hold 5s ë start cancel hold to lock scour power plus 1-24 hrs delay start clean sanitized 1-24 hrs delay star
OPERATING INSTRUCTIONS Sanitize Option Delay Start To sanitize your dishes and glassware, select SANITIZE option, by pressing WASH TEMP pad. When selected, the light will come on and remain on until end of cycle. The water temperature in the final rinse will be raised to 155oF (68oC) and will maintain that temperature for 9 minutes. This option is available in Heavy and Normal Cycles. Only these sanitization cycles have been designed to meet NSF requirements.
OPERATING INSTRUCTIONS Status Window The STATUS window, available on some models, indicates the following activity: 1-24............. Number of delay start hours. The last hour will count down in minutes. MINUTES.......... Number of minutes left in cycle (1-199). L0----L6............ Level of Rinse Aid dosage. CLOSE DOOR.......... Close door will scroll across the status window indicating the door needs to be closed. PRESS START..........
OPERATING INSTRUCTIONS Status Indicator Lights Green Light The CLEAN light will remain on after the door is opened. When the GREEN LIGHT illuminates on the floor this indicates that the wash cycle is complete. When the SANITIZE option is selected and the criteria is met, the Sanitized indicator will display and remain on after the door is opened. If the sanitization criteria is not achieved, the indicator will not display.
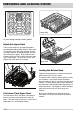
PREPARING AND LOADING DISHES Dish Preparation Loading the Upper Rack Scrape away large pieces of food, bones, pits, toothpicks, etc. The continuously filtered wash fluid will remove remaining food particles. Burned-on foods should be loosened before loading. Empty liquids from glasses and cups. Features and appearance of racks and silverware basket may vary from your model.
PREPARING AND LOADING DISHES Upper Rack 12 place settings standard loading pattern Adjustable Upper Rack The top rack height can be easily adjusted to accommodate loading taller dishes in either rack. To raise the rack to the upper position, lift rack until both sides are at the same height and the rack will secure in place. Ensure that the rack remains level from front to back with both sides at the same height. To lower rack lift the rack slightly then push down and release.
PREPARING AND LOADING DISHES Bottom Rack 8 place settings standard loading pattern. Bottom Rack 10 place settings standard loading pattern. Cup Shelf/Stemware Holders The Cupshelf holder can be folded down to be used to load two levels of cups, juice glasses, and other short items or fold down both and use for long items such as utensils and spatulas. Fold up to load tall glasses.
PREPARING AND LOADING DISHES The Stemware holder is used to securely hold your wine glasses in place for the best wash. To properly secure you glass simply press the stem of the glass into the center of the Cupshelf the rubber pieces will secure around the stem to hold the glass in place. Features and appearance of racks and silverware basket may vary from your model. Load the silverware basket while it is in the bottom rack or take the basket out for loading on a counter or table.
DISHWASHER DISPENSER & DETERGENTS Filling the Detergent Dispenser How much Detergent to use The detergent dispenser has a main wash cup where you will add your detergent or detergent tab. • Use only fresh automatic dishwashing detergent. Other detergents may cause oversudsing. • When using automatic dishwashing detergent tablet, place one tablet in main wash cup and close. • Add detergent just before starting cycle. • Store detergent in a cool, dry location.
DISHWASHER DISPENSER & DETERGENTS Dosage of detergent Place a single detergent tablet or packet into the detergent dispenser compartment. Detergent Usage Chart Water Hardness Soft Water Medium Hard Water Hard Water (0-3 grains) (4-8 grains) (9-12 grains) 8 teaspoons Amount (teaspoons) 4 teaspoons 6 teaspoons Dispenser cup level: First Line Second Line ë Full NOTE For very hard water, detergent alone may not be enough.
FACTORS AFFECTING PERFORMANCE Rinse Aid How to adjust the rinse aid dosage Rinse aid greatly improves drying, reduces water spots, filming. With it water “sheets” off dishes rather than forming water droplets that cling and leave spots. A dispenser, located next to the detergent cup, automatically releases a measured amount of rinse aid during the last rinse. If spotting and poor drying are problems, increase the amount of rinse aid dispensed.
CARE AND CLEANING Recommended Frequency to Clean Your Filters Loads per week If you scrape your dishes before loading: If you scrape and rinse your dishes before loading: If you wash your dishes before loading: 8 - 12 Monthly Every two months Once a Year 4-7 Every two months Once a Year Once a Year Once a Year Once a Year 1-3 Once a Year Fine Filter The Fine Filter is designed to collect big items such as broken glass, bones and pits.
BEFORE YOU CALL Winterizing A dishwasher left in an unheated place should be protected from freezing. Have a qualified person do the following: To Disconnect Service: ë NOTE To achieve the best results from your dishwasher, visit www.dishwashingexpert.com for general tips regarding the performance and operation of your dishwasher. 1. Turn off electrical power to the dishwasher at the supply source by removing fuses or tripping circuit breaker. 2. Shut off water supply. 3.
BEFORE YOU CALL Glassware/Flatware Spotted or Cloudy • Iron deposits in water can cause a yellow or brown film. A special filter installed in the water supply line will correct this problem. (See Removing Spots and Film). • Aluminum utensils can leave gray/black marks when they rub against other items. Load Properly. • Avoid overloading and improper loading. (See • Preparing and Loading Dishes). • Use fresh detergent. Old detergent is ineffective.
BEFORE YOU CALL Vapor at Vent Stains on Tub Interior • Spilled rinse aid can cause foam and lead to overflowing. Wipe up any spills with a damp cloth. • • Check to see that dishwasher is level. (See Installation Instructions). Dishwasher Won’t Run Washing large amounts of dishware with tomato based soil can cause a pink/orange appearance. This will not affect performance and will gradually fade over time. Pre-rinsing or using the Rinse Only cycle will reduce the chance of staining.
MAJOR APPLIANCE WARRANTY Your appliance is covered by a one year limited warranty. For one year from your original date of purchase, Electrolux will pay all costs for repairing or replacing any parts of this appliance that prove to be defective in materials or workmanship when such appliance is installed, used and maintained in accordance with the provided instructions. Exclusions This warranty does not cover the following: 1.