FRIGIDAIRE TABLE OF CONTENTS Welcome & Congratulations ................................... 2 Care & Cleaning (Cleaning Chart) ........................... 7 Important 3 Care & Cleaning .................................................... 8 Before Setting Warmer Drawer Control ................... 4 Before You Call .................................................... 9 Setting Warmer Drawer Control .............................. 5 Najor Appliance Warranty ....................................
Product Registration Register Your The PRODUCT REGISTRATION Product ..... CARD should be filled in completely, signed and returned to Electrolux Home Products, Congratulations on your purchase of a new appliance! At Electrolux Home Products, we are very proud of our product and are completely committed to providing you with the best service possible. Your satisfaction is our number one priority. We know you'll enjoy your new appliance and Thank You for choosing our product.
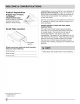
Read all instructions before using this appliance. Save these instructions for future reference. DEFINITIONS _[_ This is the safety alert symbol. It is used to alert you to potential personal injury hazards. Obey al! safety messages that follow this symbol to avoid possible injury or death. This symbol will help alert you to situations that may cause serious bodily harm, death or This symbol will help alert you to situations ay b0d !nj that = All Warmer Drawers can tip.
• Use Only Dry Pot holders=Moist or damp pot holders on hot surfaces may result in burns from steam. Do not let the pot holders touch hot heating element. Do not use a towel or other bulky cloth instead of a pot holder. • Do Not Heat Unopened Food Containers= Buildup of pressure may cause container to burst and result in injury, ® ® Use Care When Opening Warmer Drawer=Stand to the side of the unit when opening the door of a hot drawer.
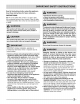
TO OPERATE THE WARMER DRAWER The purpose of the warmer drawer is to keep hot cooked foods at serving temperature. Always start with hot food. It is not recommended to heat cold food in the warmer drawer. All food placed in the warmer drawer should be covered with a lid or aluminum foil to maintain moisture and softness. Do not cover crisp foods.
TEMPERATURE SELECTION Refer to the chart for recommended settings. If a particular food is not listed, start with the medium setting. If more crispness is desired, remove the lid or aluminum foil from the food. Most foods can be kept at serving temperatures by using the medium setting. When a combination of foods are to be kept warm (for instance, a meat with 2 vegetables and rolls), use the high setting. Refrain from opening the warmer drawer while in use to eliminate loss of heat from the drawer.
CLEANING VARIOUS PARTS OF YOUR WARMER DRAWER Before cleaning any part of the appliance, be sure the control is turned OFF and the warmer drawer is COOL. REMOVE SPILLOVERS AND HEAVY SOILING AS SOON AS POSSIBLE. REGULAR CLEANING WILL REDUCE THE NUMBER OF MAJOR CLEANING LATER. Plastic To remove control knob, turn to the OFF position; grasp firmly and pull straight off the shaft. Clean with a cloth soaked in soapy water. Rinse with a clean water and a dishcloth.
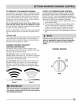
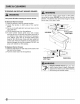
TO REMOVE AND REPLACE WARMER DRAWER Turn the warmer drawer control knob to OFF before removing the drawer. DO NOT touch the warmer drawer element. The element may still be hot enough to cause Turn power off before removing the warmer drawer. To Remove Warmer Drawer 1 Open the drawer to the fully opened position. 2 Locate the latches on both sides of the warmer drawer. 3 Pull up on the left glide latch and push down on the right glide latch. 4 Pull the drawer away from the appliance.
Beforeyou call occurrences for service, review this list. It may save you time and expense. The list includes common that are not the result of defective workmanship or materials in this appliance, Drawer is not level. Poor installation. Place a level on the cutout bottom. Make sure bottom is level. Be sure cutout bottom is strong and stable enough to adequately support drawer (and wall oven, if applicable). Cannot move appliance easily. Appliance must be accessible for service.
Your appliance is covered by a one year limited warranty. For one year from your original date of purchase, Electrolux will pay all costs for repairing or replacing any parts of this appliance that prove to be defective in materials or workmanship when such appliance is installed, used and maintained in accordance with the provided instructions. Exclusions This warranty does not cover the following: I Products with original serial numbers that have been removed, altered or cannot be readily determined.