All about the Use & Care of your Microwave Oven TA B L E O F C O N T E N T S CONVENIENT FEATURES ......................................19 IMPORTANT SAFETY INSTRUCTIONS ......................2 CLEANING AND CARE ..........................................20 PART NAMES ........................................................8 CONTROL PANEL ..................................................9 BEFORE OPERATING ........................................... 10 SERVICE CALL CHECK ................................
WELCOME & CONGRATULATIONS Questions? Congratulations on your purchase of a new microwave oven! At Electrolux Home Products, we are very proud of our product and are completely committed to providing you with the best service possible. Your satisfaction is our number one priority. 1-800-374-4432 We know you’ll enjoy your new microwave oven and Thank You for choosing our product. We hope you consider us for future purchases.
IMPORTANT SAFETY INSTRUCTIONS Definitions This is the safety alert symbol. It is used to alert you to potential personal injury hazards. Obey all safety messages that follow this symbol to avoid possible injury or death. WARNING CAUTION WARNING indicates a potentially hazardous situation which, if not avoided, could result in death or serious injury. CAUTION indicates a potentially hazardous situation which, if not avoided, may result in minor or moderate injury.
IMPORTANT SAFETY INSTRUCTIONS • Do not clean with metal scouring pads. Pieces off the pad can touch electrical parts involving risk of electric shock. WARNING If you see arcing, press the Cancel button and correct the problem. ARCING Arcing is the microwave term for sparks in the oven. Arcing is caused by: • Metal or foil touching the side of the oven. • Foil not molded to food (upturned edges act like antennas). • Metal, such as twist-ties, poultry pins, or goldrimmed dishes, in the microwave.
IMPORTANT SAFETY INSTRUCTIONS UNPACKING AND EXAMINING YOUR MICROWAVE OVEN Open the bottom of the carton, bend the carton flaps back and tilt the microwave oven over to rest on plastic foam pad. Lift carton off microwave oven and remove all packing materials, Installation Instructions, Wall Template, Top Template, Charcoal Filter, Turntable and Turntable Support. SAVE THE CARTON AS IT MAY MAKE INSTALLATION EASIER. • Remove the feature sticker from the outside of the door, if there is one.
IMPORTANT SAFETY INSTRUCTIONS ABOUT YOUR MICROWAVE OVEN ABOUT MICROWAVE COOKING This Use and Care Manual is valuable: read it carefully and always save it for reference. • Arrange food carefully. Place thickest areas towards outside of dish. A good microwave cookbook is a valuable asset. Check it for microwave cooking principles, techniques, hints and recipes.
IMPORTANT SAFETY INSTRUCTIONS ABOUT UTENSILS AND COVERINGS It is not necessary to buy all new cookware. Many pieces already in your kitchen can be used successfully in your new microwave oven. Make sure the utensil does not touch the interior walls during cooking. Use these utensils for safe microwave cooking and reheating: • • • • • • glass ceramic (Pyroceram®), such as Corningware®. heat-resistant glass (Pyrex®). microwave-safe plastics. paper plates. microwave-safe pottery, stoneware and porcelain.
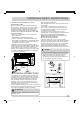
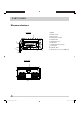
PART NAMES Microwave features Front View 1 Window 2 Interlock system 8 3 Door assembly 4 Turntable ring assembly 5 Turntable Shaft 1 6 Turntable glass tray 7 Control panel 8 Ventilation openings (on top) 9 Surface lights 2 4 5 6 11 7 10 Ventilation filters 11 Waveguide cover: DO NOT REMOVE 3 Bottom View 9 10 8 OR7̲NEW Model̲EN-4.indd 8 09.4.
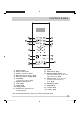
CONTROL PANEL 3 2 10 16 5 4 11 1 9 7 13 12 18 19 8 17 14 (1) (2) (3) (4) (5) (6) 15 Popcorn (P18) Sensor Cook (P15) Potato (1-4 potatoes) (P18) Reheat (3 different settings) (P16) Defrost (by time or weight) (P13) Quick Start ( 3 instant key settings) ( P11) (7) Numeric pads (0 thru 9) (8) Clock (P10) (9) Timer (P10) (10) Veggies (P11) (11) Power Level (10 power levels available) (P17) (12) START (13) Stop/Cancel (P12) (14) Exhaust (High/Low/Off) ~ Use to turn the exhaust fan on, off, or to
BEFORE OPERATING 1.Before operating your new oven make sure you read and understand this Use and Care Guide completely. 2.Before the Built-in Convention Microwave Oven can be used, follow these procedures: • Plug in the oven. Close the door. The oven display will flash 12:00. • If no operation after 1 minute, the oven will show 12:01. 3. Set clock. See below. pad once . The exhaust ventilation removes steam and other cooking vapors from the cooking surface of the range below the microwave oven. 3.
MANUAL COOKING Control Lock Heating with high power level You may lock the control panel to prevent the microwave from being accidentally started or used by children. Example: to heat for 7 minutes at 100% power: The control lock feature is very useful when cleaning the control panel. The lock will prevent accidental programming when wiping the control panel clean. 1. Use the number pads to enter desired heating time (cook time may be set up to 99 minutes and 99 seconds).
MANUAL COOKING Veggies Using the +10 sec /+ 30 sec key There are 2 options under the Veggies. 1. Press Veggies once. VEGGIES 2. Press Veggies twice. VEGGIES Touch the +10 sec /+30 sec pad to : 3. Press START pad. START The microwave will beep when finished and "End" will display. PRESS DISPLAY This feature will let you quickly start or add 10 or 3 0 seconds.
MANUAL COOKING Setting Defrost (by Weight) Setting Defrost (by Time) Example: to defrost 1.0 lb. of food with the default power Example: to defrost food with the default 30% power level for 5 minutes: level and cook time determined automatically: 1. Press Defrost pad once. 0.0 will appear in the display. 1. Press Defrost pad twice. 0:00 will appear in the display. 2. Use the numeric pads to input weight of food to defrost in pounds (10 = 1.0 lb.) You may enter any weight from 0.1 to 6.0 lbs. 2.
MANUAL COOKING Defrosting tips • When using the defrost weight feature, the weight entered should always be pounds (valid entries are from 0.1 to 6.0 pounds). • The shape of the package will alter the defrosting time. Shallow rectangular food packets defrost more quickly than a deep frozen block of food. • Use both defrost weight and defrost time features for raw food items only. Defrosting gives best results when food to be thawed is a minimum of 0°F (taken directly from a true freezer).
MANUAL COOKING Sensor cooking has an electronic controlled sensor that detects the vapor (moisture and humidity) emitted from the food as it heats. The sensor adjusts the cooking times and power level for various foods and quantities automatically. Using Sensor Settings: 1. Be sure the exterior of the cooking container and the interior of the oven are dry. Wipe off any moisture with a dry cloth or paper towel. 2. The oven works with foods at normal storage temperature.
MANUAL COOKING Reheat The reheat feature provides 2 quick preset settings. Melt/ Soften Example: to reheat 24 ounces of food The oven uses low power to melt and soften items. See the following table. Example: to melt 8 oz. of Cream Cheese. 1. Press Reheat pad 2 times 1. Press Melt/Soften pad 4 times to soften 8oz. of Cream Cheese. So-4 will appear in the display (see Melt/Soften category table). Then press 2 number pad, cook time will appear in the display . 2. Press 3 for 24 oz. 3.
MANUAL COOKING Suggested power levels for cooking The 10 power levels available with this microwave will help you to adjust to the power output best suited for the food type you are preparing. As with any food preparation in the microwave, it is best to follow the microwave instructions that are printed on food packaging. The table below provides suggested power levels for various types of food that you can be prepare in the microwave.
AUTO COOKING Popcorn • DO NOT leave microwave oven unattended while popping corn. The popcorn feature lets you pop 3 different commercially packaged microwave popcorn sized bags. Use the table below to determine the setting to use. PRESS DISPLAY Popcorn x1 3.3 oz. Popcorn x2 3.0 oz. Popcorn x3 1.75 oz. The microwave will beep when finished. Notes: • Before cooking, pierce potatoes with fork several times. • After cooking, let potatoes stand for 5 minutes.
CONVENIENT FEATURES Setting the Sound Setting Weight Ib/kg Turning Sound Low/Nor/Hi/Off J Example: setting weight between pounds & kilograms: Audible signals are available to guide you when setting and using your oven. • A programming tone will sound each time you touch a pad. • Two tones signal the end of a Kitchen Timer count down. • Two tones signal the end of a cooking cycle. Example: setting audible signal off: 1. Touch pad 2 times . 2.
CLEANING AND CARE Disconnect the power cord or leave the door open to deactivate the oven during cleaning. Disconnect the power cord before replacing filters and lights. EXTERIOR The outside surface is precoated steel and plastic. Clean the outside with mild soap and water; rinse and dry with a soft cloth. Do not use any type of household or abrasive cleaner. DOOR Wipe the window on both sides with a soft cloth to remove any spills or spatters.
CLEANING AND CARE Disconnect the power cord or leave the door open to deactivate the oven during cleaning. Disconnect the power cord before replacing filters and lights. Surface light replacement Cleaning the exhaust filters The oven ventilation exhaust filters should be removed and cleaned often; generally at least once every month.
CLEANING AND CARE Disconnect the power cord or leave the door open to deactivate the oven during cleaning. Disconnect the power cord before replacing filters and lights. Charcoal filter replacement Charcoal filter part number 5304464577 To order parts call 800-599-7569 5. Slide the top of the new charcoal filter into the top area of the filter cavity. Charcoal Filter when installed in your microwave oven, is used for nonvented, recirculated installation.
CLEANING AND CARE Disconnect the power cord or leave the door open to deactivate the oven during cleaning. Disconnect the power cord before replacing filters and lights. Oven light replacement Remove the vent grill (see steps 1 - 4 in charcoal filter replacement section. 4. Reconnect LED light to the harness and place the LED light assembly back into the plastic housing. 1. Remove the light cover by carefully pulling up on the front edge and pulling the cover forward.
SERVICE CALL CHECK Please check the following before calling for service: Place one cup of water in a glass measuring cup in the microwave oven and close the door securely. Operate the microwave oven for one minute at HIGH 100%. A Does the microwave oven light come on? YES ____ NO ____ B Does the cooling fan work? (Put your hand at top above Display.) YES ____ NO ____ C Does the turntable rotate? (It is normal for the turntable to turn in either direction.
MAJOR APPLIANCE WARRANTY INFORMATION Your appliance is covered by a one year limited warranty. For one year from your original date of purchase, Electrolux will pay all costs for repairing or replacing any parts of this appliance that prove to be defective in materials or workmanship when such appliance is installed, used and maintained in accordance with the provided instructions. Exclusions This warranty does not cover the following: 1.